Thinka for KNX — FAQ
Discover Our New User Interface
We’re excited to introduce our brand-new user interface, designed for a smoother, more intuitive experience! While most of the core features and functionality remain familiar, you’ll notice a modern look and improved navigation to make your workflow even easier.
- Streamlined Design: Enjoy a fresh, user-friendly layout crafted for effortless browsing.
- Enhanced Performance: Experience faster load times and seamless transitions between features.
- Easy Transition: All the essential tools you know and love are still here—just better!
We’re currently updating our FAQs to cover everything you need to know about the new interface. In the meantime, if you have any questions or need assistance, our support team is here to help! Simply email us at support@thinka.eu and we’ll get back to you promptly.
Stay tuned for more updates, and thank you for choosing us as your trusted platform!
How Do I Log In to My Thinka?
Logging in to your Thinka is fast and easy! Just follow these simple steps:
- Open your preferred web browser and visit https://setup.thinka.eu.
- Enter the serial number of your Thinka device.
- You will be automatically redirected to your Thinka’s web interface on your local network.
- If your Thinka is password-protected, simply enter your password when prompted.
- Once logged in, you’ll be taken straight to the Settings page, where you can easily manage all your Thinka features and settings.
Pro Tip: For quick access in the future, bookmark your Thinka’s web interface so you can go directly to it without revisiting the setup.thinka.eu site.
Enjoy seamless control and management of your Thinka smart home hub—right from your browser!
How Do I Configure My Devices?
Setting up your smart home devices is simple and hassle-free with our step-by-step configuration guides. Whether you're looking to connect sensors, switches, or smart appliances, we have easy-to-follow instructions tailored for each device.
Explore our detailed guides for:
- Carbon Dioxide (CO2) Sensor
- Contact Sensor
- Humidity Sensor
- Leak Sensor
- Light Sensor
- Lightbulbs
- Motion Sensor
- Occupancy (Presence) Sensor
- Push Button
- Scene
- Smoke Sensor
- Switch
- Outlet
- Temperature Sensor
- Thermostat
- Window Covering (curtains, blinds)
- Fan
- Valve
- Energy Monitor
- Garage Door
Click on your device above for a comprehensive setup guide and start enjoying a smarter, more connected home today.
Do I Need ETS to Configure My Devices?
No, you don't always need ETS to configure your devices with Thinka! While having an ETS project file can streamline and simplify the configuration process, Thinka is designed to be flexible and user-friendly for all users.
- If you already have an ETS project file, you can easily import it to make device configuration even more convenient.
- No ETS file? No problem! You can manually set up Thinka by navigating to the Configuration tab.
- Create new Accessories (devices) and add Services directly within the Thinka interface.
- For each service, simply enter your group addresses in the provided fields to complete the setup.
Whether you're a professional installer or a smart home enthusiast, Thinka offers a straightforward configuration process tailored to your needs.
For step-by-step instructions, see our guide: How do I configure my devices?
What Types of Remote Access Does Thinka Offer?
Thinka provides a variety of secure and convenient remote access solutions, designed to fit your needs—whether you’re a homeowner, integrator, or require technical support. Explore the options below to see which remote access method is right for you:
- Thinka Support Access: Need assistance? Our support team can securely connect to your Thinka for troubleshooting. Learn more about granting Thinka support remote access.
- System Integrator Web Access: Let your system integrator manage and configure your Thinka remotely for seamless integration and updates. Discover how to set up remote access for your integrator.
- HomeKit Remote Control: Enjoy full control of your smart home devices from anywhere using Apple HomeKit. Find out how to control your home remotely with HomeKit.
- VPN Access (PRO Version Only): For advanced users, connect securely via VPN—ideal for ETS and professional setups. See how to set up VPN access.
With Thinka, remote access is safe, flexible, and tailored to your needs!
Can I Use Thinka for Visualisation?
Yes, Thinka is designed for seamless visualisation of your smart home devices!
- Effortlessly monitor and control your home with HomeKit on your iPad, iPhone, Apple TV, or Apple Watch.
- Prefer Amazon Alexa or Google Home? Thinka also integrates smoothly with their apps for easy visualisation and management.
- Enjoy the convenience of voice control or explore intuitive interfaces—choose the platform that fits your lifestyle!
With Thinka, your smart home is always at your fingertips, offering you flexibility, comfort, and complete control from your favorite device.
What is the Easiest Way to Configure My Thinka?
Setting up your Thinka is simple and efficient! The easiest way to configure your Thinka is by importing your existing ETS configuration file (version 4 or 5). ETS stores important details about your KNX devices, and Thinka will automatically read and extract as much information as possible from your file.
- Quick Start: Just import your ETS file—Thinka does the rest!
- Automatic Detection: Thinka identifies device types, group addresses, and even assigns them to rooms based on your preferred language.
- Convenient Guidance: For a step-by-step visual guide, check out our helpful video on Thinka’s video channel.
- Optimize Your Setup: Make your ETS project even more Thinka-friendly for flawless configuration. Discover how in our detailed tutorial.
Enjoy seamless integration and a hassle-free smart home setup with Thinka!
How Do I Organize My Devices in Rooms?
Organizing your smart devices into rooms with Thinka is simple and ensures smooth control of your smart home.
- Step 1: First, confirm that your devices are assigned to the correct rooms in Thinka. Our convenient ETS import tool automatically recognizes devices and their corresponding rooms for quick setup.
- Step 2: Prefer a hands-on approach? You can manually assign devices to rooms. Need guidance? Watch our detailed instructional video on Thinka's video channel to help you configure rooms easily.
- Step 3: Once you're satisfied with your room setup, use the Thinka Setup app from the Apple App Store. This app syncs your Thinka layout directly with Apple HomeKit, saving you from reassigning each device manually in Apple's Home app.
Enjoy effortless room organization and seamless smart home control with Thinka!
How to Easily Locate Your Thinka Device on Your Network
Finding your Thinka on your local network is quick and simple! Just follow these easy steps:
- Visit https://setup.thinka.eu/ in your web browser.
- Enter the serial number (S/N) of your Thinka device.
- Once submitted, you’ll be automatically redirected to the last known IP address of your Thinka on your LAN for easy access and configuration.
With this simple process, locating your Thinka on your home or office network has never been easier. For more information on finding your Thinka’s serial number, just click the link above.
Enjoy seamless smart home integration with Thinka—start managing your device today!
Can I Use Thinka on My Android Phone?
Absolutely! Using Thinka with your Android phone is simple and convenient. You can easily connect and control Thinka through popular smart home platforms like Google Home and Amazon Alexa, both of which offer user-friendly Android apps.
-
Google Home App: Seamlessly manage Thinka devices and enjoy smart home automation with the Google Home app.
Download Google Home for Android -
Amazon Alexa App: Integrate Thinka with Alexa and control your home using simple voice commands directly from your Android device.
Download Amazon Alexa for Android
Enjoy effortless smart home control with Thinka on your Android phone by using either of these trusted apps. Start making your home smarter today!
How to Configure the IP Address of Your Thinka Device
Setting up your Thinka is quick and hassle-free! By default, your Thinka automatically uses DHCP to obtain an IP address from your network, so you don’t need to worry about manual configuration—just plug it in and get started.
- Automatic Setup: Thinka connects to your network and receives its IP address automatically through DHCP, making installation easy and seamless.
- Need a Static IP Address? If you prefer your Thinka to always have the same IP address, simply reserve a static IP through your router’s settings. This gives you complete control and ensures consistent connectivity.
- No Extra Configuration Needed: Enjoy a smooth experience with Thinka’s plug-and-play setup, whether you use automatic or static IP assignment.
For more detailed instructions on reserving a static IP address, please refer to your router’s user manual or support website. With Thinka, connecting your smart home is always simple and reliable!
Do I Need to Configure My Network for Thinka?
Good news! Setting up Thinka is effortless—there’s no need for complicated network configurations. Thinka automatically connects to your local network using DHCP, so it quickly obtains an IP address from your LAN without any manual setup required.
No internet access is required for Thinka to function within your home network. You don’t need to open any incoming ports or adjust your firewall or router settings, ensuring your network remains secure and private.
Thinka will only use outgoing internet access for a few optional features:
- Receiving software updates directly from our secure private repositories
- Integrating with smart home assistants like Amazon Alexa
- Connecting to Google Home for seamless voice control
- Enabling remote support access when you need expert help
Enjoy hassle-free installation and peace of mind knowing Thinka is designed to work securely with minimal network demands.
What is a Window Covering?
A Window Covering is a versatile term used by Apple HomeKit to describe smart home solutions such as Venetian blinds, shades, and curtains. These window treatments not only enhance your home's style but also offer privacy, light control, and energy efficiency.
- Venetian Blinds: Adjustable slats allow you to control sunlight and privacy with precision.
- Shades: Smooth, fabric coverings that can be raised or lowered for a clean, modern look.
- Curtains: Classic fabric panels that add elegance and can be automated for convenience.
With HomeKit compatibility, you can easily control your window coverings through your iPhone, iPad, or voice commands with Siri. Whether you want to let in morning sunlight or darken a room for movie night, smart window coverings provide comfort, convenience, and style for any home.
Do You Support Venetian Blinds?
Yes, we proudly support Venetian blinds! Our smart system allows you to easily control both the up and down movement and the tilt angle of your Venetian blinds for optimal light and privacy.
- Effortless Control: Adjust the blinds’ height and slat angle with a simple tap or voice command.
- Personalized Comfort: Let in just the right amount of sunlight or enjoy complete privacy anytime.
- Energy Efficiency: Fine-tune your blinds to help regulate indoor temperature and save on energy bills.
- Seamless Integration: Our system works smoothly with your existing Venetian blinds setup.
Whether you want to brighten your room or block out the light, our support for Venetian blinds puts you in total control. Enjoy convenience, style, and smarter living with our easy-to-use solutions.
What is the Beta Channel?
Discover the beta channel—your exclusive gateway to try out the latest and most innovative Thinka features before anyone else! By joining the beta channel, you'll help shape the future of Thinka by testing new and experimental updates.
- To join, simply email us at support@thinka.eu. Please include your serial number for Z-Wave or serial number for KNX so we can review your request quickly.
- Once approved, you can easily enable the beta channel yourself. Just log in to your Thinka’s web interface, navigate to the Update Thinka page in the menu, and follow the instructions.
- If the beta channel doesn’t appear, simply restart your Thinka to refresh the updates.
Experience new features first—switch your Thinka from stable to beta and start exploring!
Will I Lose My Configuration if I Upload My ETS Again?
Good news! You can safely upload your ETS projects as many times as you need—your current configuration will stay intact. When you import your ETS project again, all your existing settings are preserved. Any new devices or accessories are placed in a dedicated area called the Review Room.
- Review Room: This special room acts as a holding area for new or unassigned accessories. Devices here aren’t visible in smart home platforms like HomeKit, Amazon Alexa, or Google Assistant until you decide to move them to the appropriate room.
- Flexible Management: Easily review and organize new accessories at your convenience without impacting your current setup.
If you do want to completely overwrite your configuration and start fresh with a new ETS import, simply go to Settings → System and select Reset configuration.
Tip: Always back up your configuration before making major changes. Better safe than sorry!
Can I Use ETS3 or Older Projects to Configure Thinka?
Thinka supports ETS4, ETS5, and ETS6 project formats for seamless configuration and integration. Unfortunately, we do not support older ETS file formats such as prx, pr1, pr2, pr3, pr4, or pr5 directly.
- If your KNX project was created with ETS3 or earlier, don’t worry! You can still get started with Thinka.
- Simply send your old ETS project file to our support team via WeTransfer.
- We’ll do our best to convert your file to a compatible format so you can enjoy all the smart home features Thinka has to offer.
Please email your WeTransfer link to: support@thinka.eu
Our team is here to help make your transition to Thinka as smooth as possible!
Can I Have a Permanent VPN Connection with Thinka?
No, Thinka VPN connections are designed to be temporary and are limited to a maximum of 7 days. This security feature is in place to safeguard the homeowner's network and provide peace of mind. We believe that a 7-day window is more than sufficient for initial Thinka installation and configuration. After this period, any ongoing access should be conducted with the homeowner’s explicit permission to ensure privacy and security.
- Enhanced security: Limiting VPN duration helps protect your home network from unauthorized access.
- Easy setup: You have ample time—7 days—to install and configure your Thinka device.
- Homeowner control: Any further maintenance requires consent, keeping the homeowner in control.
If you are a system integrator or need remote, unattended Thinka management for longer than 7 days, simply contact our support team with your request. Email us at support@thinka.eu and we’ll be happy to help extend your VPN connection period as needed.
Does Thinka Support Geolocation?
Yes, Thinka supports geolocation through smart home automations!
- Apple HomeKit: You can easily set up location-based automations in HomeKit, such as turning on lights when you arrive home. To use geolocation features, simply configure a HomeKit hub (like an Apple TV, HomePod, or iPad) for seamless smart home control.
- Amazon Alexa: Thinka allows you to create powerful triggers in Alexa routines. Set up actions that are activated when you enter or leave a designated area—perfect for a hands-free, personalized home experience.
Unlock the full power of your smart home with Thinka’s geolocation support. Enjoy effortless automation, enhanced convenience, and a truly intelligent living environment!
What is the Thinka Companion App? And what is the Home App?
The Thinka Companion App is your essential tool for effortlessly setting up and managing your smart home with HomeKit. Instead of adding each device individually, the Thinka Companion App automatically syncs your Thinka devices and rooms to your HomeKit home, saving you time and ensuring everything stays perfectly organized.
- Seamless HomeKit Configuration: Instantly sync all your Thinka devices and rooms to HomeKit—no manual setup required.
- Easy Device Management: Quickly find your Thinka on your network and monitor its real-time status.
- Remote Support Access: Effortlessly enable remote access for support whenever you need assistance.
- Free to Download: Get the Thinka Companion App from the App Store and start streamlining your smart home setup today.
The Home App is Apple’s pre-installed app on your iPhone or iPad, designed for daily control of all your HomeKit-enabled devices. Once your setup is complete with the Thinka Companion App, you’ll use the Home App for everyday smart home control—simple, intuitive, and always at your fingertips.
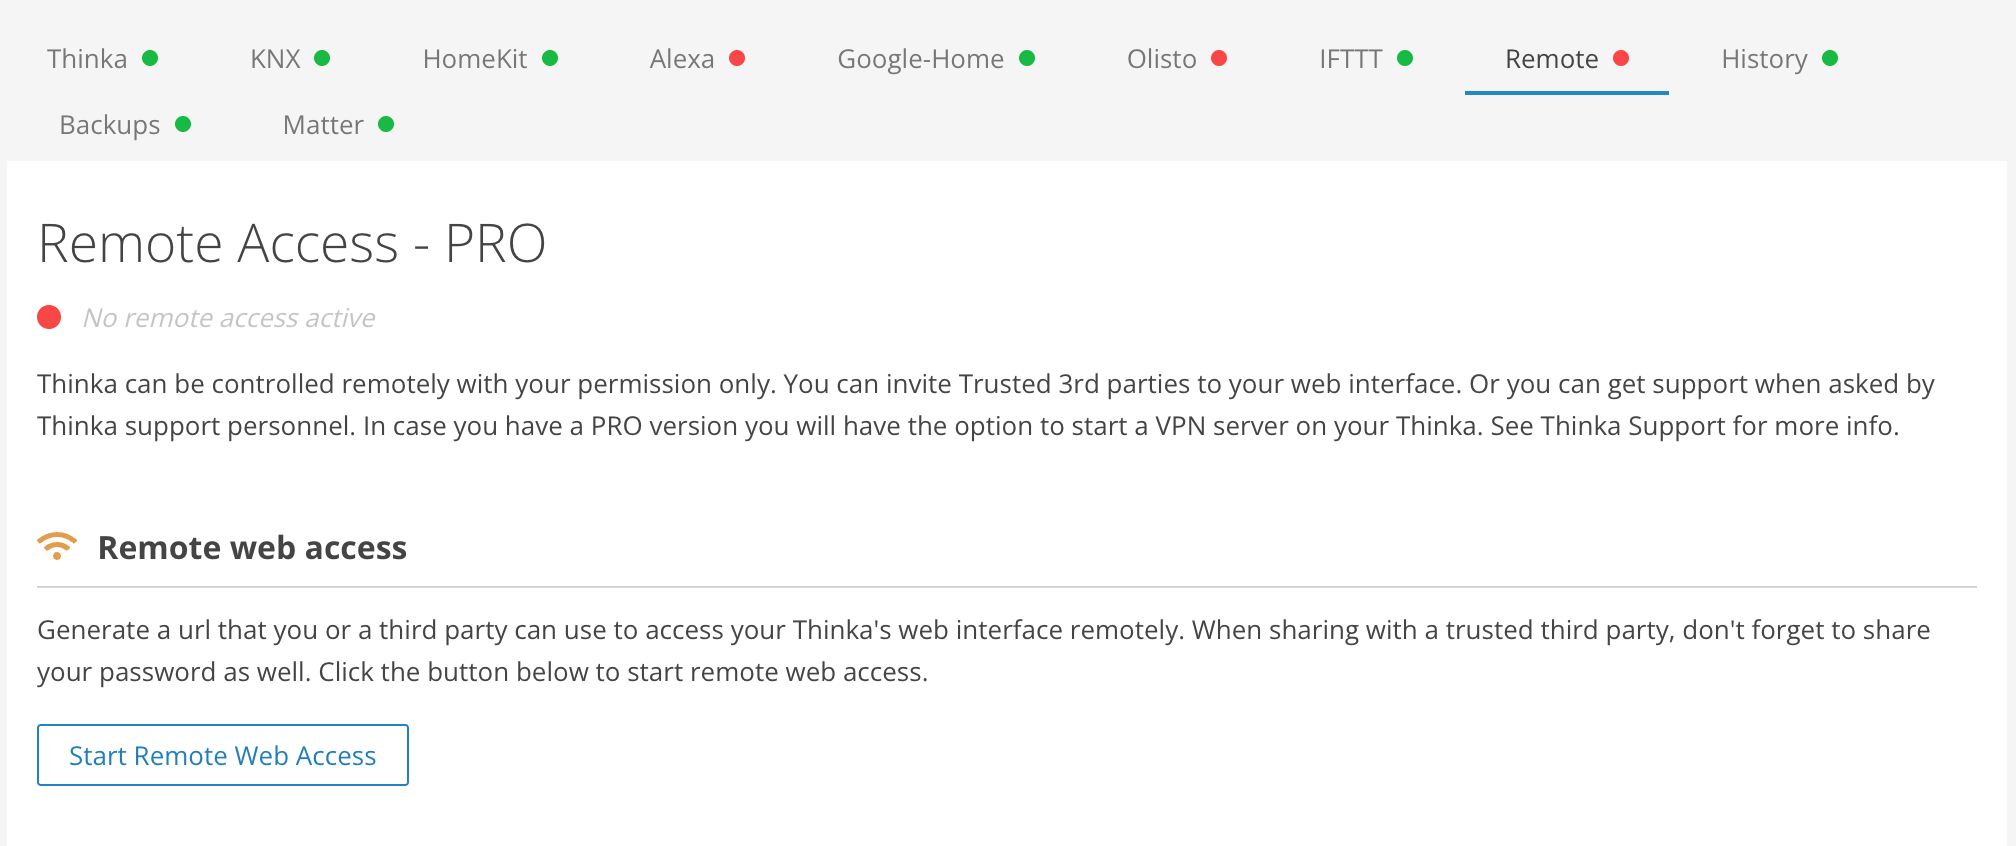
How to Grant Remote Access to Your Thinka for Your System Integrator
Need to give your KNX installer remote access to your Thinka? Our "Installer Support" feature makes it safe and simple! Just follow these easy steps:
- Open your Thinka’s web interface.
- Navigate to Settings → Remote → Remote Web Access.
- Click Start Remote Web Access to generate a secure link.
- Use the Copy URL button and share this link with your installer via email, WhatsApp, or another trusted method.
This unique link allows your installer to access your Thinka’s web interface remotely. If your Thinka is password protected, remember to either temporarily remove the password (see how to remove your Thinka password) or securely share it with your installer.
Important: Only share the link and password with people you trust—anyone with these details can access your Thinka. You can revoke access at any time, and for your safety, all remote access is automatically disabled after 14 days. Each new access request creates a fresh, unique link for maximum security.
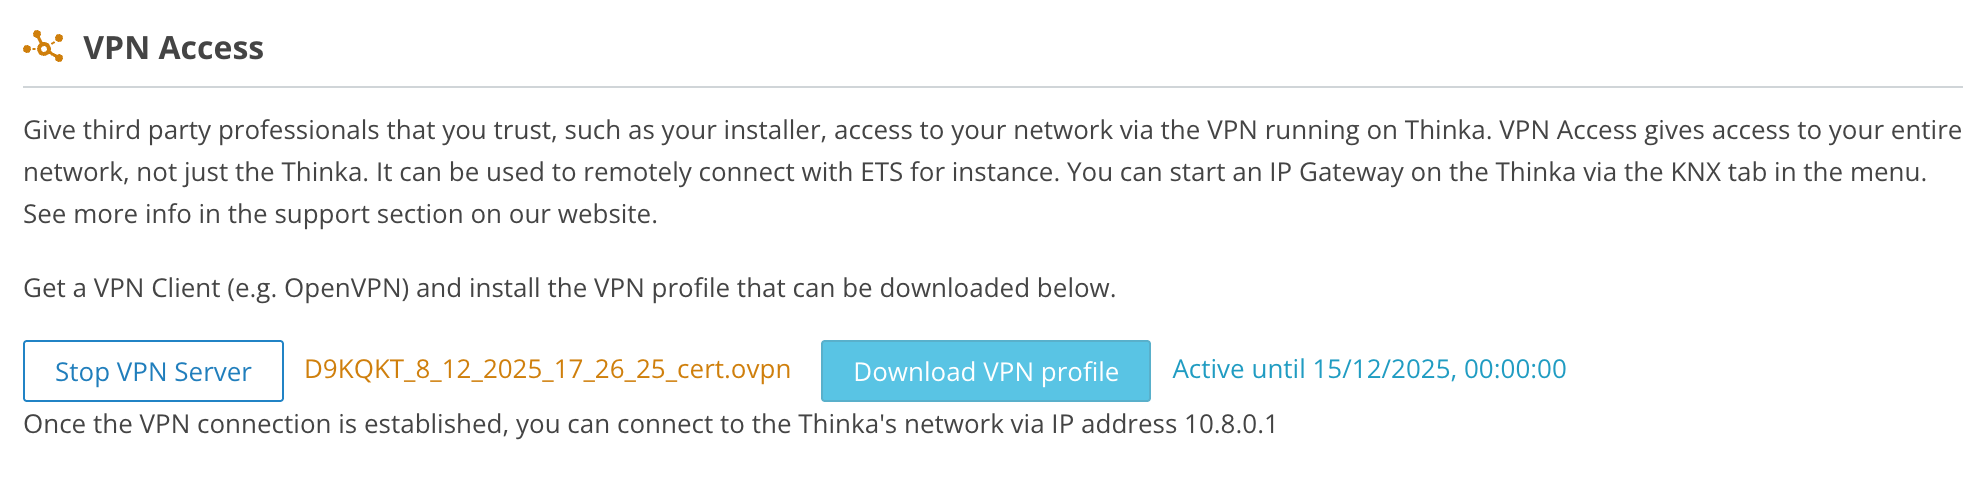
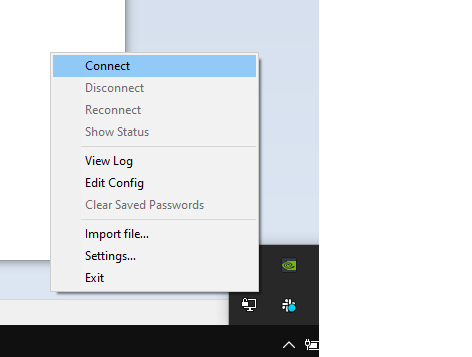
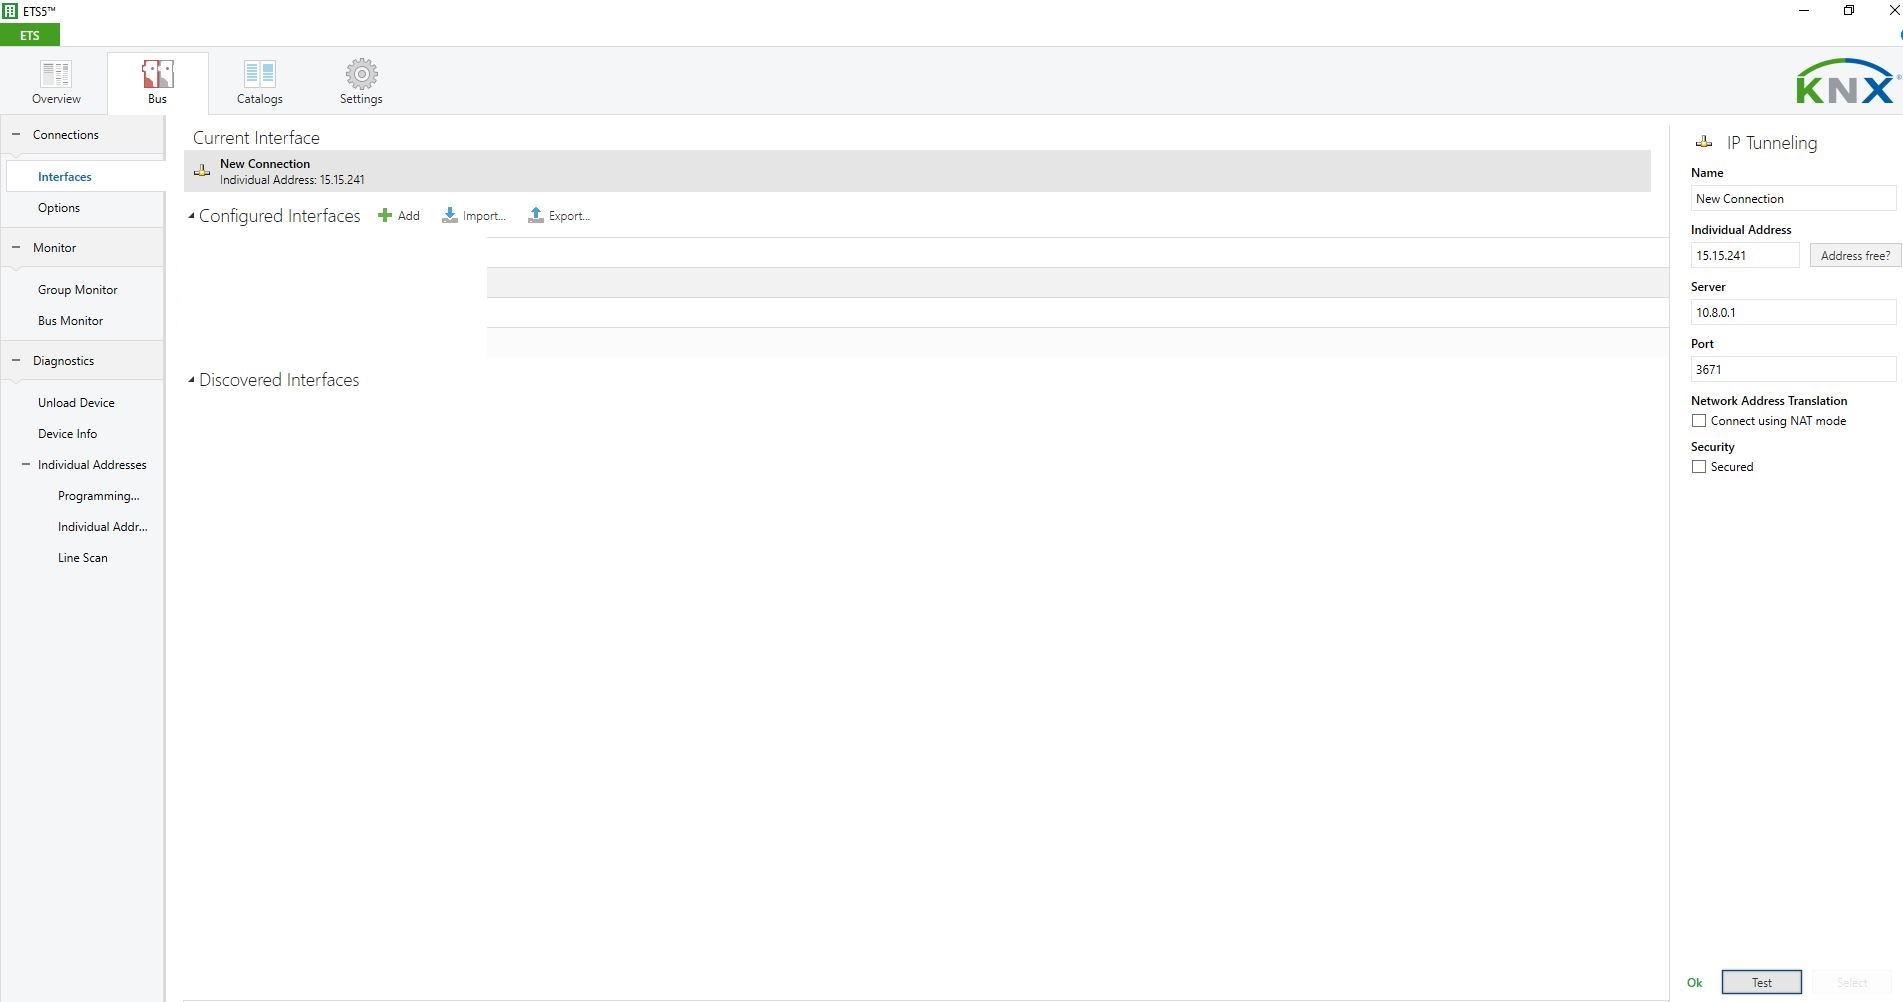
How to Set Up a VPN Connection to Your Thinka Device
Note: VPN setup is available exclusively for the Thinka for KNX Pro.
-
Go to Settings → Remote in your Thinka dashboard. Click the Start VPN Server button.

-
Once the VPN server starts, Thinka automatically generates a client certificate. Download it by clicking Download VPN File.
-
Install a VPN client if needed. Right-click the VPN app icon and select Import file.
-
Choose the downloaded client certificate.
-
Open the VPN app again and click Connect.
-
When connected, the icon turns green.
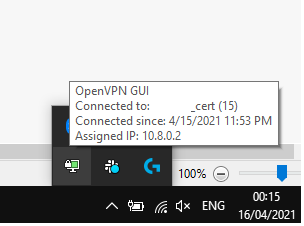
-
Your computer is now securely connected! Access your Thinka device via IP address 10.8.0.1.
-
If you use ETS, enable the built-in KNX IP interface and use 10.8.0.1 to access your KNX network.
Enjoy secure and remote access to your Thinka device anytime, anywhere!
How to Easily Configure an Outlet
Setting up your smart outlet is quick and straightforward! Just like configuring a Switch, the process is simple and user-friendly. Follow these steps to get your outlet connected and ready to use:
- Open your smart home app: Whether you use HomeKit, Alexa, or Google Home, launch the corresponding app on your device.
- Add a new device: Select the option to add a new accessory or device, then choose "Outlet" or "Plug" as prompted.
- Follow the on-screen instructions: The app will guide you through pairing your outlet and connecting it to your network.
- Name and organize: Once connected, you can name your outlet and assign it to a room for easy control.
Tip: In HomeKit, your device will appear as an Outlet, while in Alexa and Google Home, it will show up as a Plug for seamless voice control and automation.
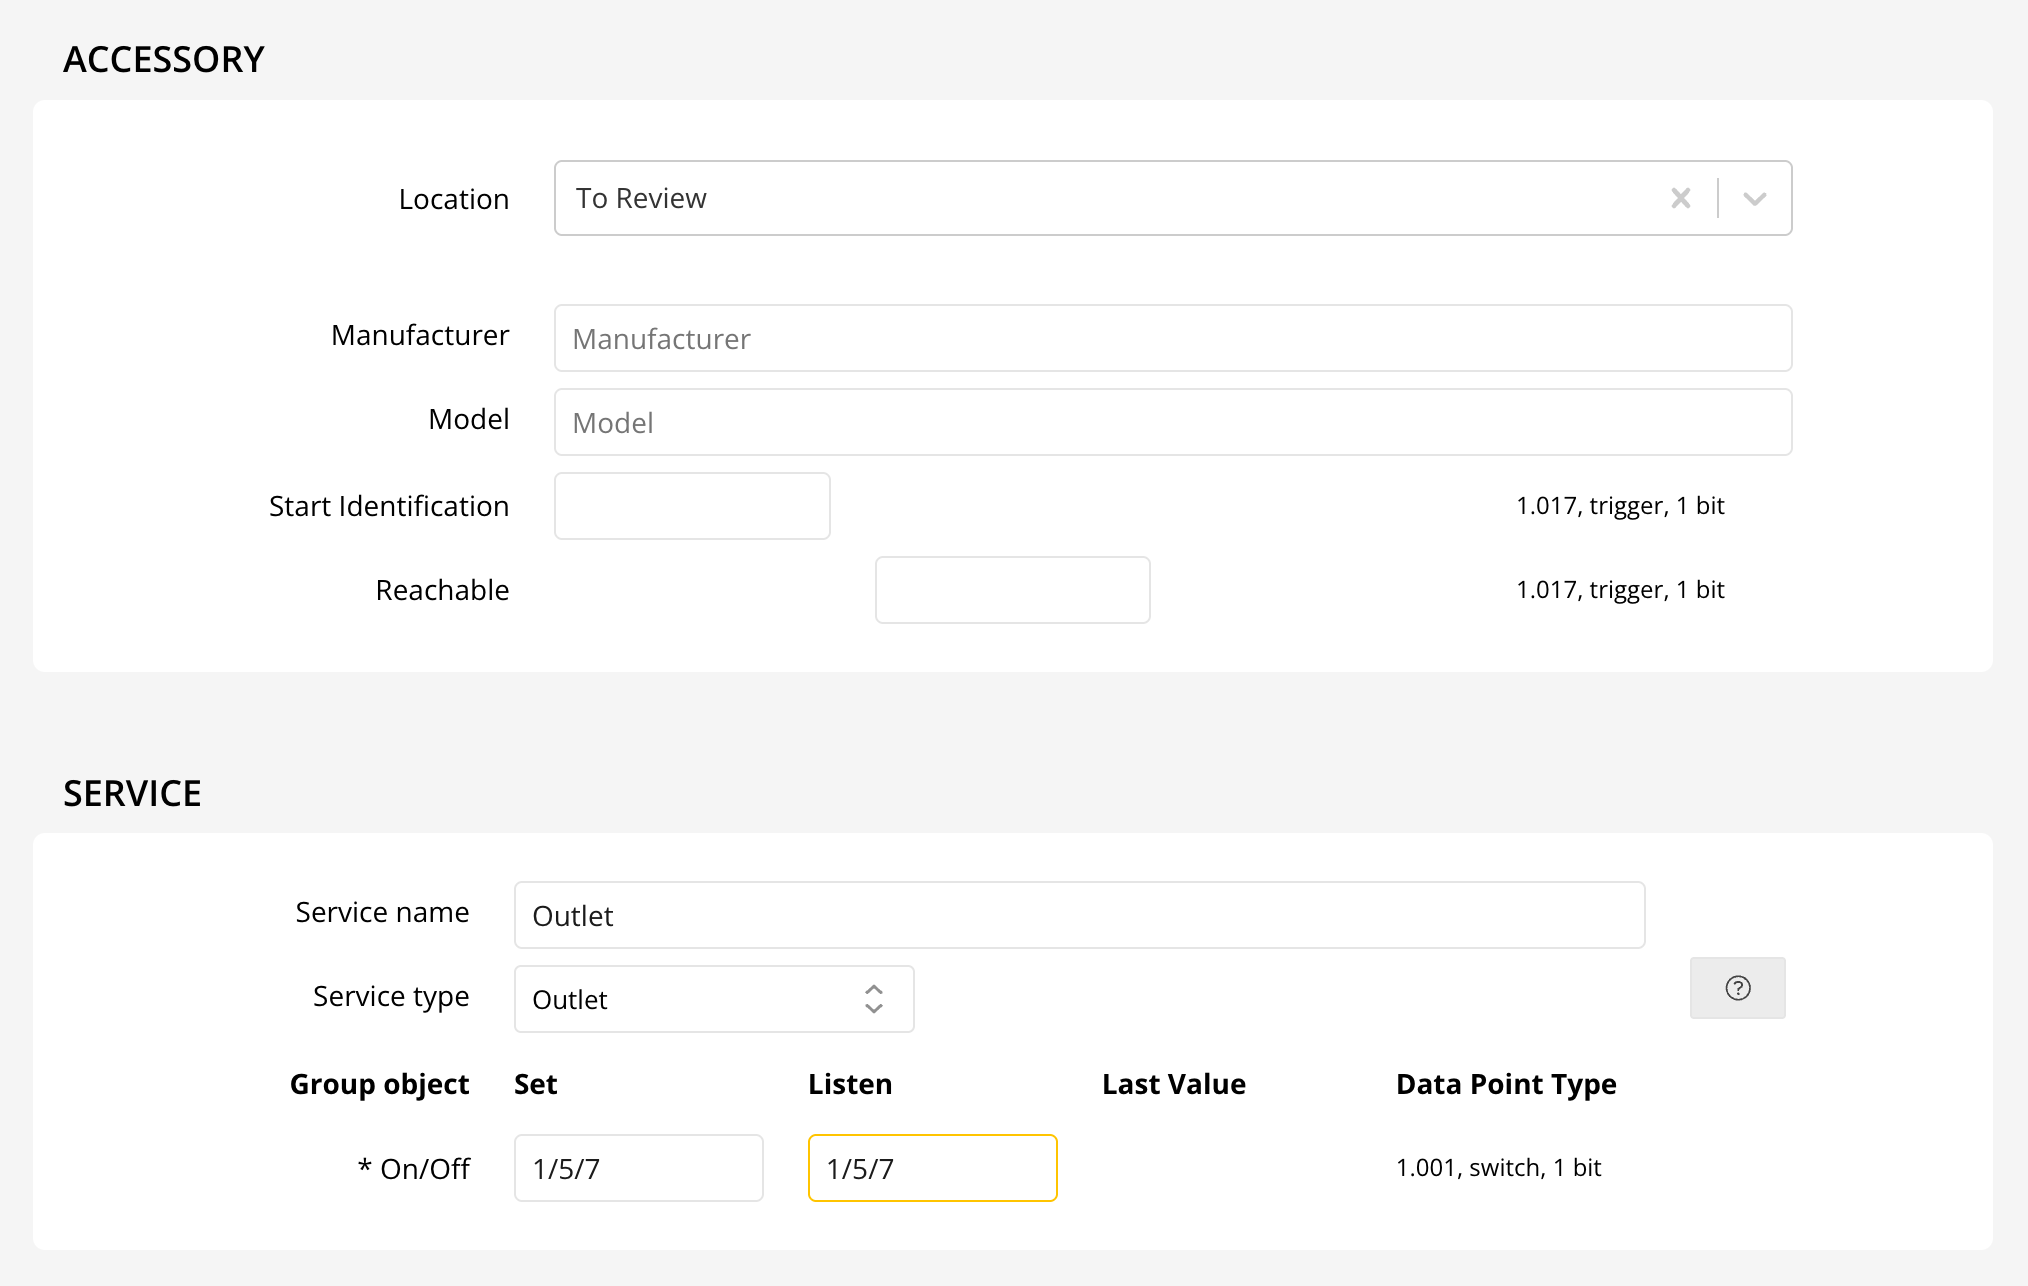
Enjoy effortless control of your smart outlet and simplify your home automation today!
How to Configure Your Air-Conditioning in HomeKit
Setting up your air conditioning in HomeKit is simple and intuitive! In HomeKit, your air conditioning system is managed as a Thermostat accessory, giving you full control and comfort directly from the Home app.
- Select Your Thermostat Type: Choose between heating, cooling, or heating and cooling. For systems that provide both, select whether switching modes should be manual or automatic.
- Choose HVAC Mode: Opt for basic On/Off control or advanced KNX modes—HVAC (20.102) or HVAC Control (20.105). For air conditioning, the 20.105 mode is ideal and supports Auto, Heat, Cool, and Off.
- Adjust Setpoints: Control your air conditioner’s setpoint directly or shift it using temperature differences or counter values. Ensure the steps and parameters match your KNX airco settings.
- Set Temperature Limits: Define minimum and maximum target temperatures for precise climate control within your home.
- Configure Group Addresses: Assign group addresses for actual temperature, setpoints, heating/cooling messages, and mode controls based on your preferences.
Tip: Add Fan and Swing Arm controls as separate services for enhanced comfort, as shown below.
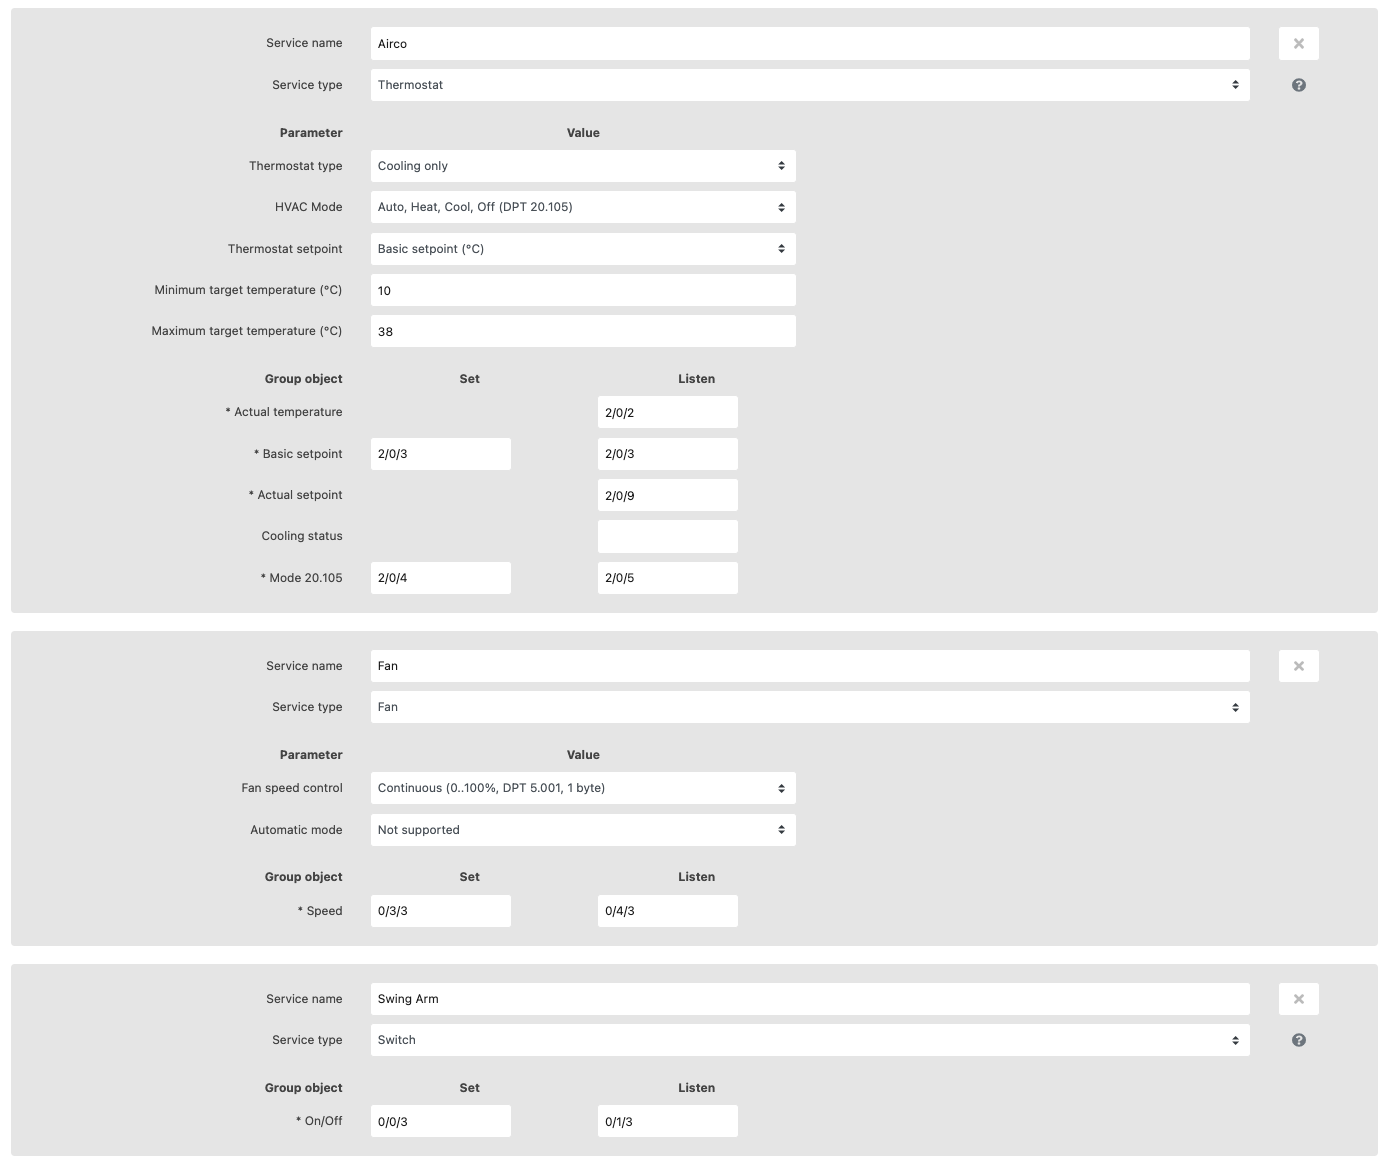
Note: This accessory is not available with Google integration.
How to Activate Your Thinka for KNX PRO Upgrade
Congratulations on upgrading to Thinka for KNX PRO! Unlocking your new PRO features is simple and hassle-free—no hardware changes required.
- Automatic Upgrade: As soon as your payment is confirmed, your Thinka device will receive the PRO software upgrade automatically. There’s nothing extra you need to install or replace.
- Access New Features: Enjoy powerful new capabilities like the IP Gateway and VPN Server. These features become available on your Thinka the next day, or immediately after a quick restart of your device.
- Seamless Experience: Your Thinka for KNX continues to deliver smart home control with added flexibility and security, all thanks to your PRO upgrade.
If you need any help or want to explore your new features, visit our FAQ section or contact our support team.
Do I Receive Thinka PRO Software with My PRO Device Purchase?
When you purchase a Thinka device with PRO functionality, the PRO software is delivered digitally—no physical shipment is needed. After your order is shipped, you'll receive an email with easy-to-follow instructions on how to activate your Thinka PRO features.
- Activation Email: Look out for an email containing a secure activation link.
- Order History Access: The link will take you directly to your order history in your account—resellers can access here, while customers can log in here. Both are accessible from the Thinka shop.
- Feature Availability: After activation, new PRO features like IP Gateway and VPN Server will be enabled automatically the next day, or immediately after a device restart.
Enjoy seamless access to advanced Thinka PRO software features—quick, convenient, and entirely online!
Why Do My Blinds Appear Inverted on Thinka?
If your blinds seem to operate in reverse, don’t worry—it’s a common setup detail. Thinka follows Apple HomeKit’s standard for blinds, where “Up” means 100% open (maximum light) and “Down” means 0% open (no light).
- Up (100%): Blinds are fully open, letting in all available daylight.
- Down (0%): Blinds are fully closed, blocking out the light.
To ensure your smart blinds work perfectly with Thinka and Apple HomeKit, it’s essential to program them in ETS to match this definition. Setting the correct orientation during setup will guarantee smooth and intuitive control through your smart home system.
Tip: Double-check your ETS configuration to align the blind’s movement with HomeKit’s “Up” and “Down” positions for the best user experience.
How to Configure Your Valve: Step-by-Step Guide
Configuring your valve is simple and ensures optimal performance. Follow these easy steps to get started:
- 1. Set Up the "Active" Object:
The "Active" object controls whether your valve is open or closed. Assign both a listen and set address to this object. Make sure to use Datapoint Type 1.001 for accurate operation. - 2. Set Up the "In Use" Object:
The "In Use" object indicates when water is actually flowing. If your system doesn’t have a dedicated "In Use" object, you can simply use the same listen address as the "Active" object. The correct Datapoint Type for this is 1.002.
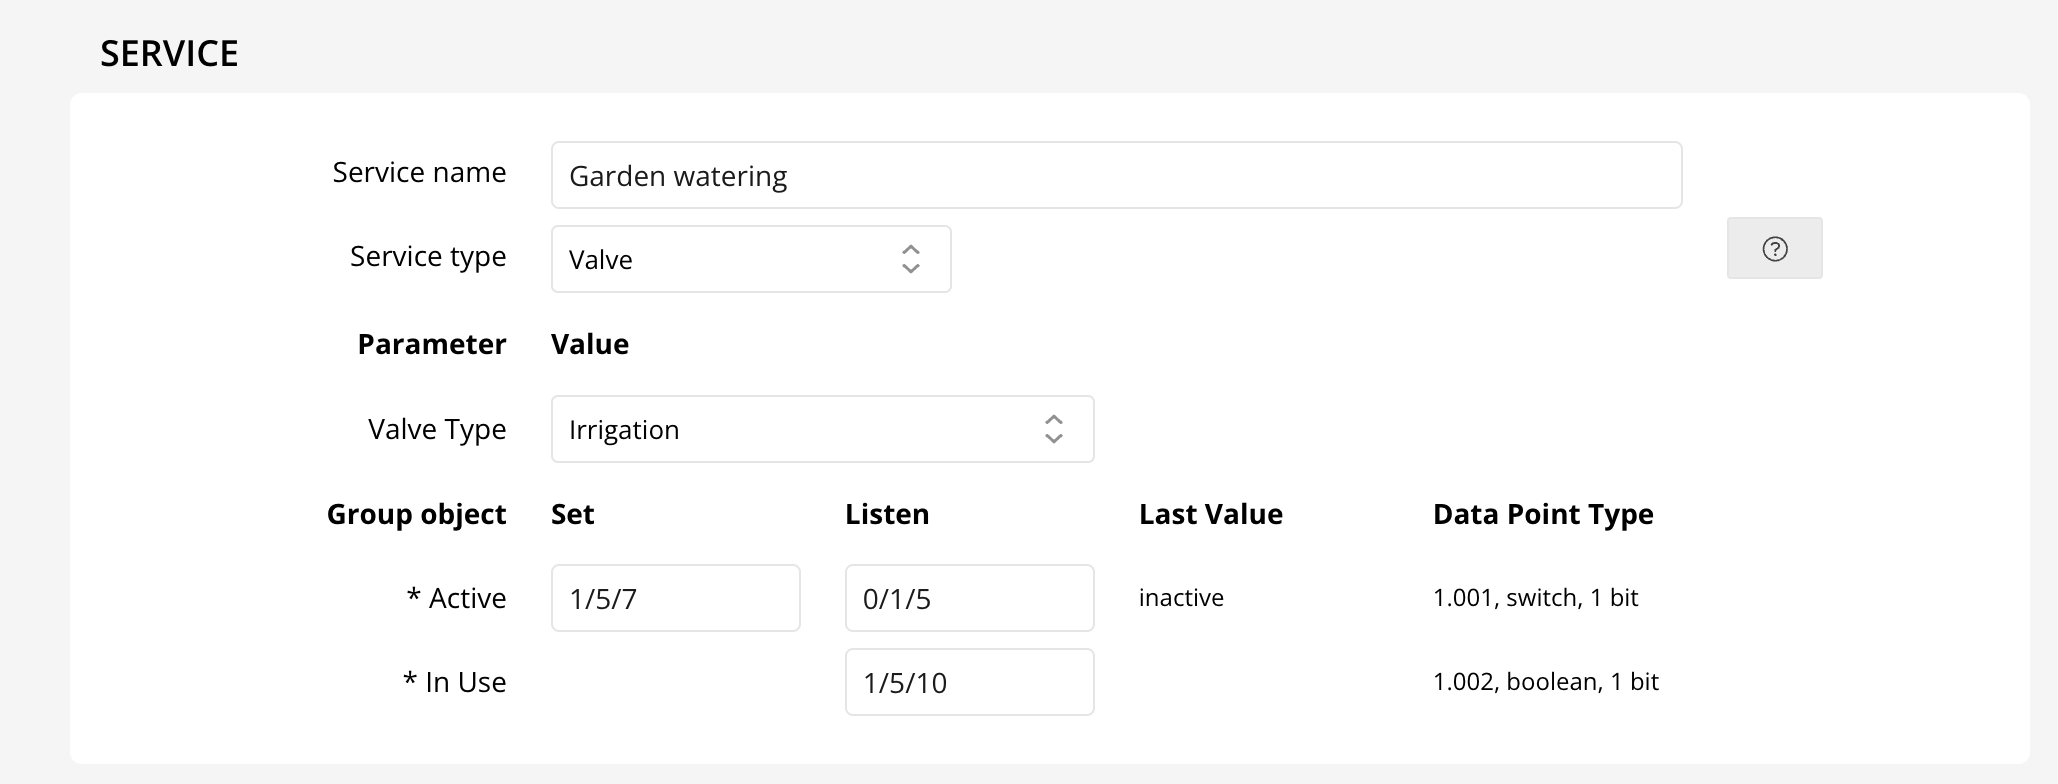
Additionally, you can customize how your valve appears in your Home app by adjusting the "Valve Type" parameter. The available options are shown below:
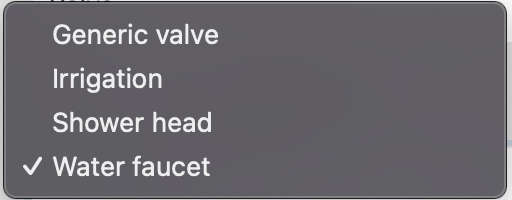
Changing the "Valve Type" will update the icons and appearance of your device in the Home app, making control even easier!
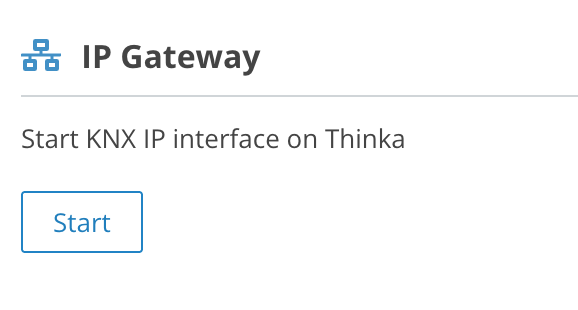
How to Enable the Thinka PRO IP Gateway
Unlock seamless connectivity with your Thinka PRO’s built-in IP Gateway! Activating this feature is quick and easy. Follow these simple steps:
- Access your Thinka PRO’s web interface from any device on your network.
- Click on the Settings icon in the main menu.
- Navigate to the KNX Tab.
- Find and select the IP Gateway section to enable it.
By enabling the IP Gateway, you unlock powerful integration options, making it easier to manage your KNX devices and streamline smart home automation. This feature ensures reliable communication between your KNX system and IP-based technologies, delivering enhanced flexibility and control.
If you need further assistance, our support team is here to help. Experience the full potential of your Thinka PRO today!
How to Set Up a Thinka Integration Using Olisto
Getting started with Thinka integration via Olisto is quick and easy! Simply visit the "Inspiration" tab within Olisto, where you’ll discover a variety of ready-made Thinka bundles. These bundles make it simple to connect Thinka with other channels like weather updates, sports teams, and much more—expanding your smart home possibilities with just a few clicks.
- Browse the available Thinka bundles in the "Inspiration" tab.
- Select the integrations that best suit your needs, such as automating actions based on weather or your favorite football team’s results.
- Follow the step-by-step prompts to link your Thinka device with Olisto’s powerful automation tools.
For more details and to explore the full range of integrations, visit the official Olisto website. Enhance your smart home experience effortlessly with Thinka and Olisto!
How to Easily Connect Your Thinka to the Olisto App
Connecting your Thinka smart home hub to the Olisto app unlocks powerful automation features for your smart devices. Follow these simple steps to get started:
- Enable Olisto in Thinka Settings: Go to your Thinka’s settings page and activate Olisto. This allows your Thinka to securely connect to Olisto through the Thinka Cloud.
-
Check Thinka Cloud Connection: Verify that your Thinka is connected to the Thinka Cloud. You should see a confirmation screen like the one below:
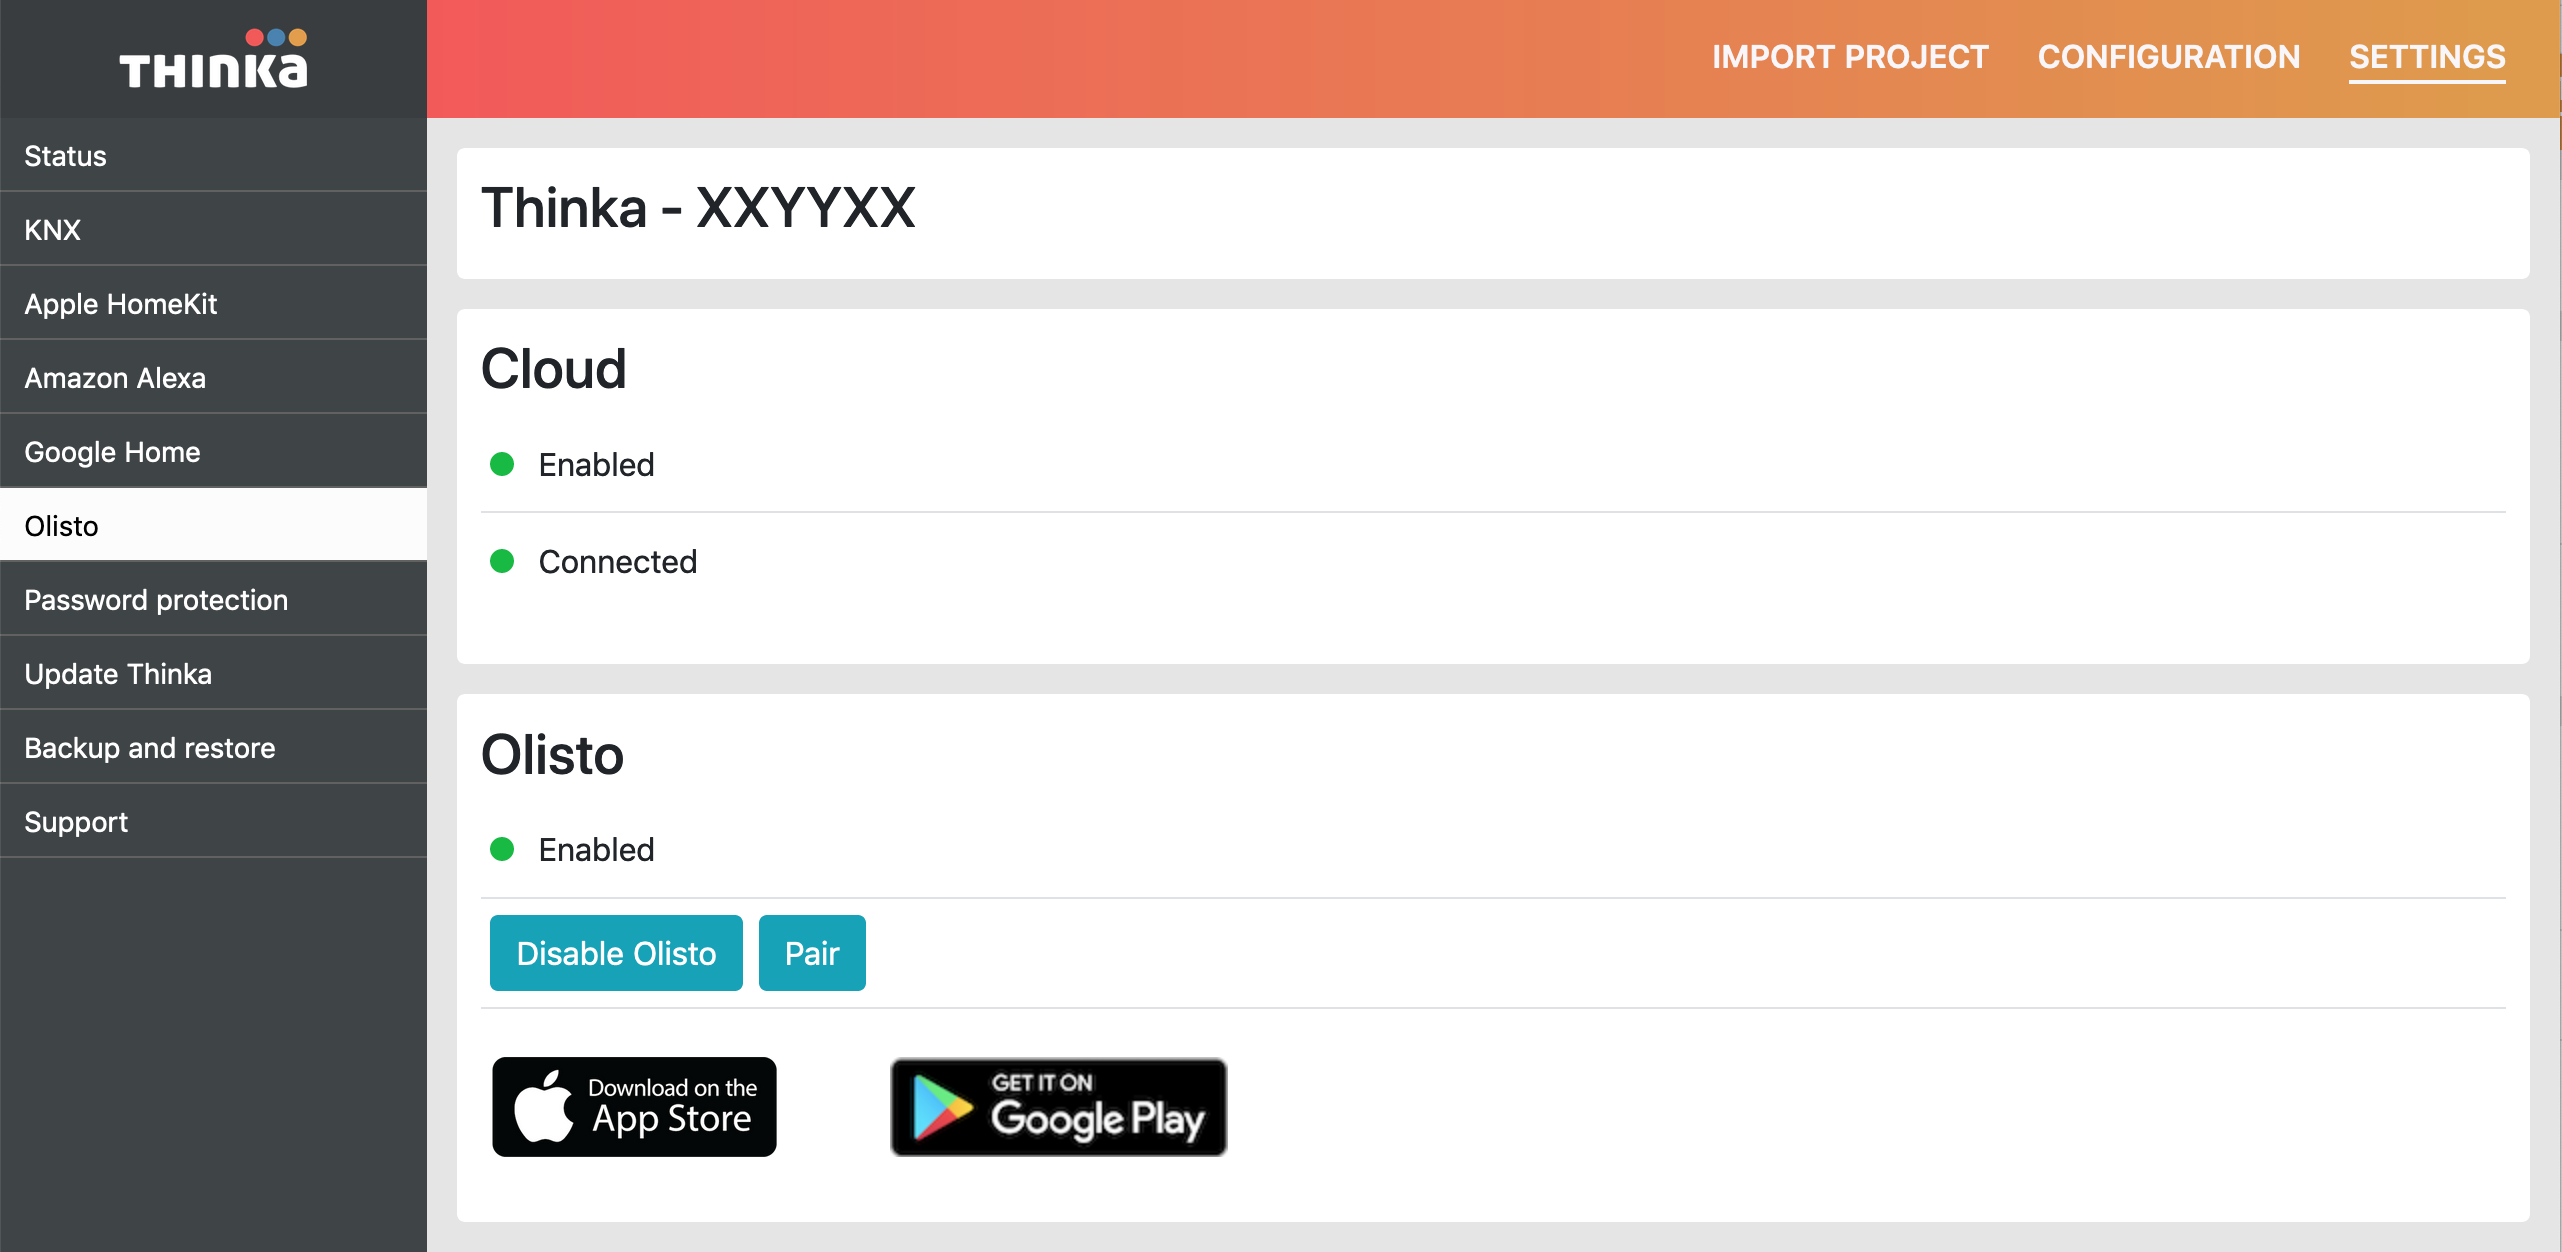
- Pair Thinka with Olisto: Click the “PAIR” button and copy the generated token.
- Set Up in Olisto App: On your smartphone, open the Olisto app (iOS | Android). Log in or create an account, tap "More," choose "Channels," select "Thinka," and press "Add channel." Paste your token to complete the pairing.
Enjoy seamless integration and enhanced smart home automation with Thinka and Olisto!
Can Thinka Act as a KNX Date and Time Server?
Yes, Thinka can function as a reliable KNX date and time server for your smart home system.
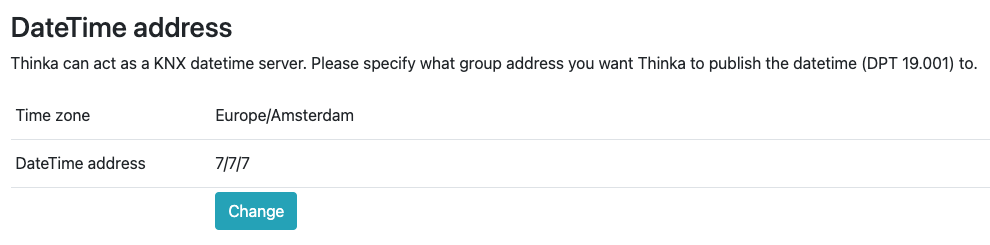
- Thinka automatically publishes the current time on the KNX bus every 10 minutes, ensuring your devices stay perfectly synchronized.
- You can easily configure a group address, which can be accessed and read by your KNX devices at any time.
- Date and time are published using the standard DataPoint Type 19.001 for seamless KNX integration.
Setting up your KNX DateTime server is simple through the Thinka web interface:
- Navigate to the KNX menu
- Select your preferred time zone
- Enter the group address you wish to use
With Thinka as your KNX time server, your automation system will always have the accurate date and time it needs for smooth operation.
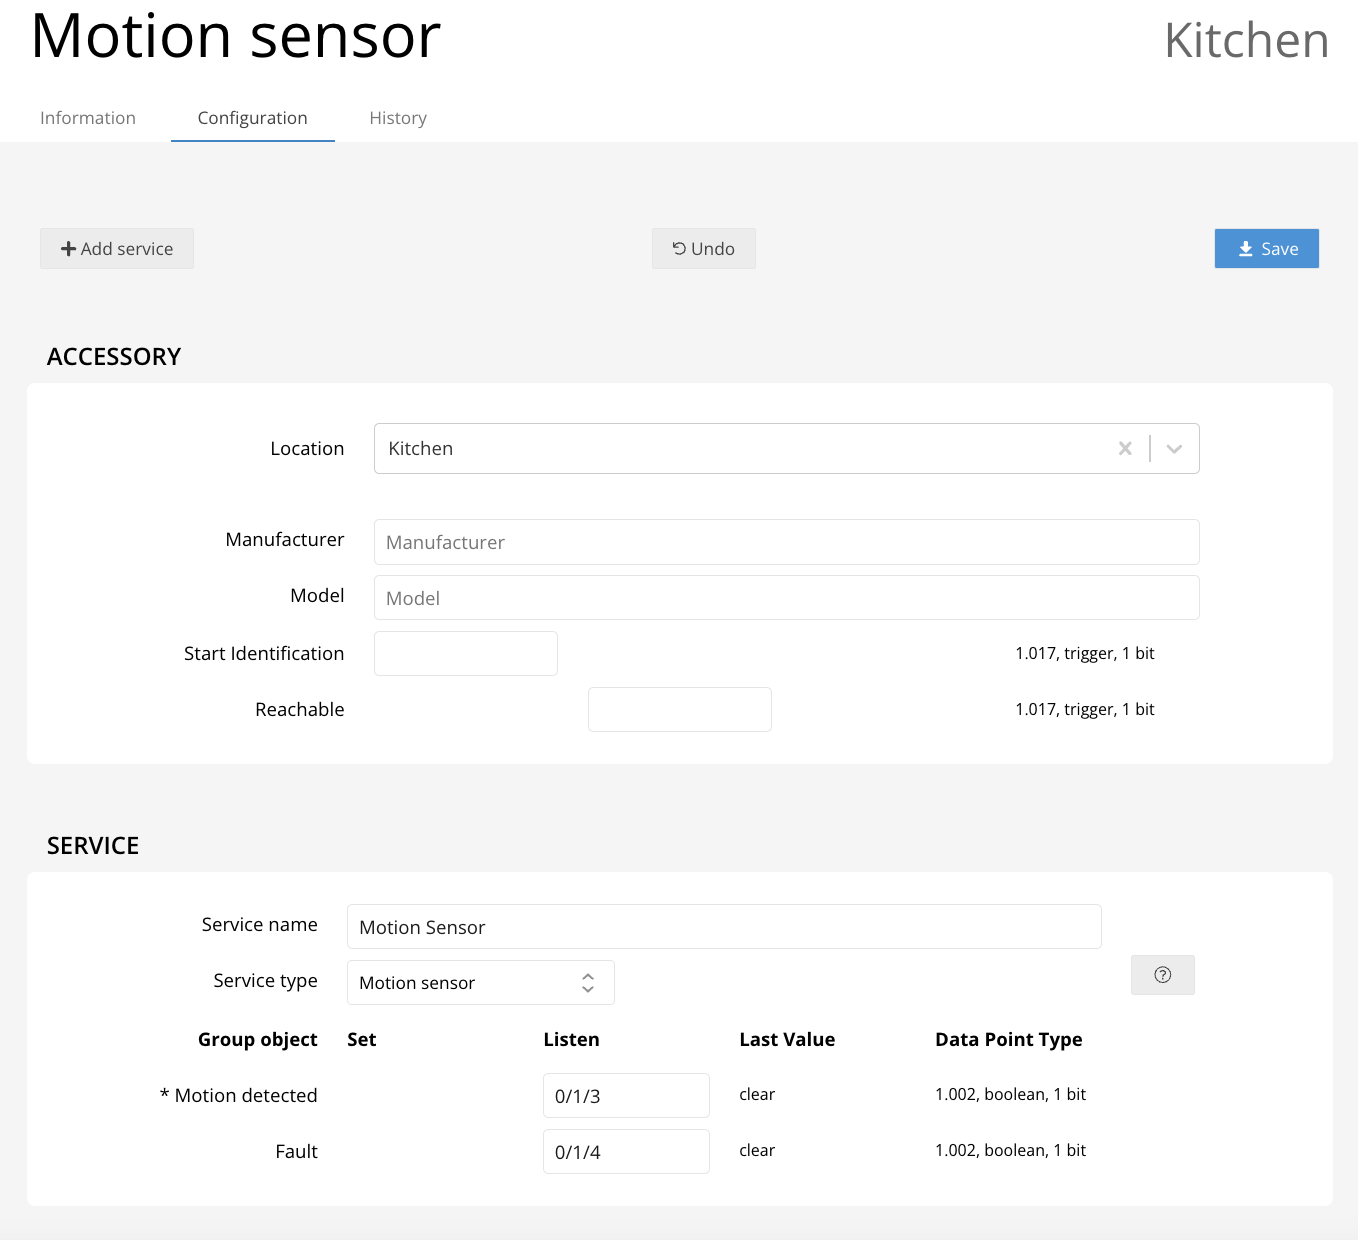
Use a Motion Sensor to detect motion in a room. Only one group address is needed. You can receive notifications when the sensor detects motion and create automations based on these notifications in the Home app. It can automatically turn on a light for example.
Note: This sensor is not available in Google.
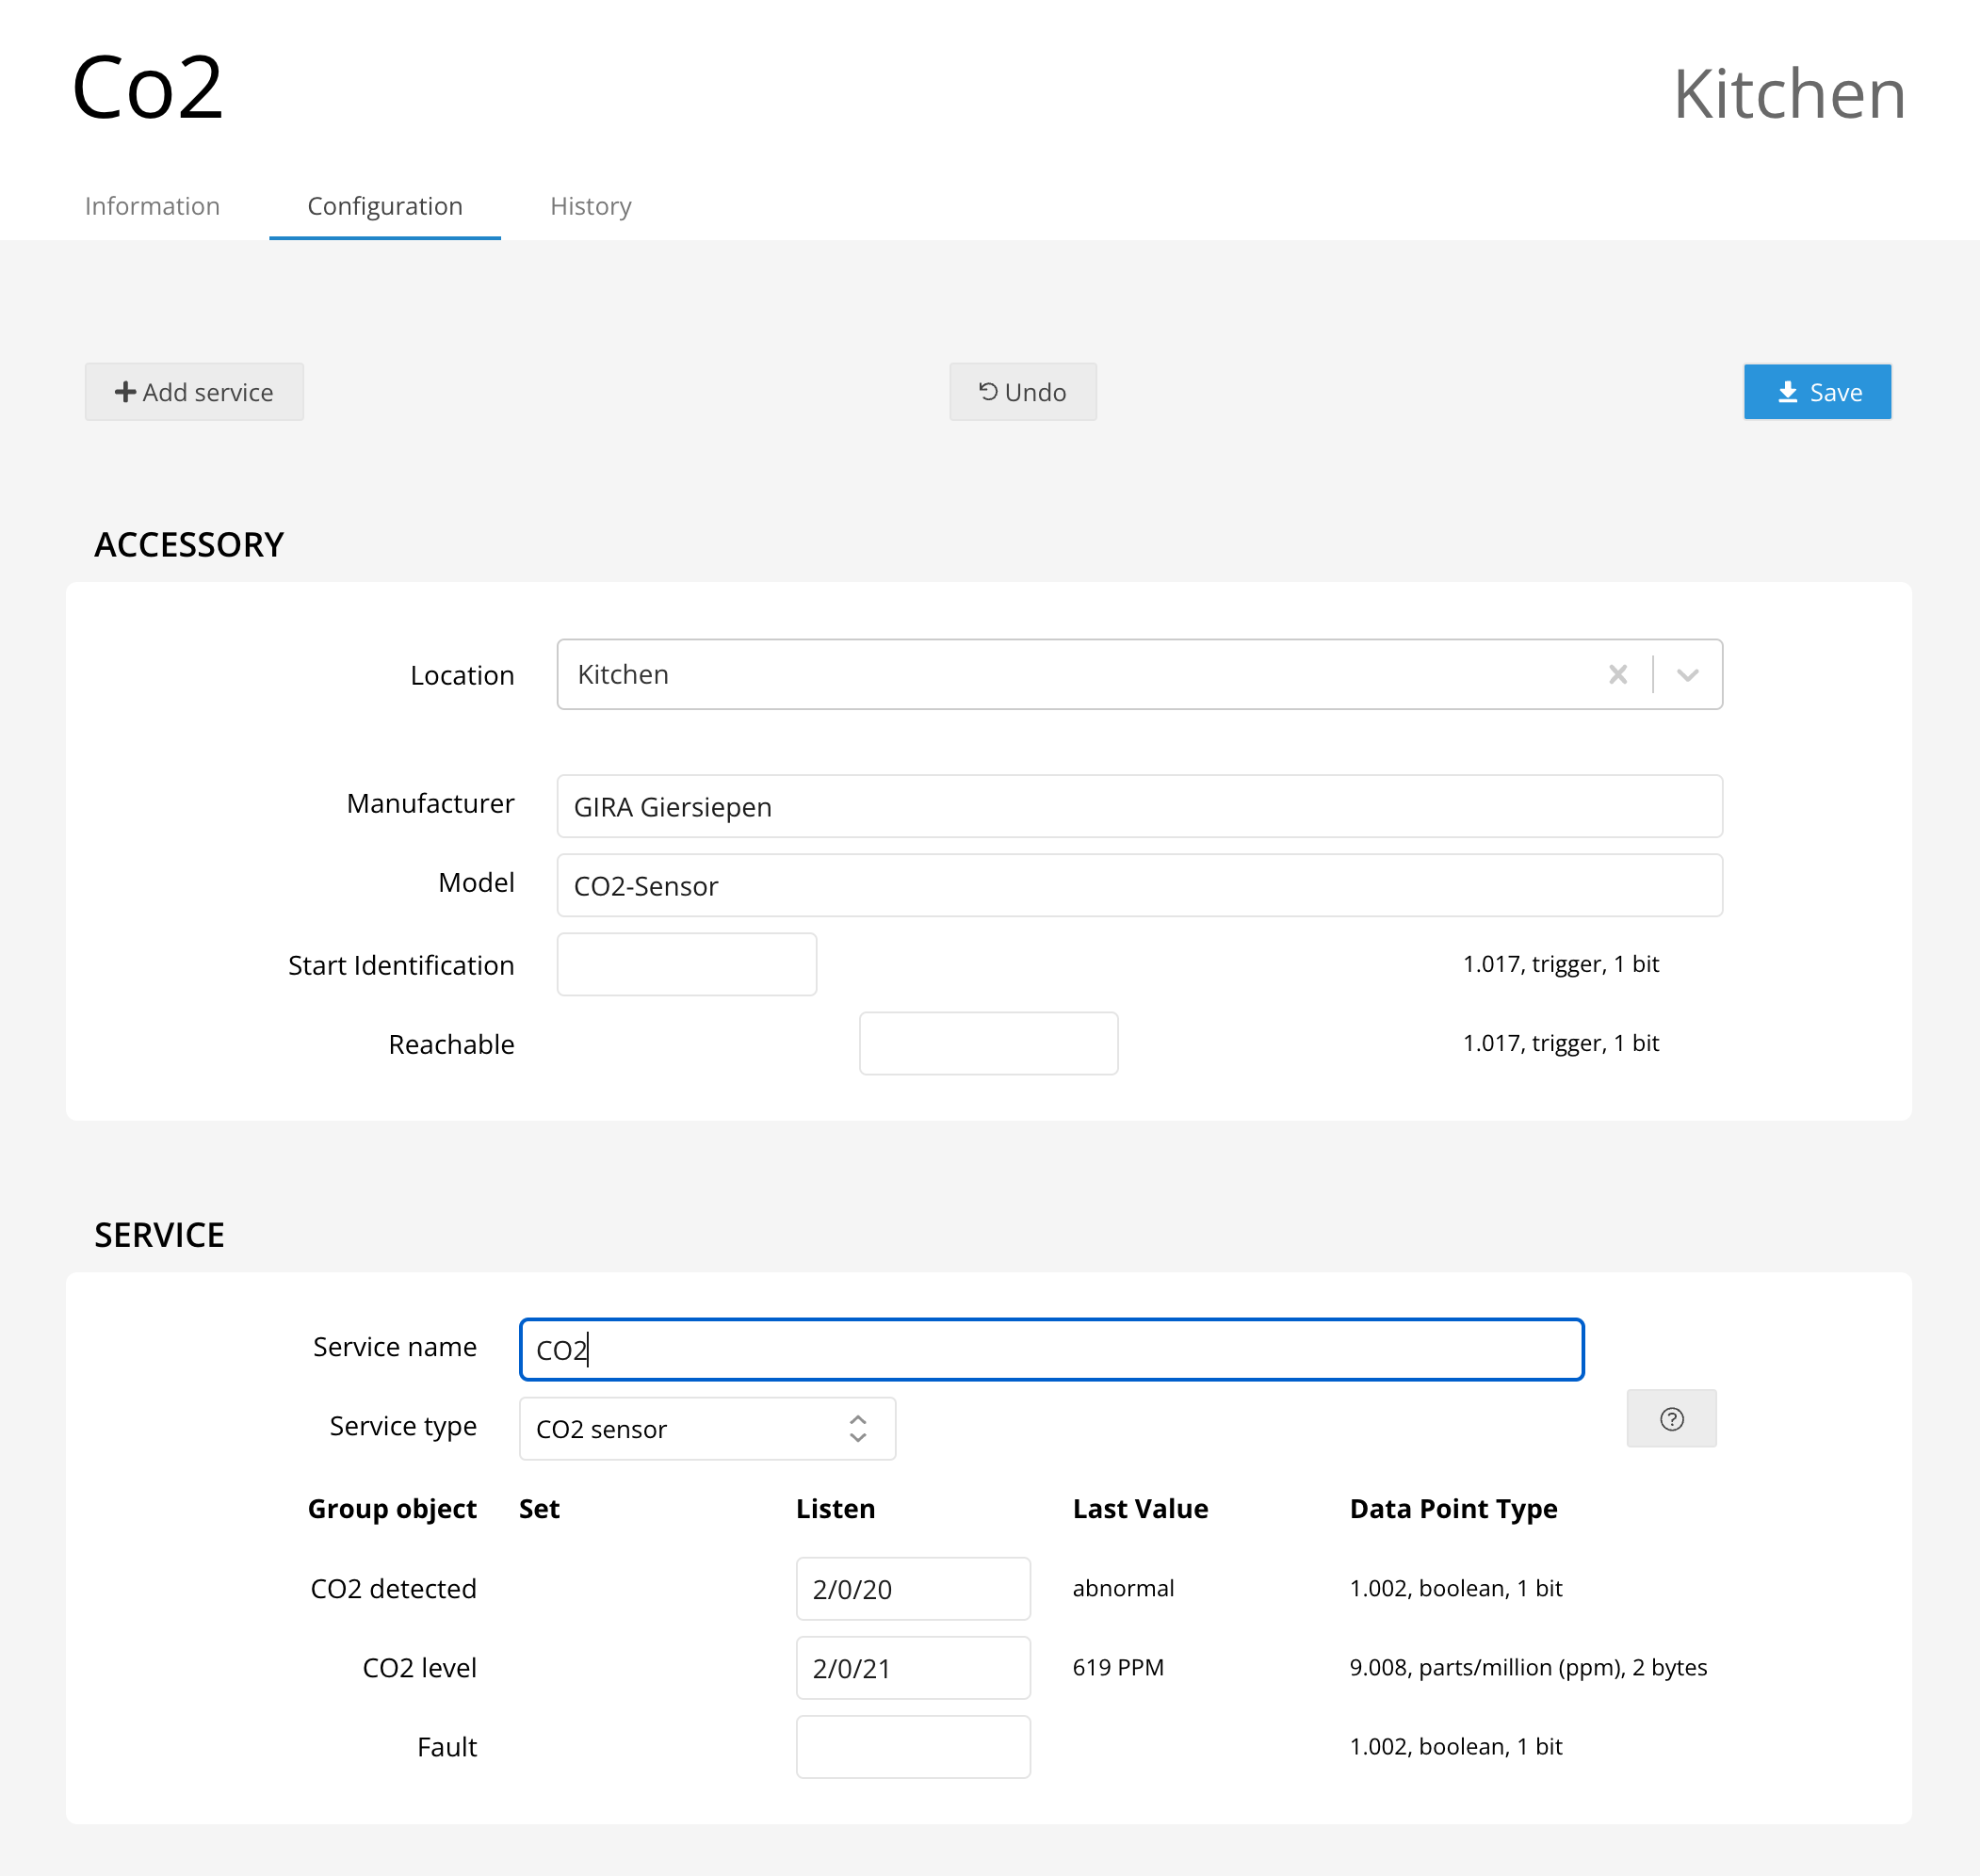
Two group addresses can be configured for a CO2 sensor. CO2 detected and CO2 level. Both are optional, but you'll need to configure at least one to make this useful. When configuring CO2 detected you can receive notifications in HomeKit when levels are abnormal. You can create automations based on this notification in your HomeKit configuration, it can automatically turn on a fan for example.
Note: This sensor is not available in Alexa and Google.
Can I Use Excel to Import My Devices and Group Addresses?
Yes, Thinka fully supports the use of Excel for importing and exporting your devices and group addresses!
- Exporting Data: Easily back up your Thinka configuration by accessing the web interface. Navigate to Backup and Restore in the menu and select Export to Excel. Your configuration will be downloaded as a CSV file, ready to open in Excel.
- Importing Data: You can prepare your own Excel file for import. Ensure your file contains the following 11 columns:
- Room Name
- Device Name or Unique Number
- Service Name (as shown in HomeKit)
- Service Type (e.g., Switch, LightBulb, Thermostat)
- Type: Characteristic or Parameter
- Name of Characteristic or Parameter
- Listen (Read) Address
- Set (Write) Address
- (Optional) Manufacturer
- (Optional) Model
- (Optional) Serial Number
After filling out your Excel sheet, save and export it as a CSV file. Then, simply click Import CSV in the Thinka web interface to upload your configuration.
Need help getting started? Download a sample Excel file here for your reference.
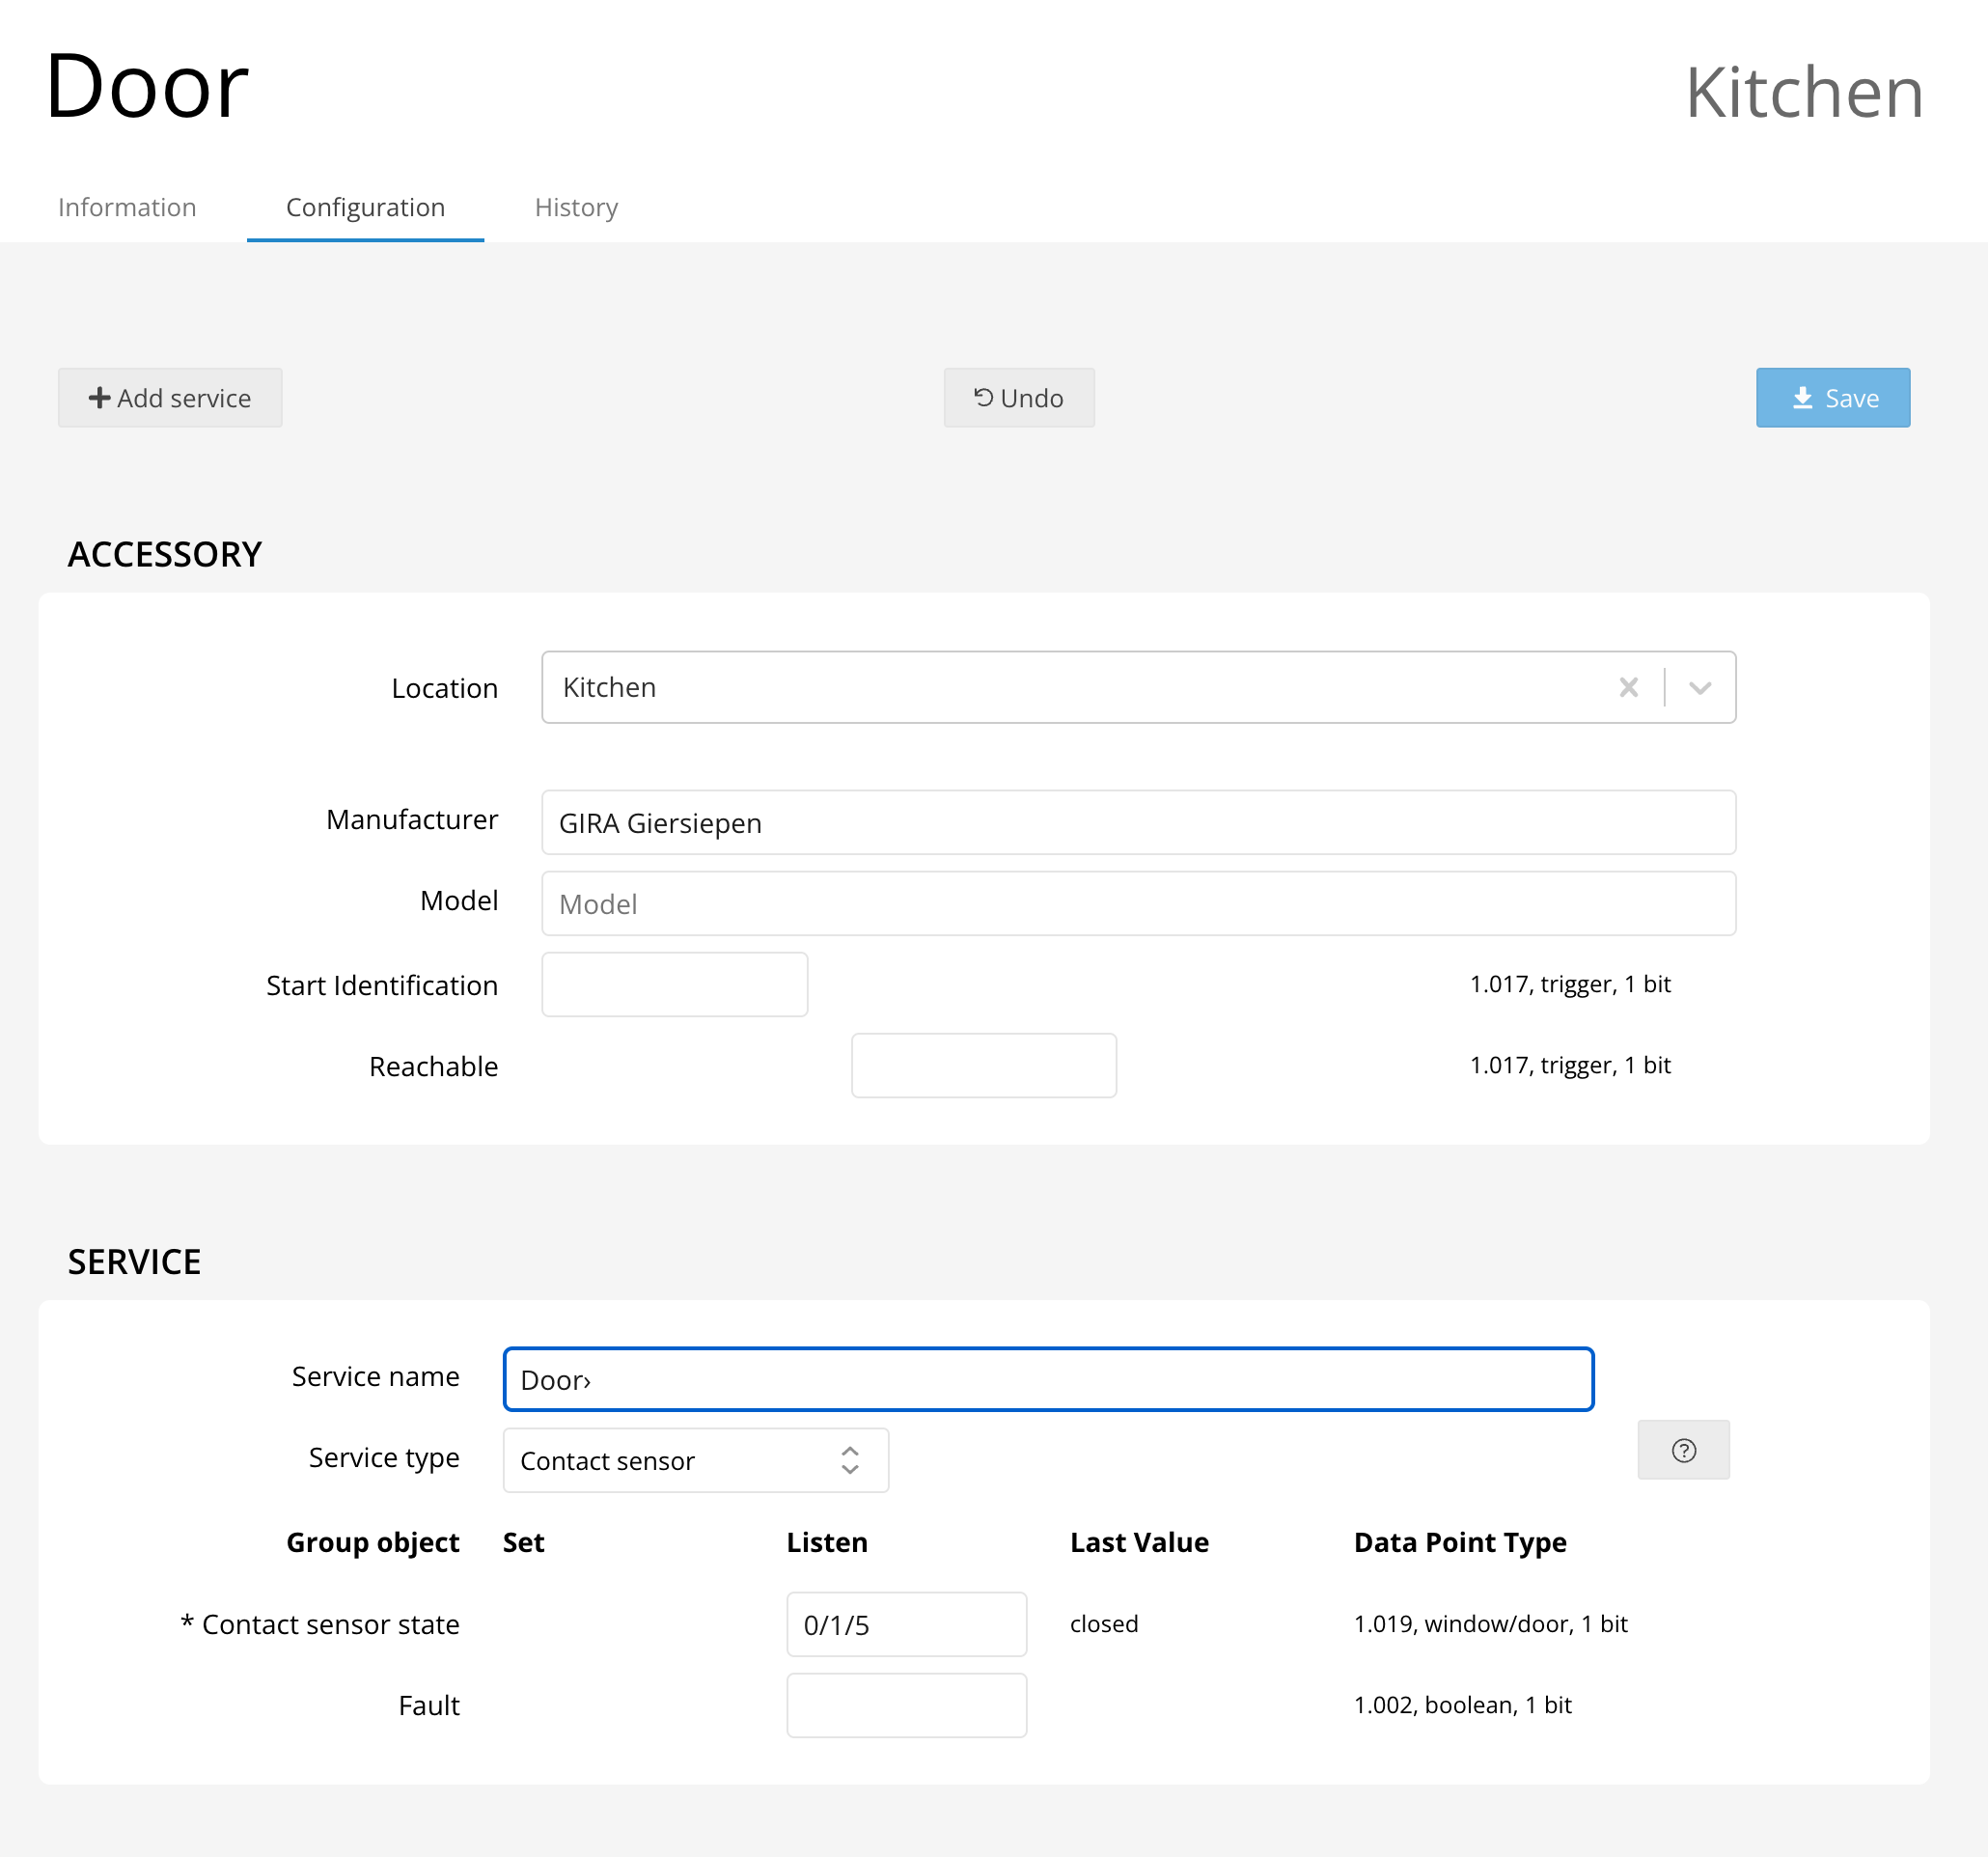
A Contact Sensor is mostly used to detect if a door or window is opened. A single group address needs to be configured. You can receive notifications when the sensor makes contact and create automations based on these notifications in the Home app. It can automatically turn on a light for example.
Do I Need to Purchase a Separate KNX IP Gateway?
No additional KNX IP Gateway is required when you choose the Thinka KNX Pro. Our Thinka KNX Pro comes with a powerful, built-in IP gateway designed to seamlessly connect and manage your KNX home automation network.
- All-in-One Solution: Enjoy integrated IP gateway functionality—no extra hardware needed.
- Easy Network Management: Effortlessly configure and control your KNX system via ETS with our built-in IP gateway.
- Upgrade Friendly: Already have a Thinka device? You can easily upgrade to the Thinka KNX Pro to access these features.
For detailed information about remote access and smart support, check out our Smart Support page.
- Important Security Tip: We strongly recommend NOT exposing the Thinka KNX Pro IP gateway directly to the Internet. For secure remote access, please use our reliable VPN Server solution.
Choose Thinka KNX Pro for a secure, all-in-one home automation experience with built-in IP gateway capabilities!
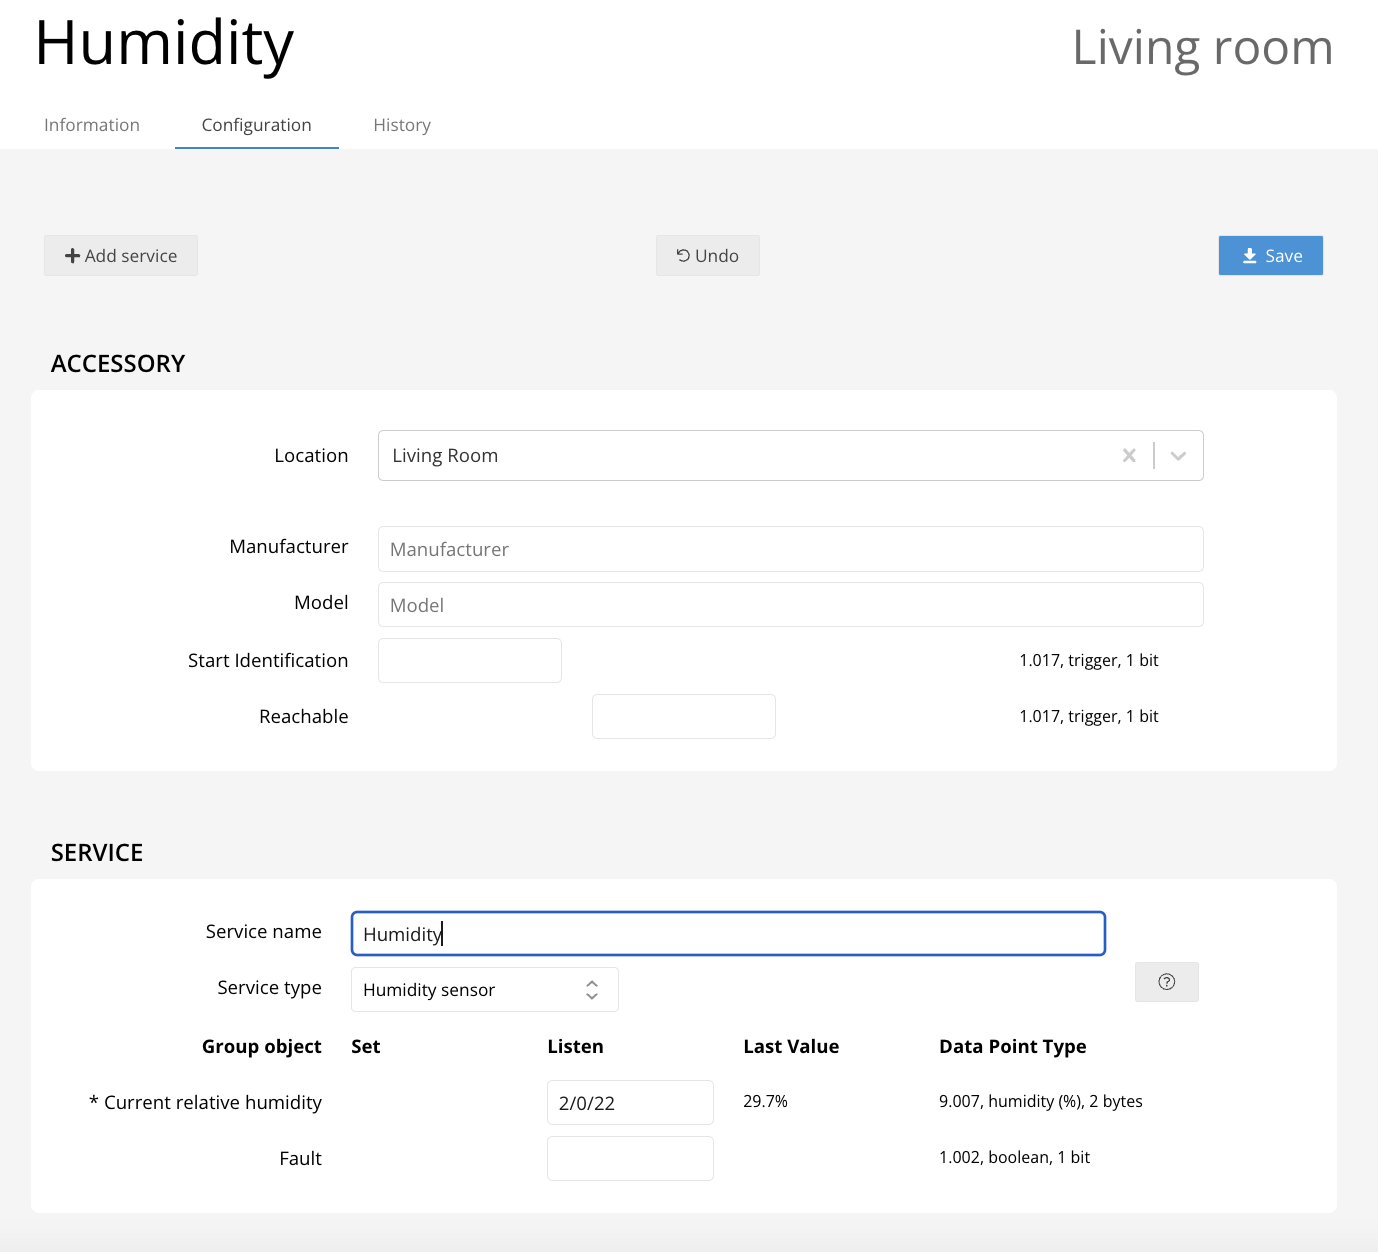
The current humidity can be displayed in the supported app like Apple Home, Google home, etc. One group address needs to be configured. The humidity is displayed in percentages.
Note: This sensor is not available in Alexa.
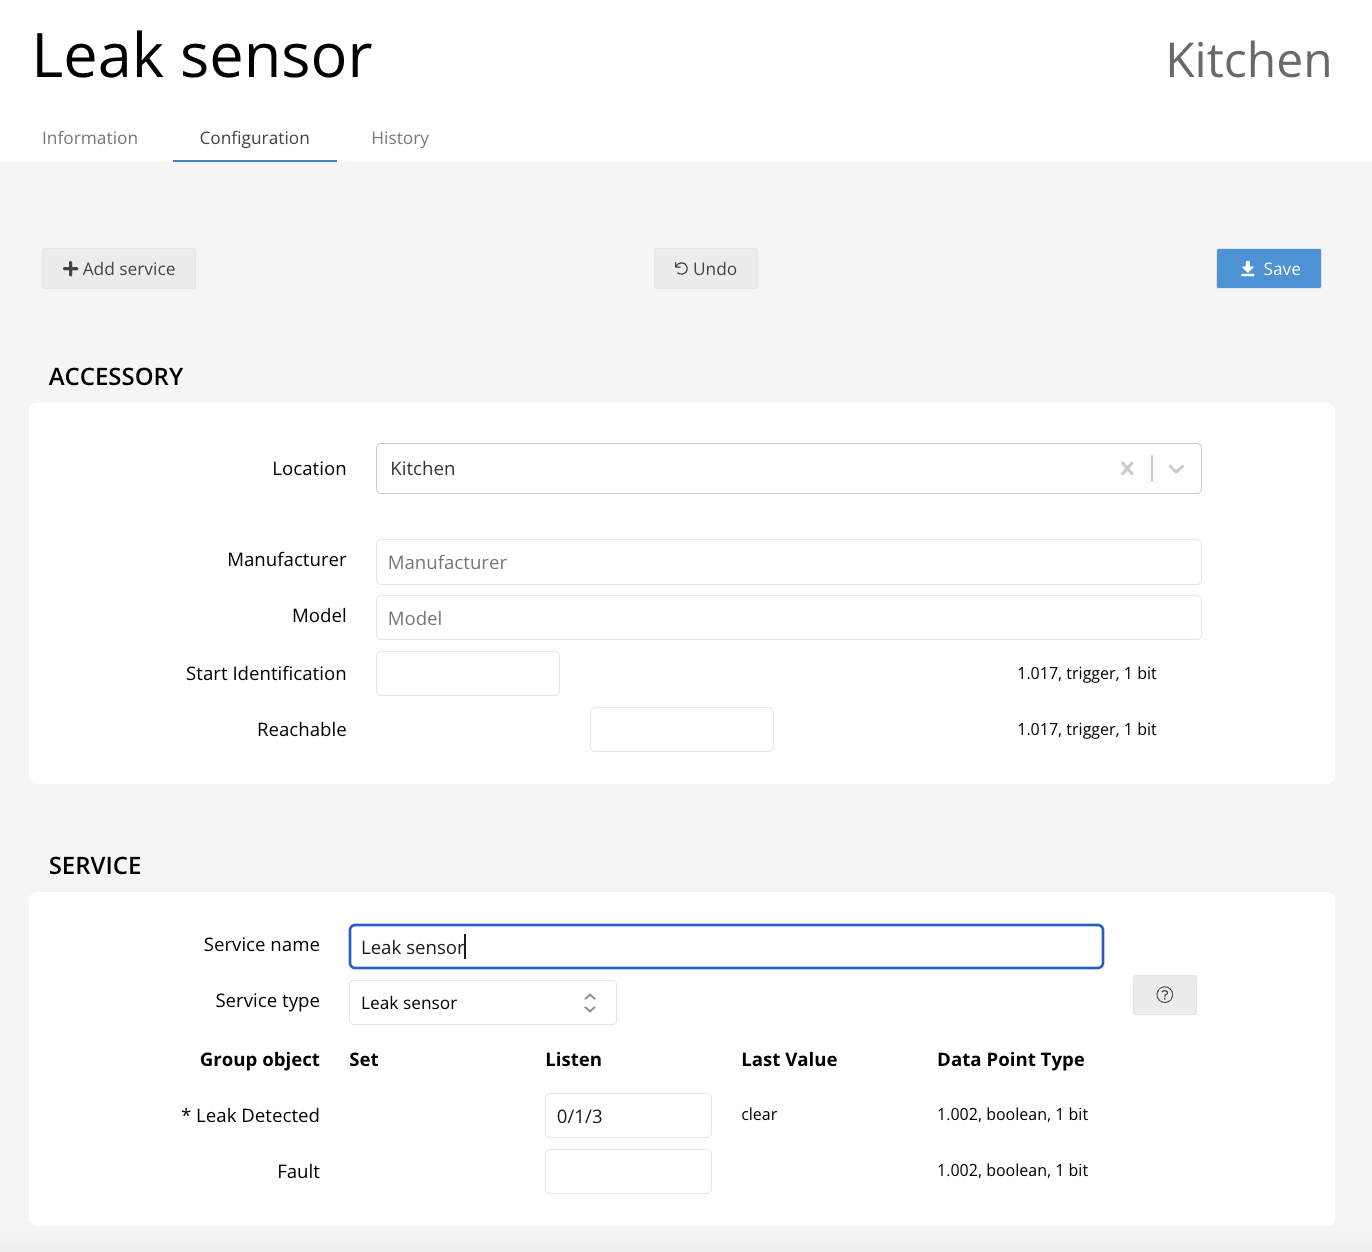
A Leak Sensor is used to detect broken water pipes or other leakage. When leakage is detected quick action can be taken to limit the damage. A single group address needs to be configured. You can receive notifications when the sensor detects a leak and create automations based on these notifications in the Home app. It can automatically turn off power or close a valve.
Note: This sensor is not available in Alexa. Google support for this sensor is available in the beta channel.
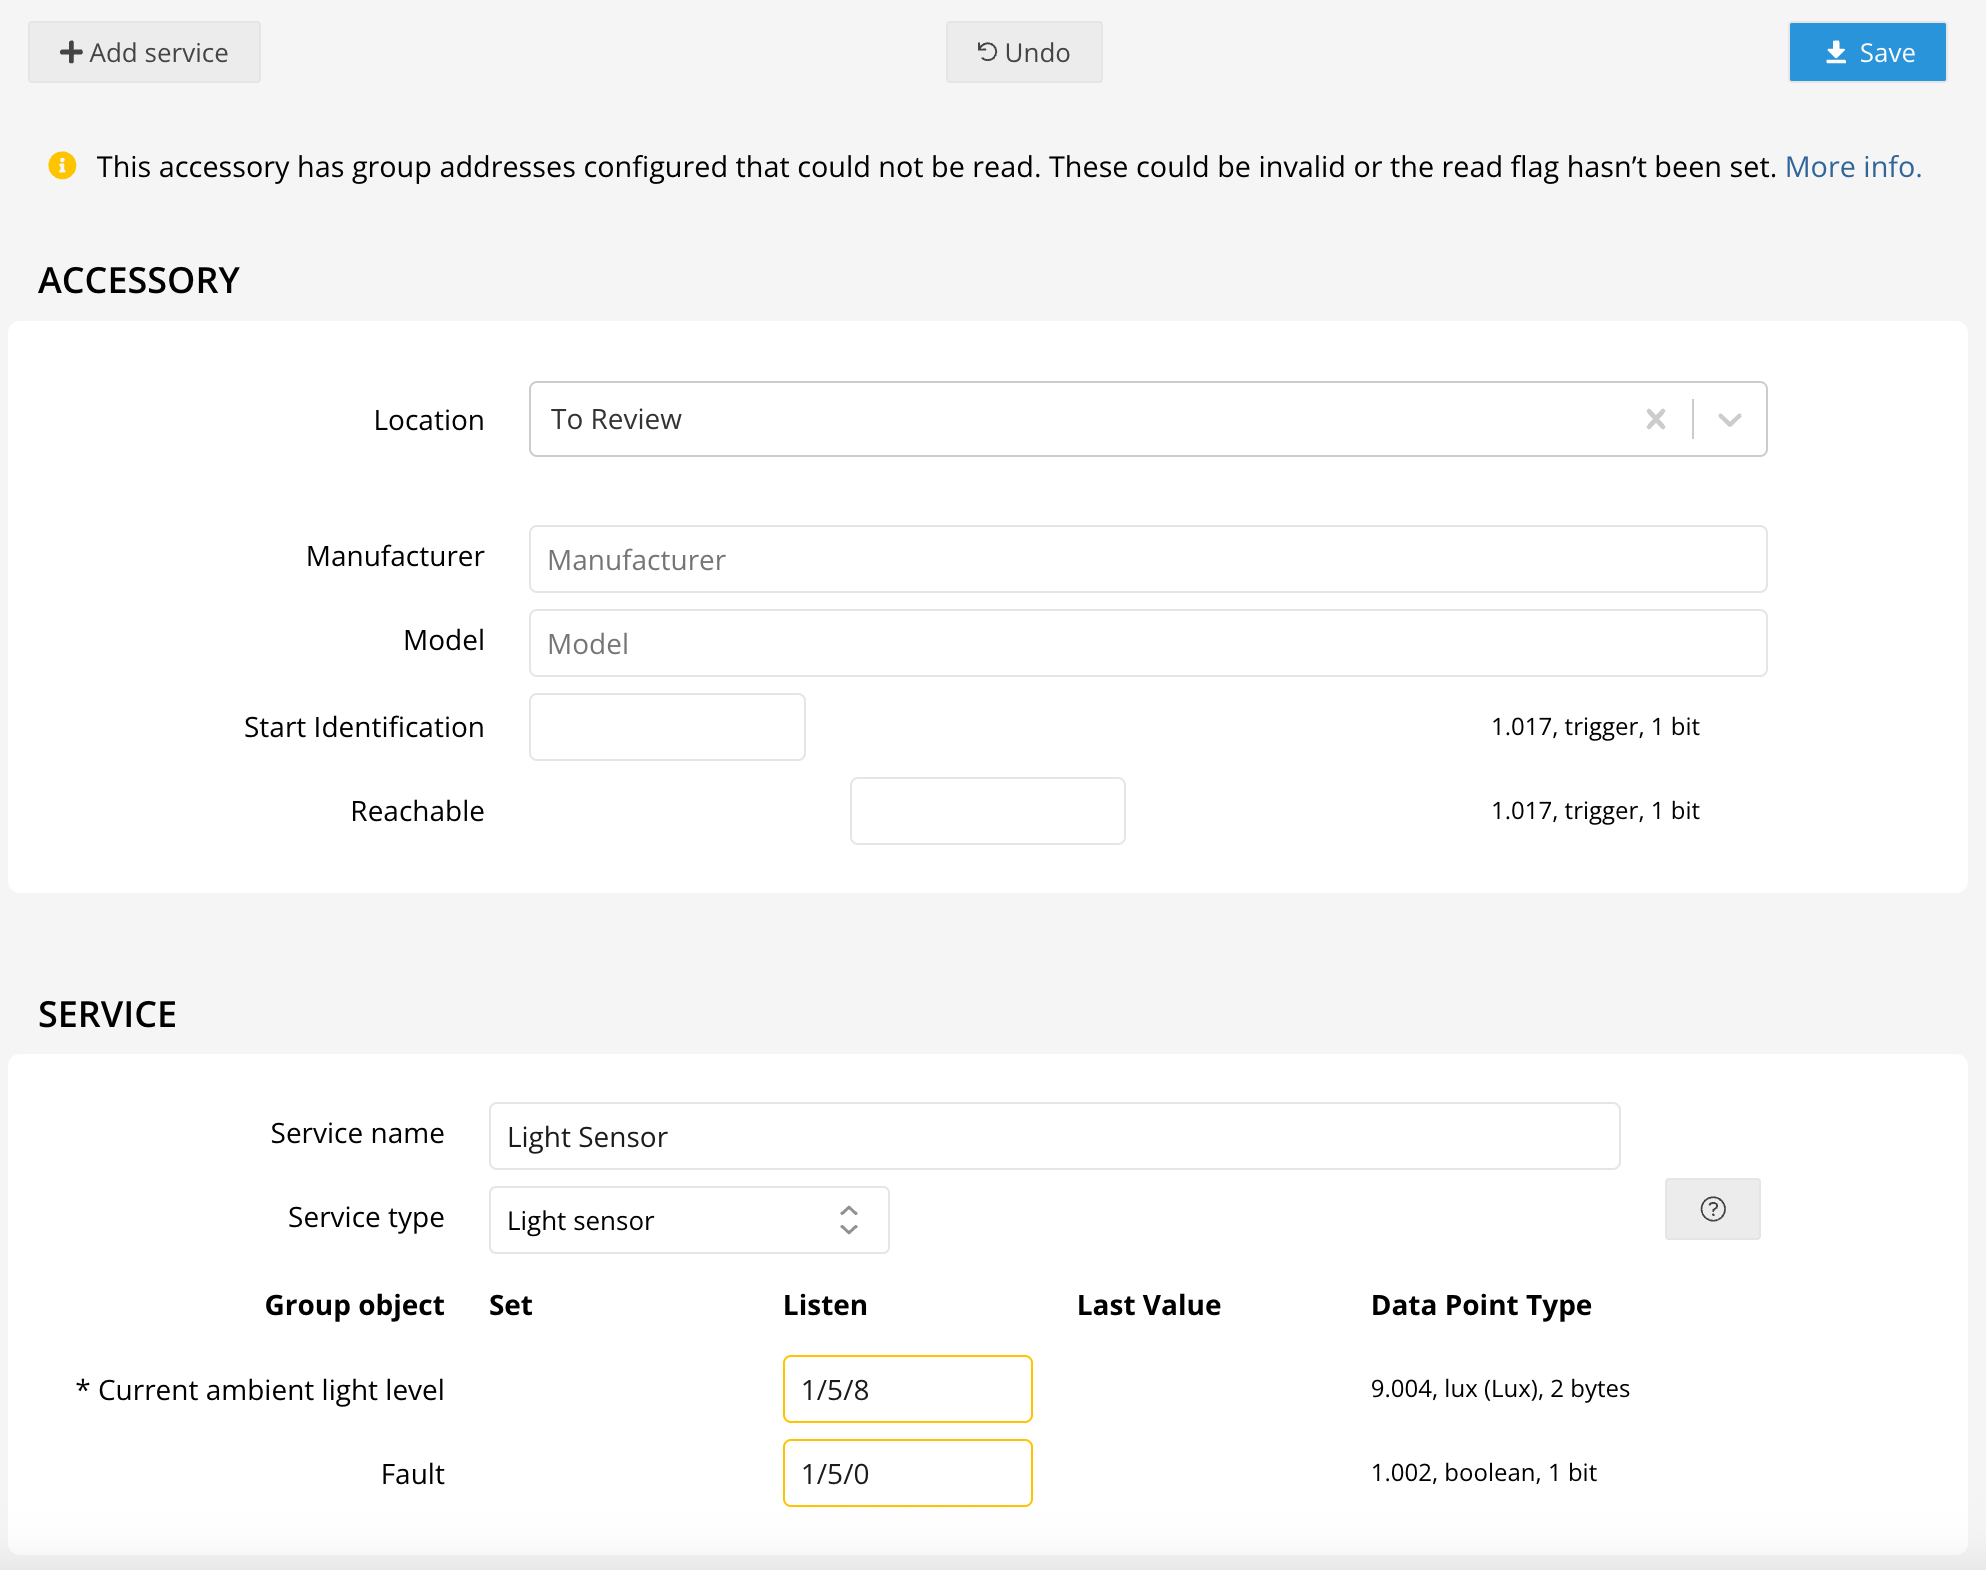
The current light level can be displayed in the Home app. One group address needs to be configured. The light level is displayed in Lux.
Note: This sensor is not available in Alexa and Google.
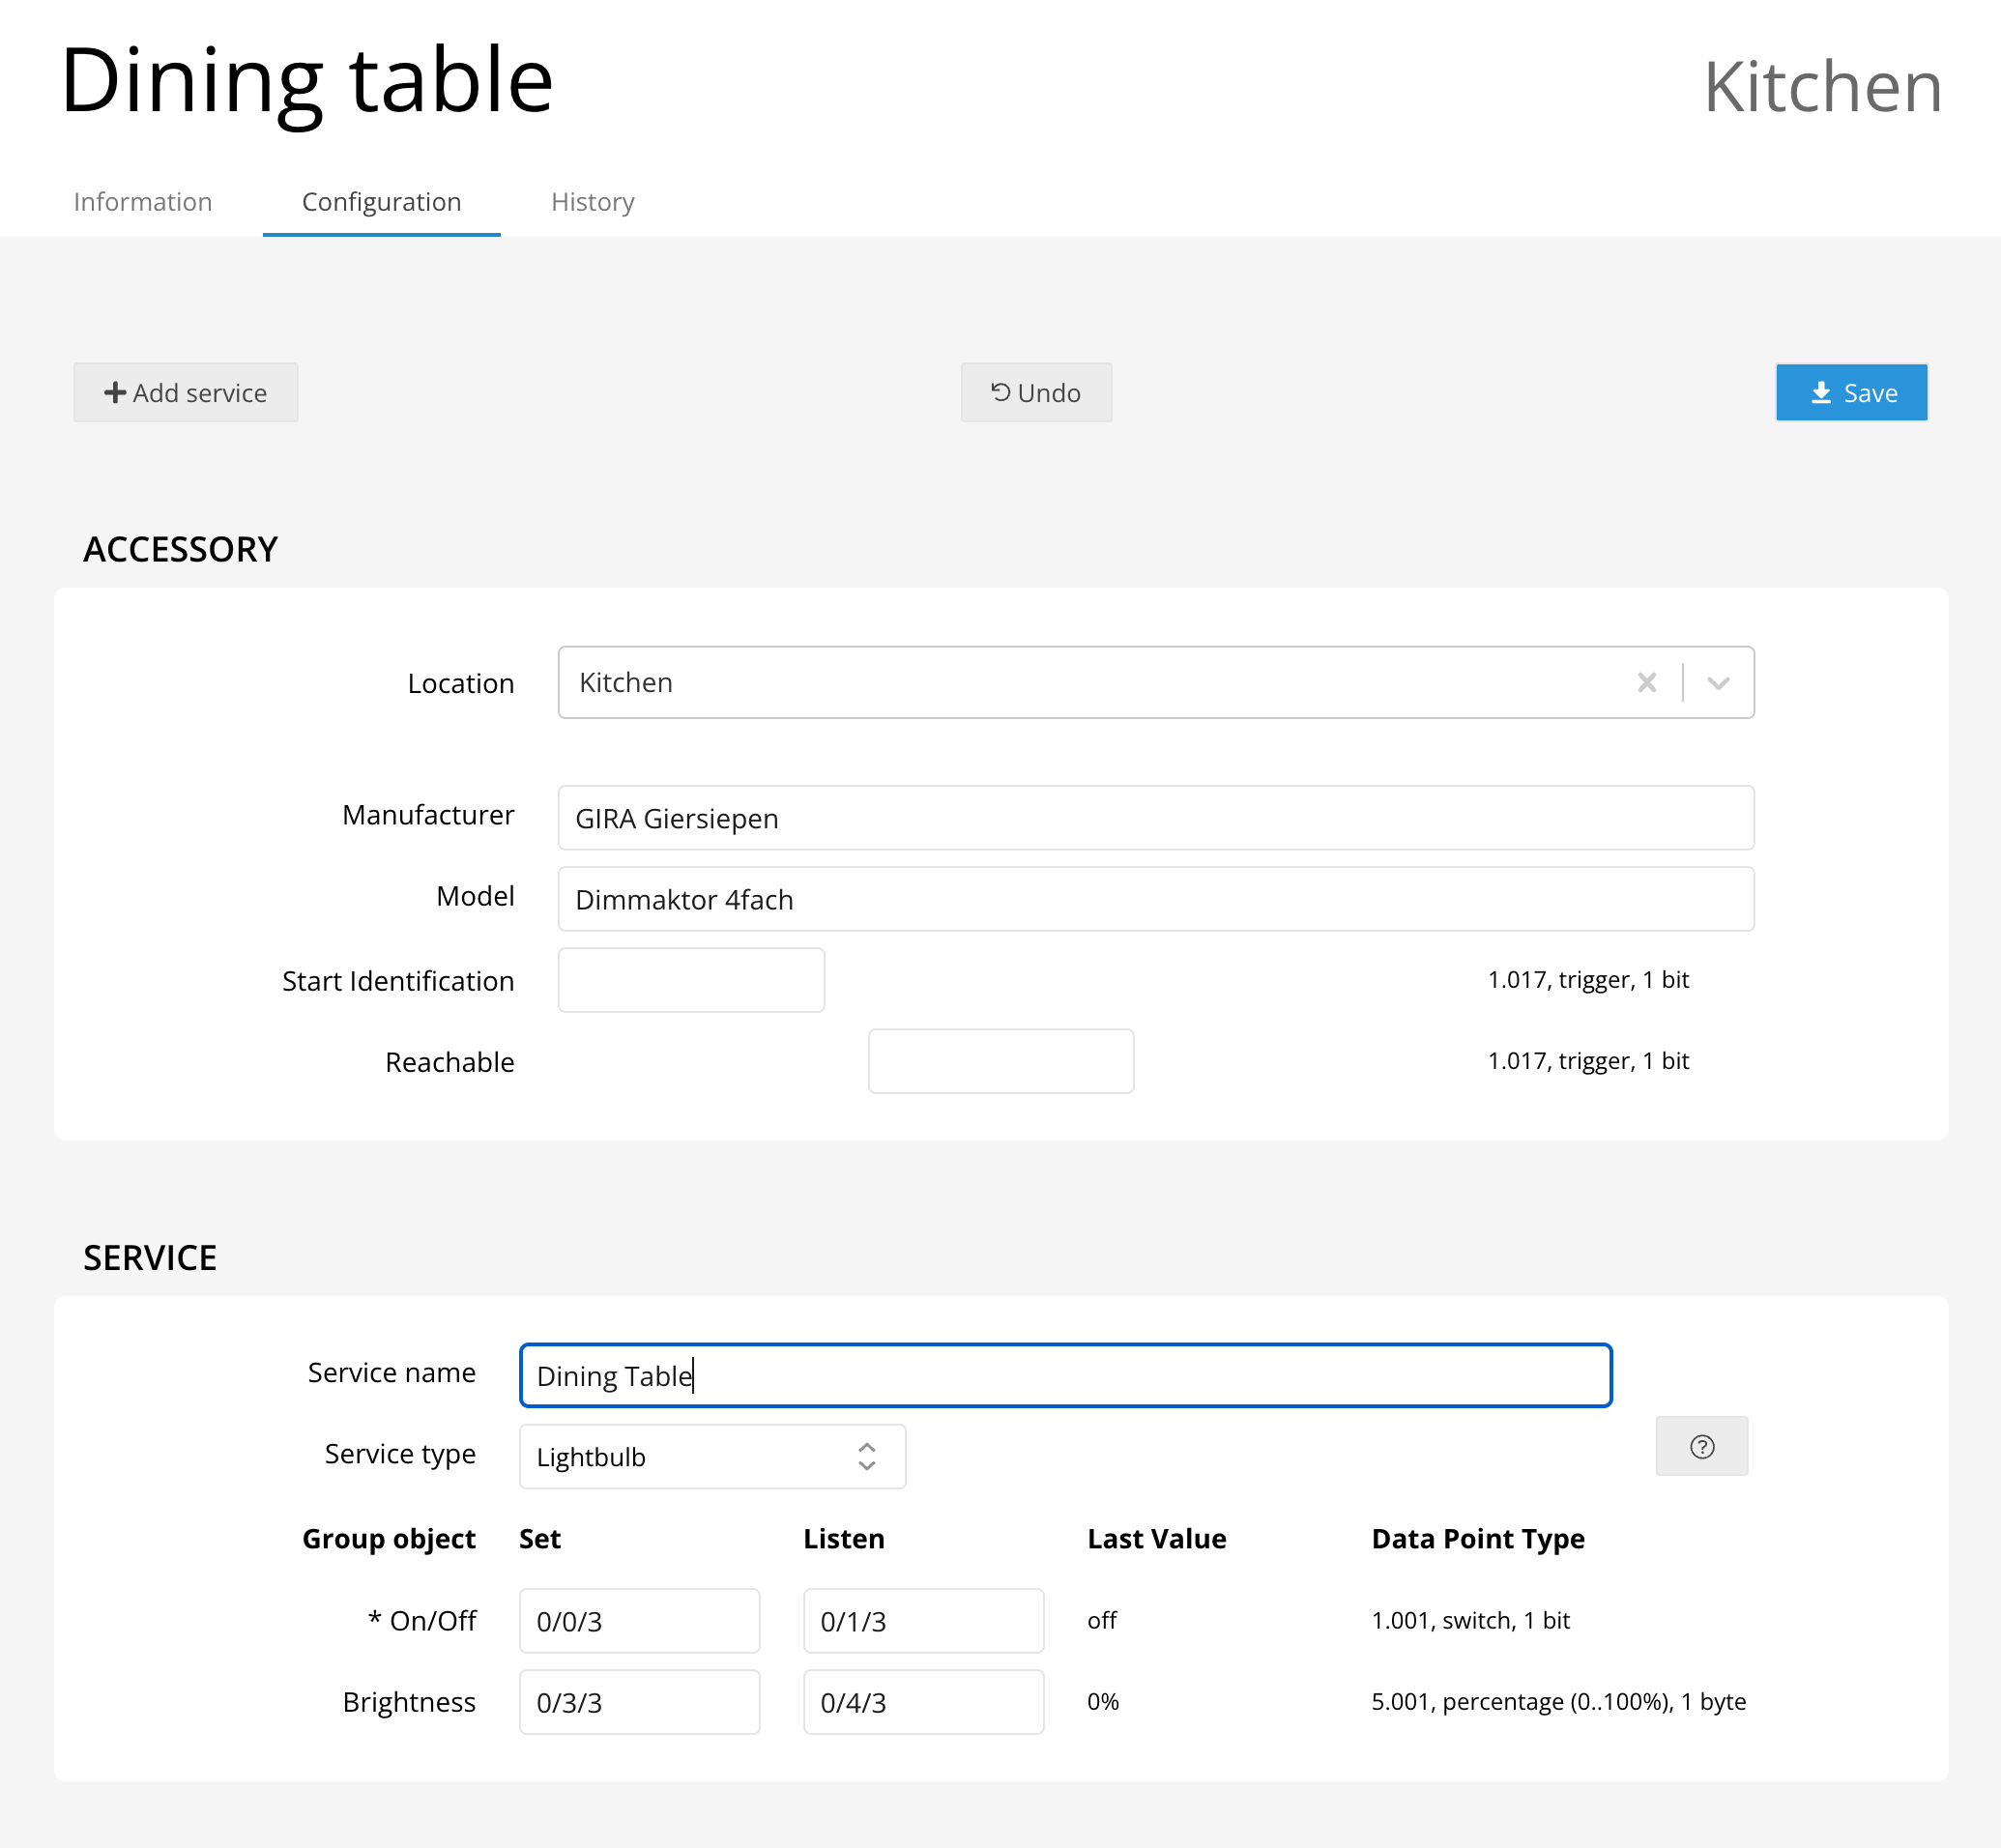
How Do I Configure My Lightbulb?
Regular Lightbulbs
Setting up a standard lightbulb for on/off switching or dimming is simple! Just follow these steps:
- Switching: Enter the group addresses for turning the light on or off and for reporting its status.
- Dimming (optional): Provide the group addresses for brightness control (0-100%). Only absolute dimming is supported.
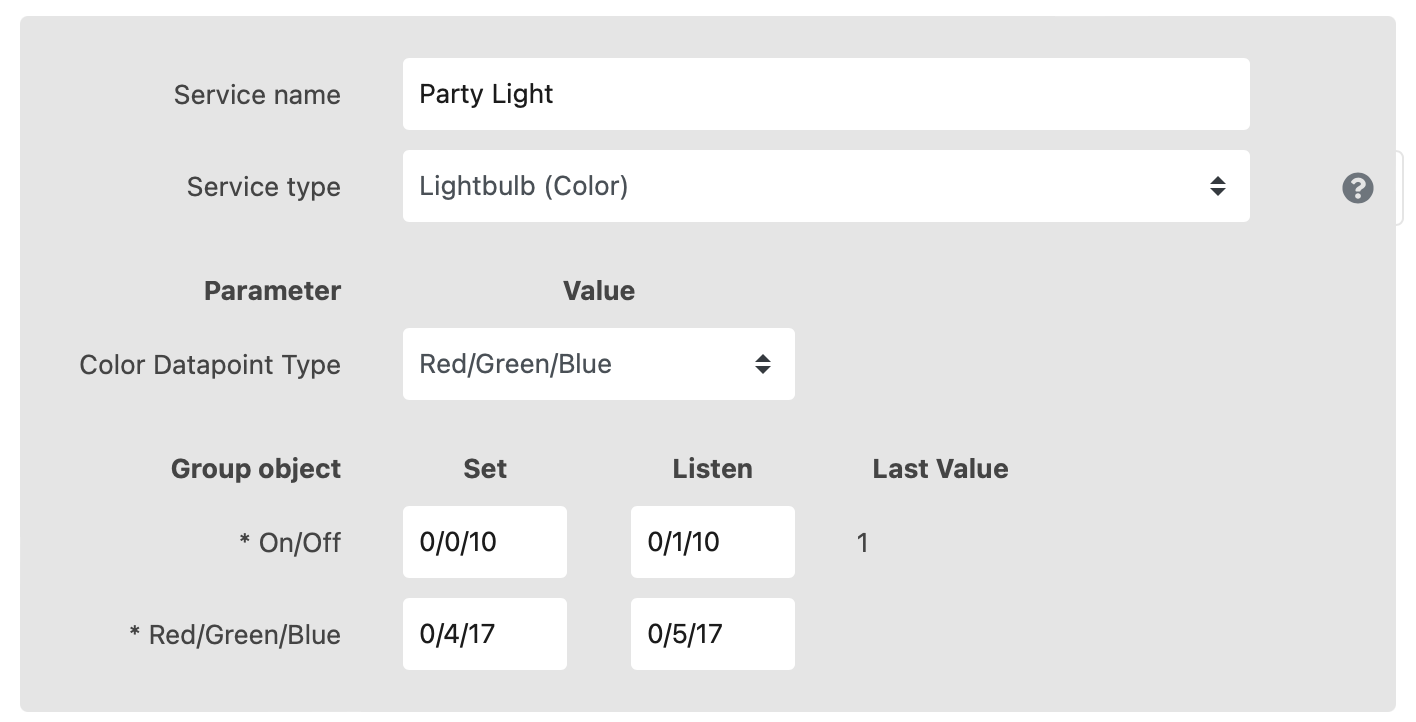
Color Lightbulbs
For color-changing bulbs, enjoy vibrant control over your lighting:
- Enter group addresses for switching and status reporting.
- Specify the color control datapoint type (e.g., RGB, HSB), and corresponding group addresses.
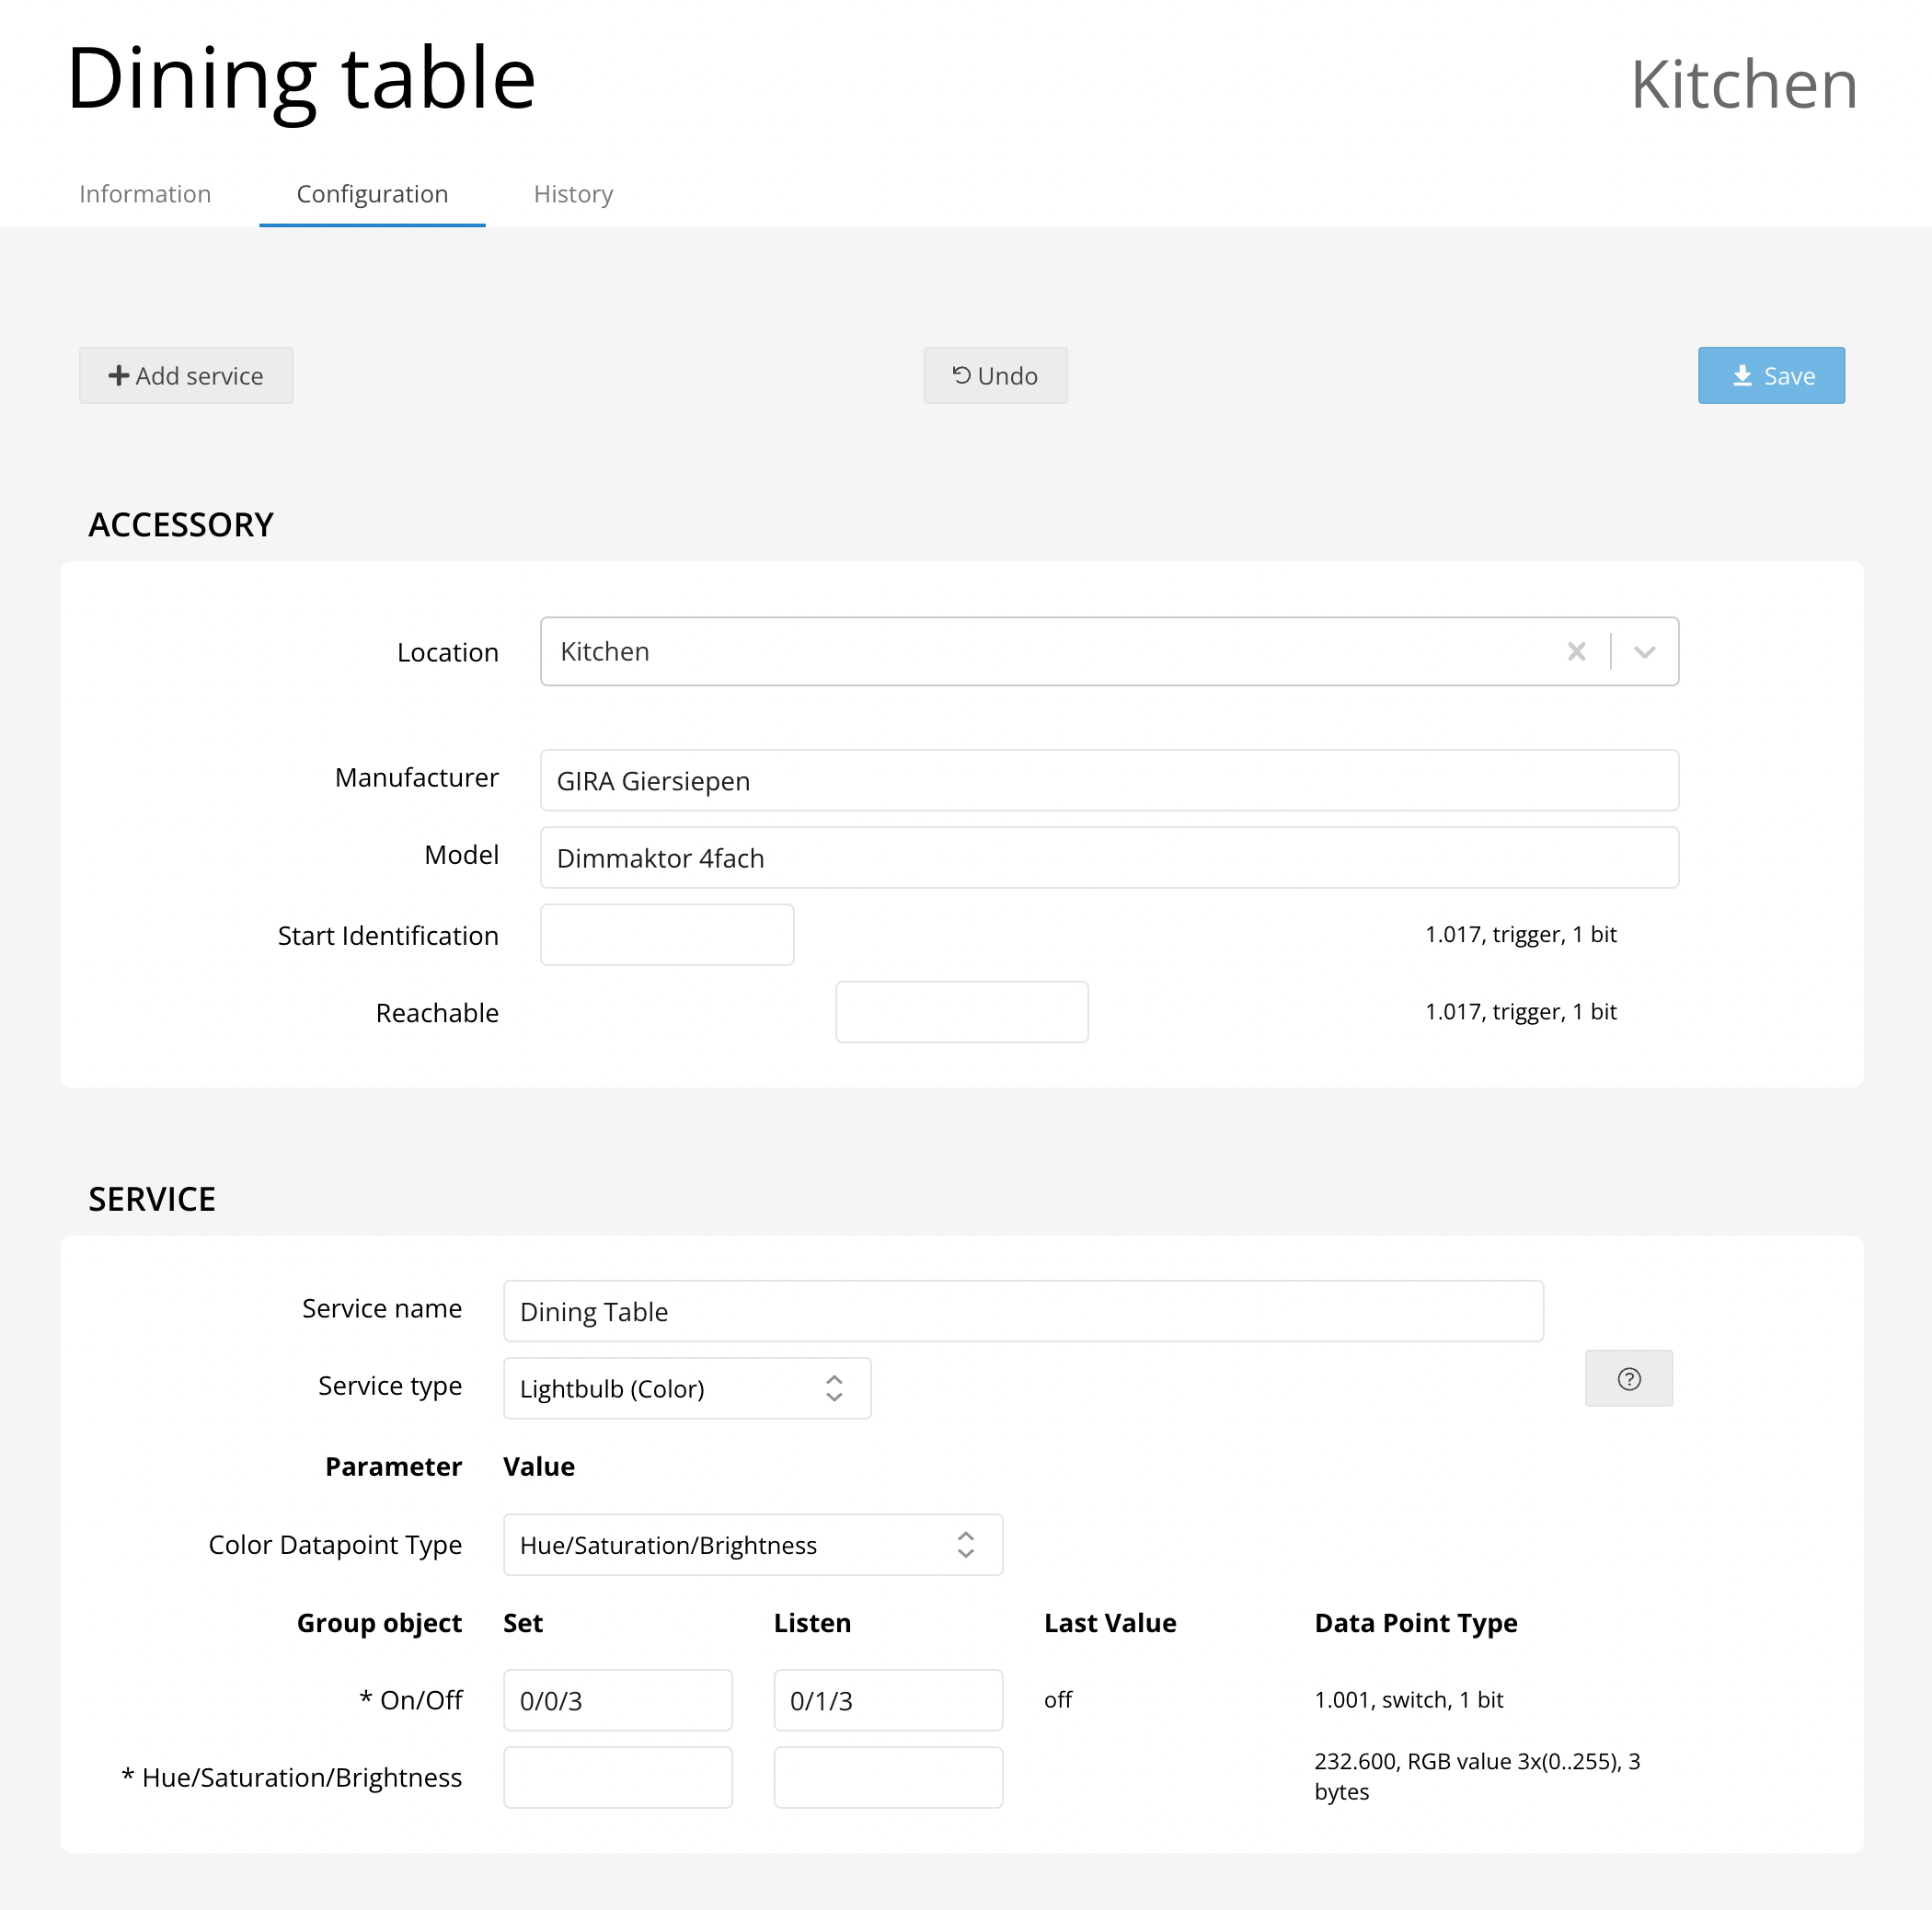
Choose the color datapoint that matches your device—like Red/Green/Blue or Hue/Saturation/Brightness.
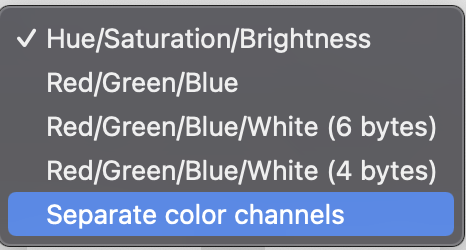
If your bulb supports a white channel, select Red/Green/Blue/White and provide group addresses for each channel.
Tunable White Lightbulbs
Get the perfect ambiance by adjusting color temperature:
- Provide group addresses for on/off, brightness, and color temperature control.
- Set minimum and maximum color temperature parameters to match your device.
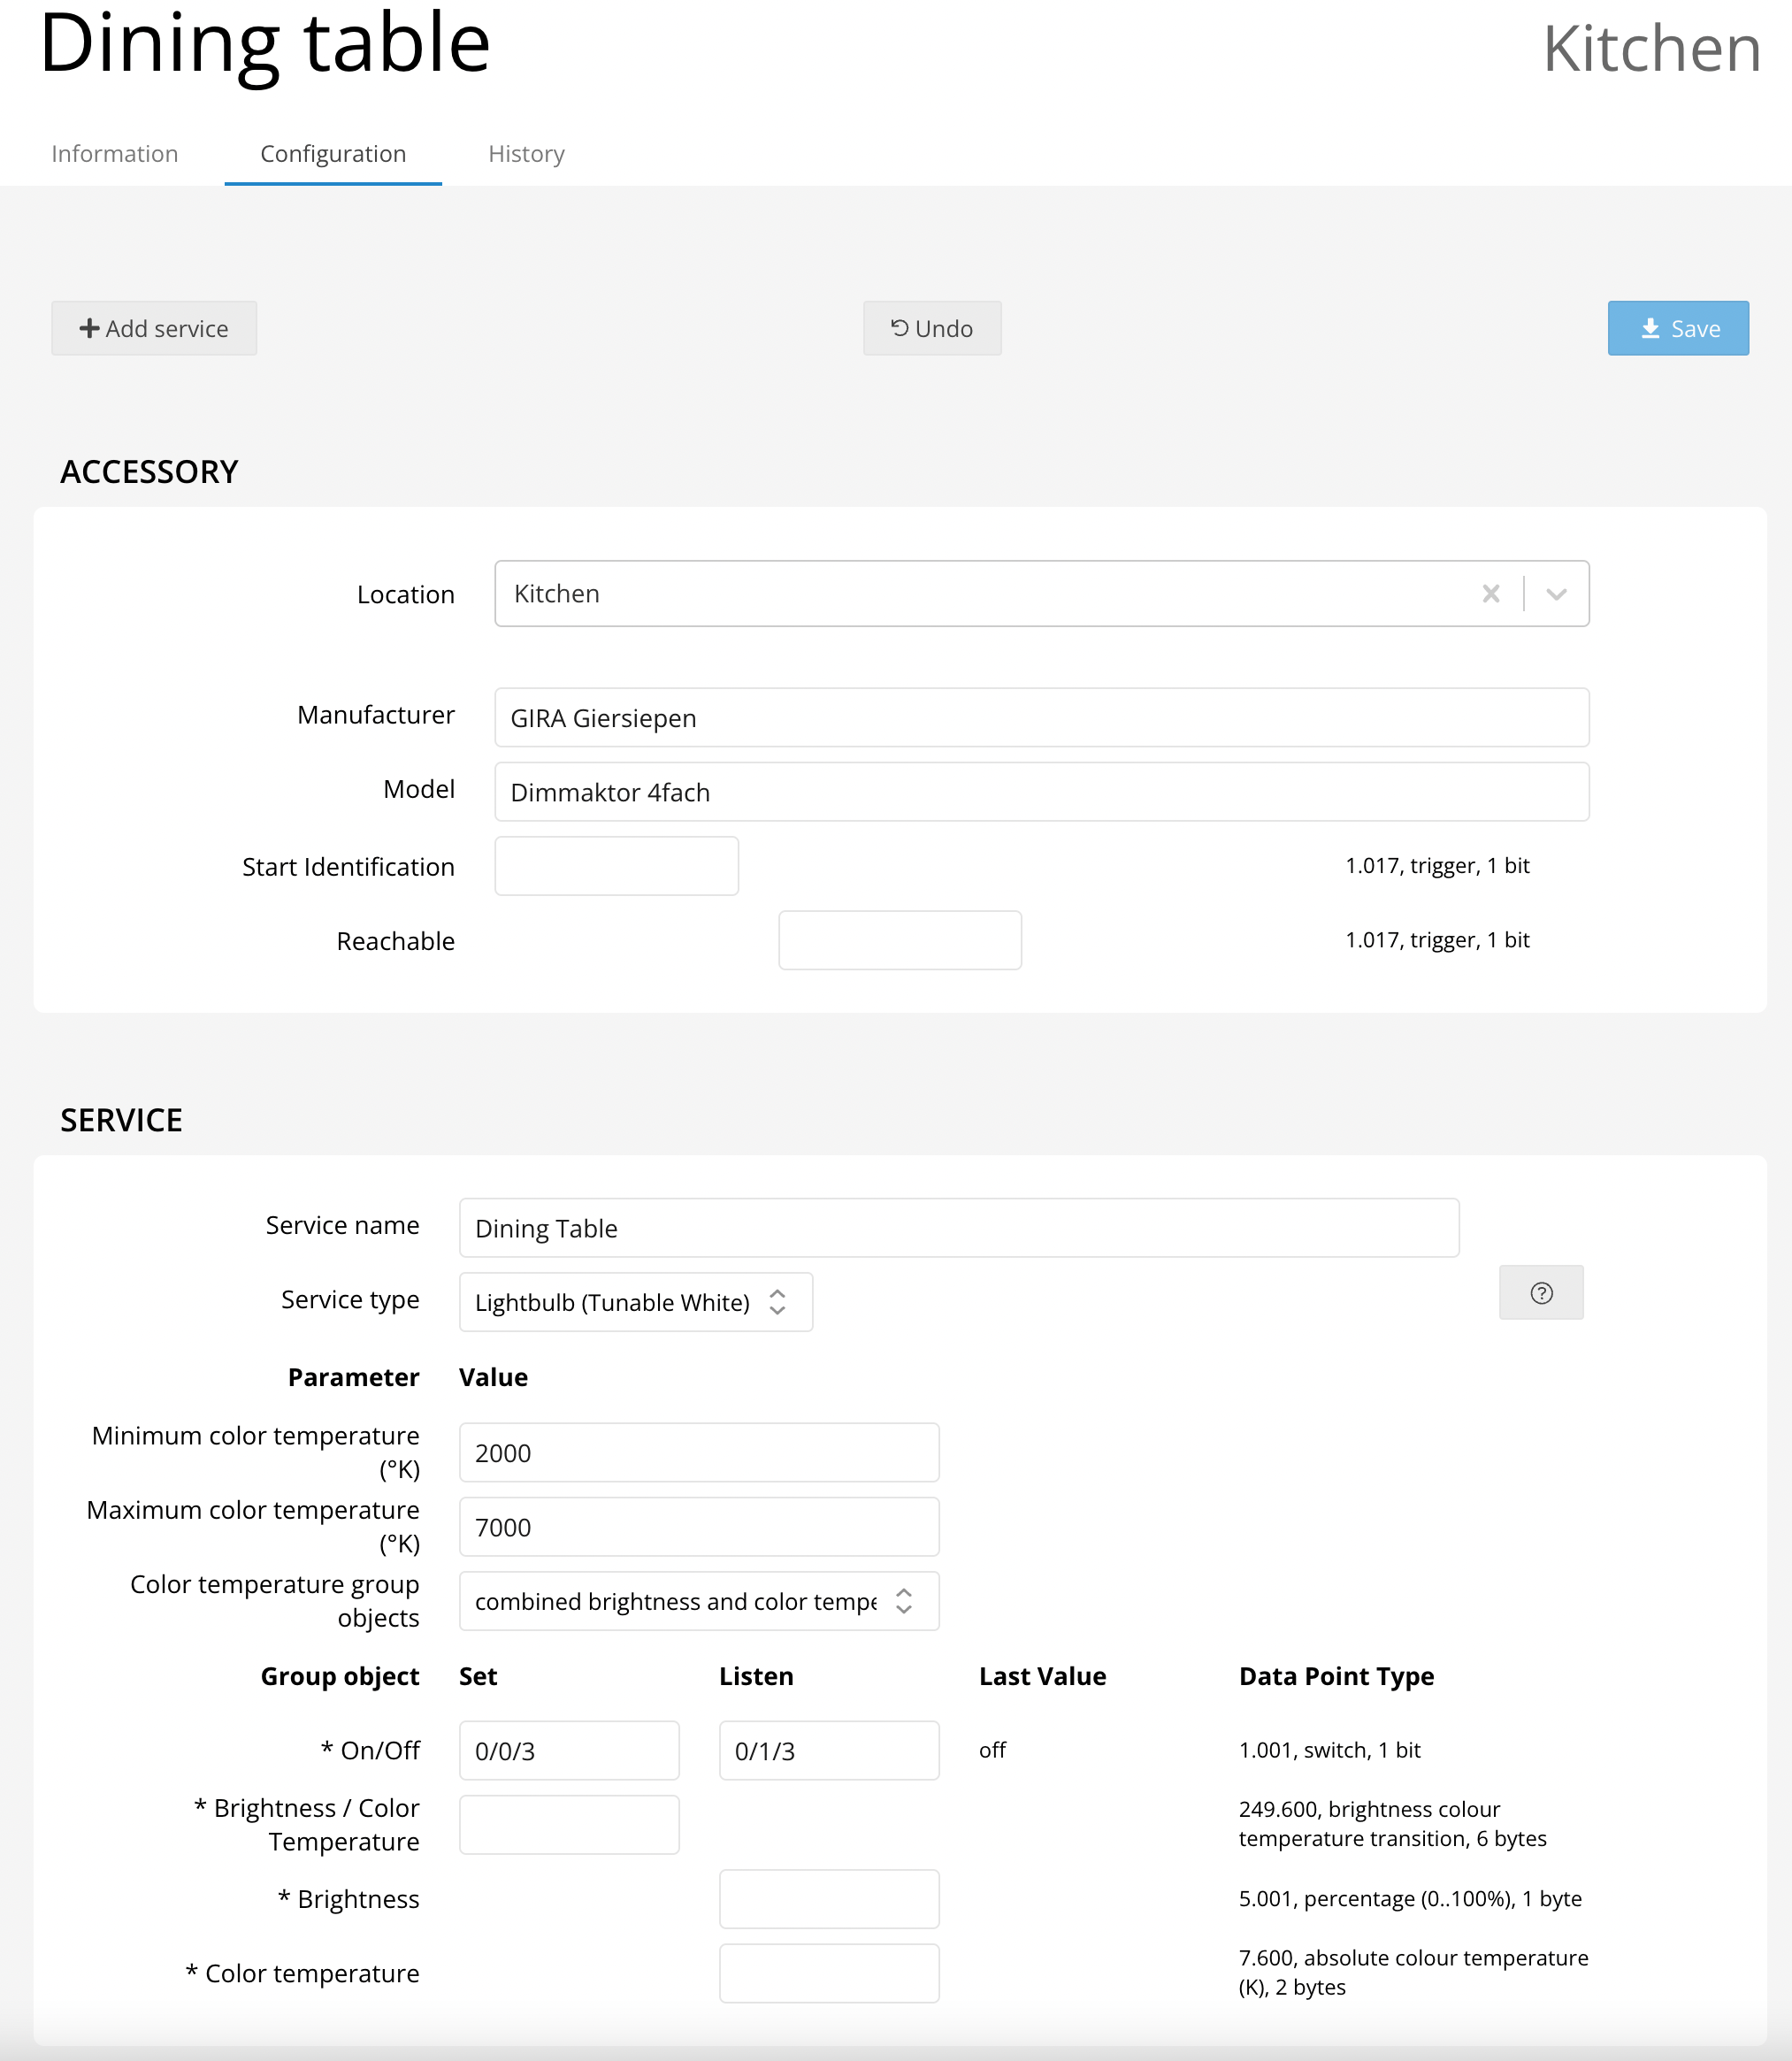
For advanced setup, choose the correct Color temperature group objects option, and fill in the corresponding group addresses for both brightness and color temperature.
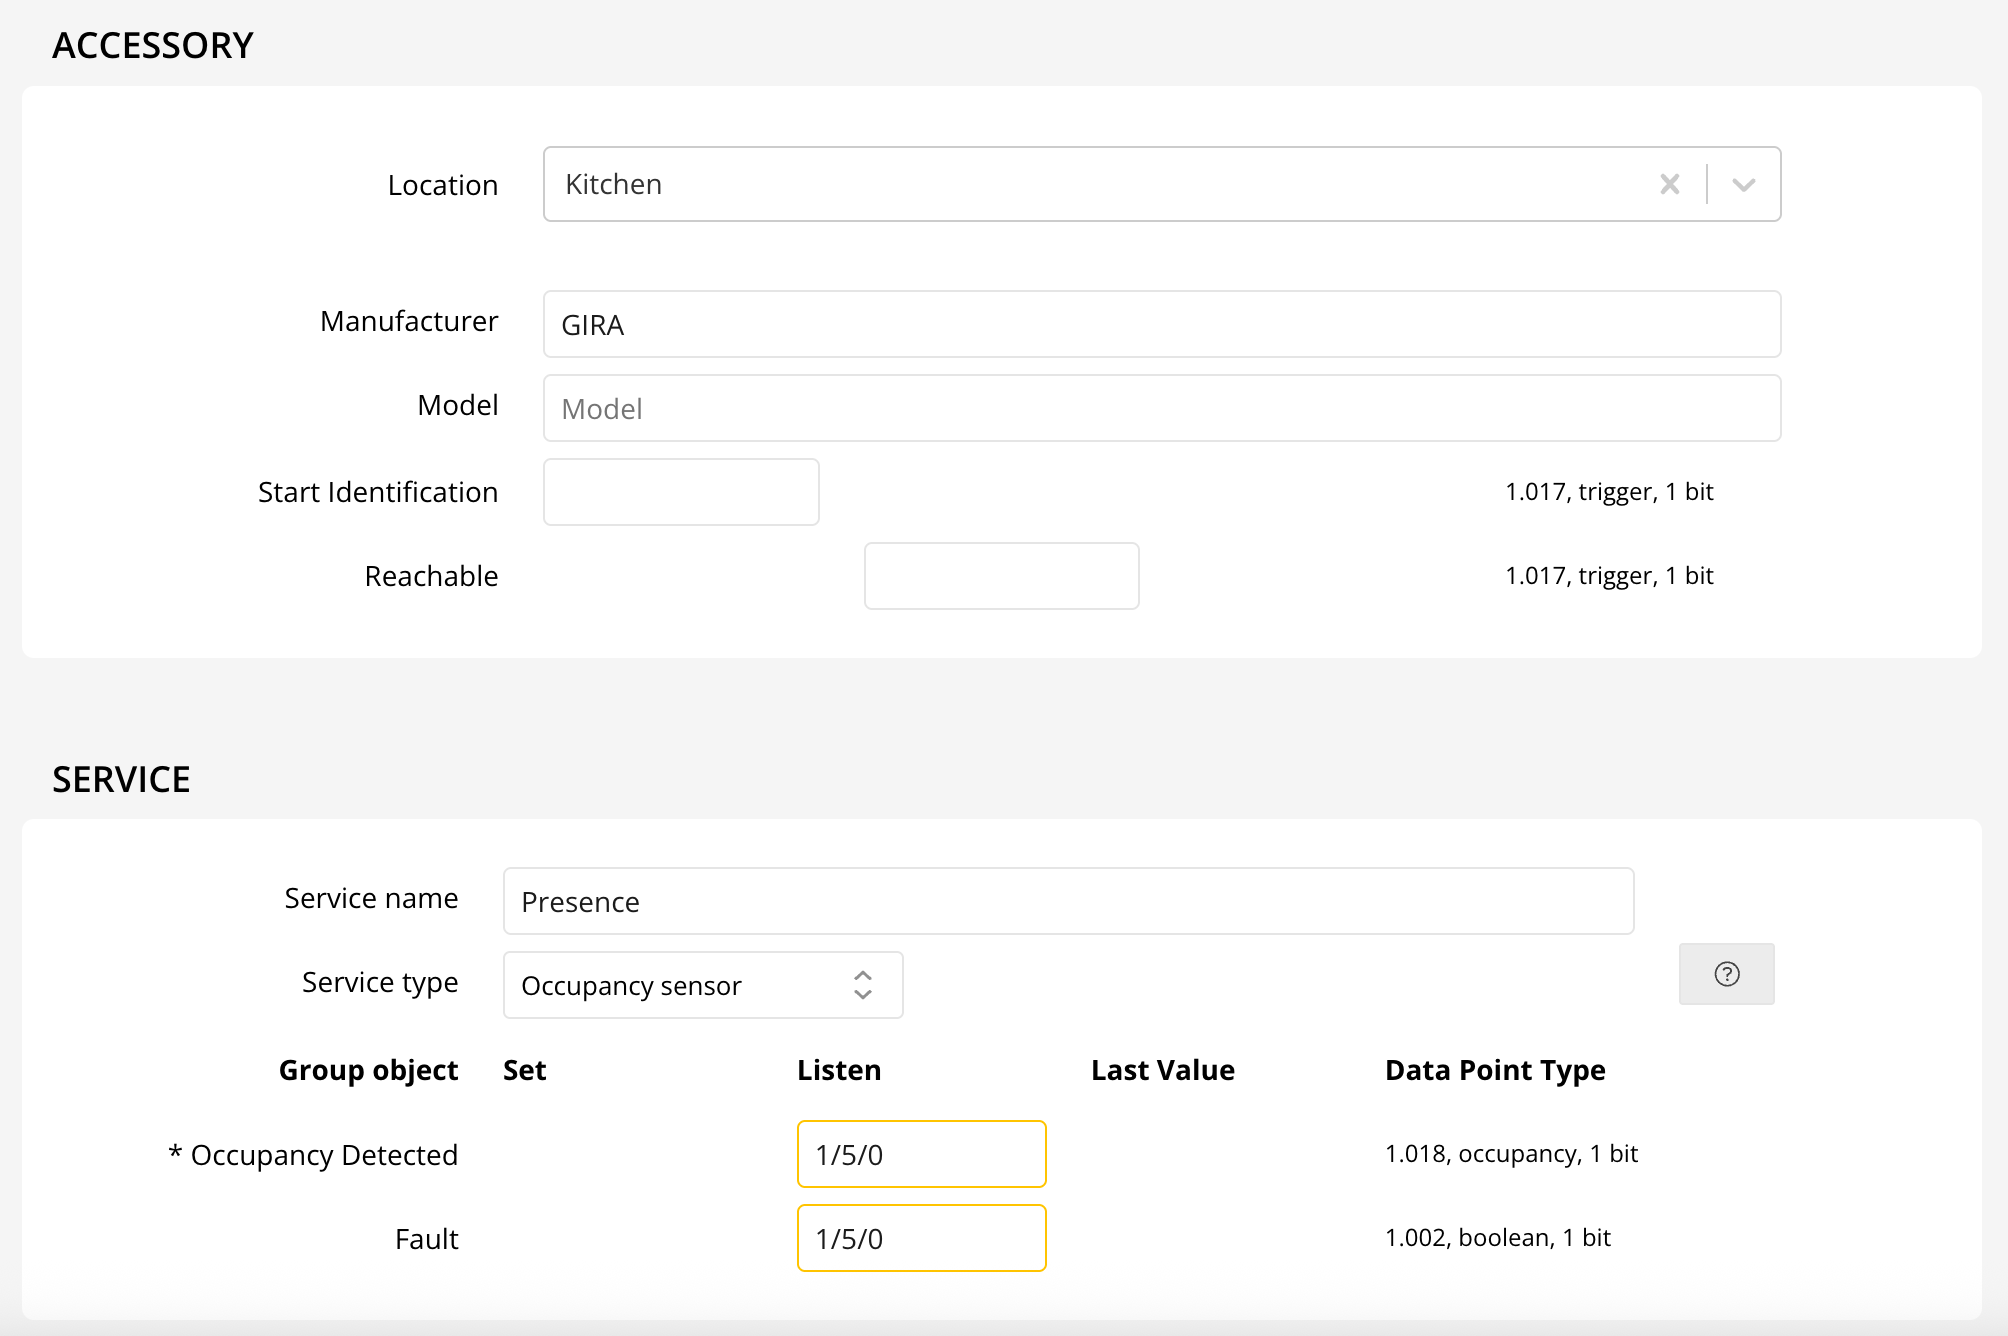
Use an Occupancy Sensor to detect presence in a room. Only one group address is needed. You can receive notifications when the sensor detects presence and create automations based on these notifications in the Home app. It can automatically turn on a light for example.
Note: This sensor is not available in Google.
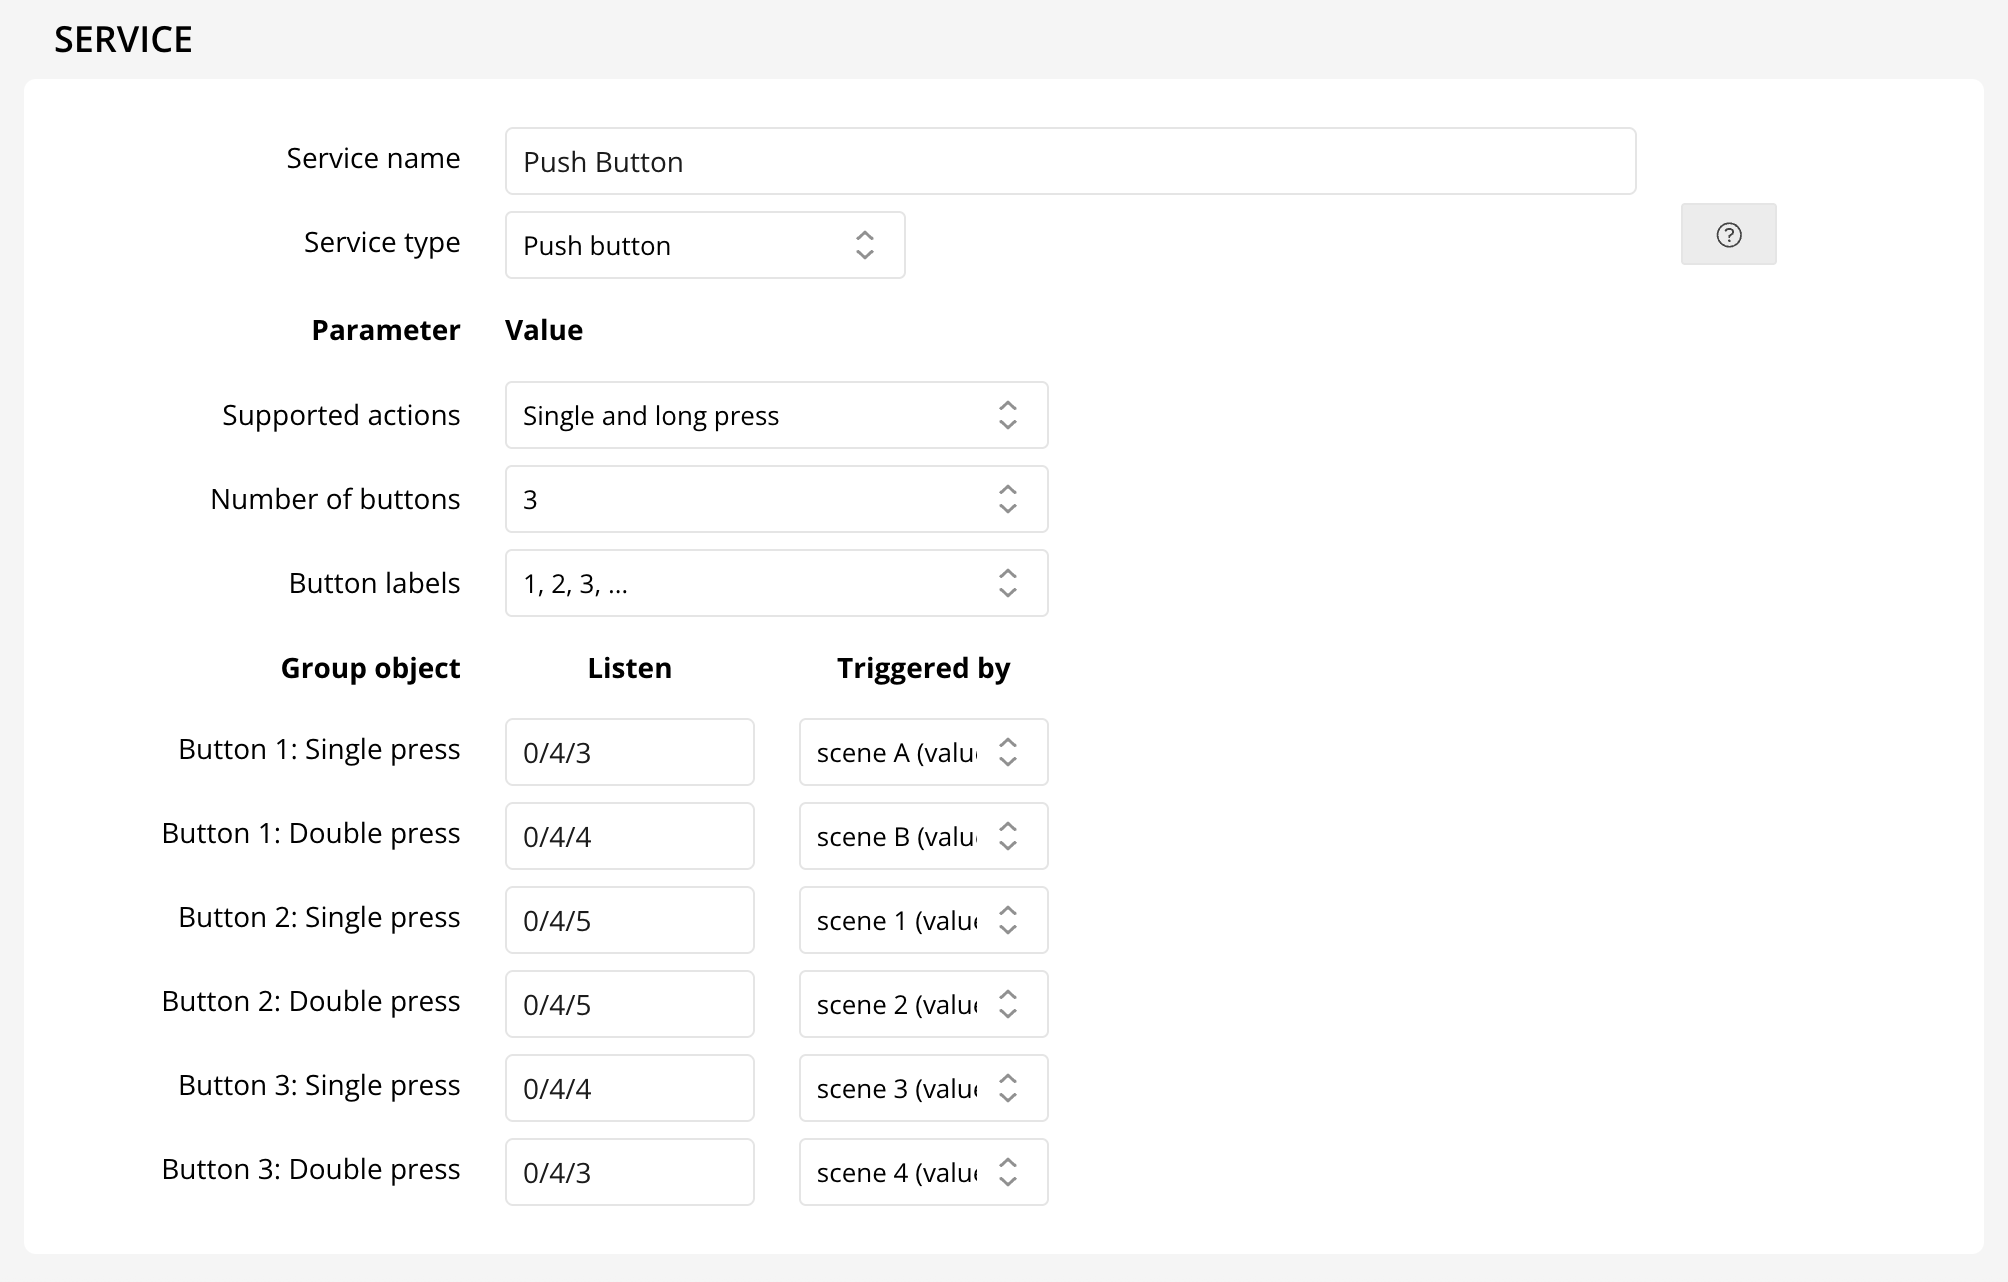
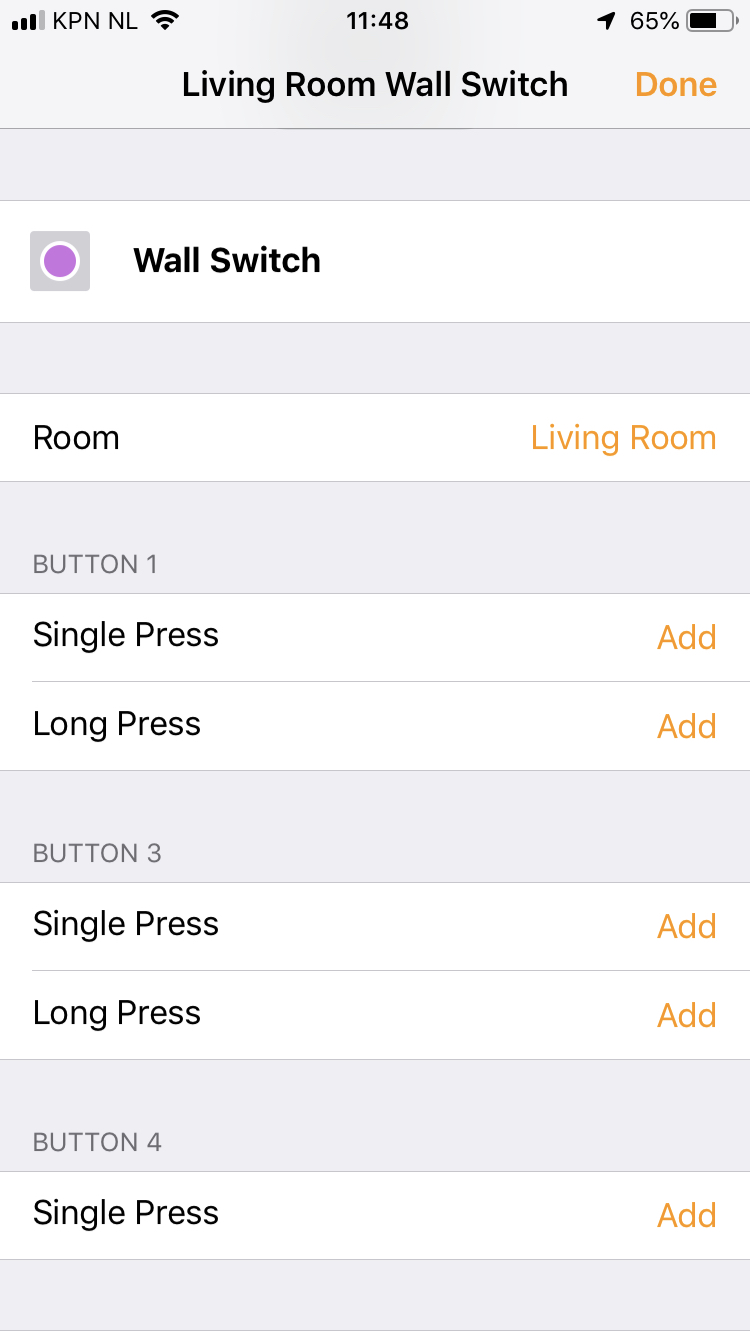
Push buttons allow you to trigger actions in HomeKit by pressing KNX buttons.
In ETS you need to configure your KNX push button device (taster) to send an activate scene number command to a group address when pressed. You can safely use the same group address for every button, as long as the scene numbers are different.
On your Thinka configure the Push Button service to match your KNX device:
- First select the number of buttons that are present on your KNX device.
- Then configure which button actions (short, long, and/or double press) your KNX device supports. For each button and action that should be visible in the Home app select the group address and scene number that matches the KNX push button. You can skip any buttons or actions that you do not need (for example, buttons that are already used to switch on a light or control a thermostat).
- You can set "Button labels" option how you want the labels to appear on the Apple Home.
After you've saved the Thinka configuration you can open the Home app and configure each button with accessories or HomeKit scenes.
Note that if you wish to integrate activate or extend existing KNX scenes with Thinka you should use the Scene service type instead.
Note: This sensor is not available in Alexa and Google.
How to Easily Configure Your KNX Scenes with Thinka
Unlock seamless smart home control by configuring your KNX scenes with Thinka! Setting up is simple:
- Assign Your Scene Group Address: Enter the group address and scene numbers for each scene you want to control.
- Optional Off Scene: Add a second scene number to define an "Off" scene for even greater flexibility.
Once configured, your scenes become instantly available across your favorite smart platforms:
- Alexa, Google, and Olisto: Access your scenes directly as Scenes for voice or app activation.
- Apple HomeKit: Scenes appear as Switches. Turning the switch On triggers your On scene, while switching Off (if set) activates your Off scene.
For KNX Scene A/B (DPT 1.022) devices, Thinka maps Scene A to "On" and Scene B to "Off"—making smart integration effortless.
Enhance your KNX scenes with extra HomeKit automations by adding actions in the Apple Home app. Simply go to Automations, create a trigger for your scene switch, and choose the devices you want to control—all activated by Siri, the Home app, or KNX!

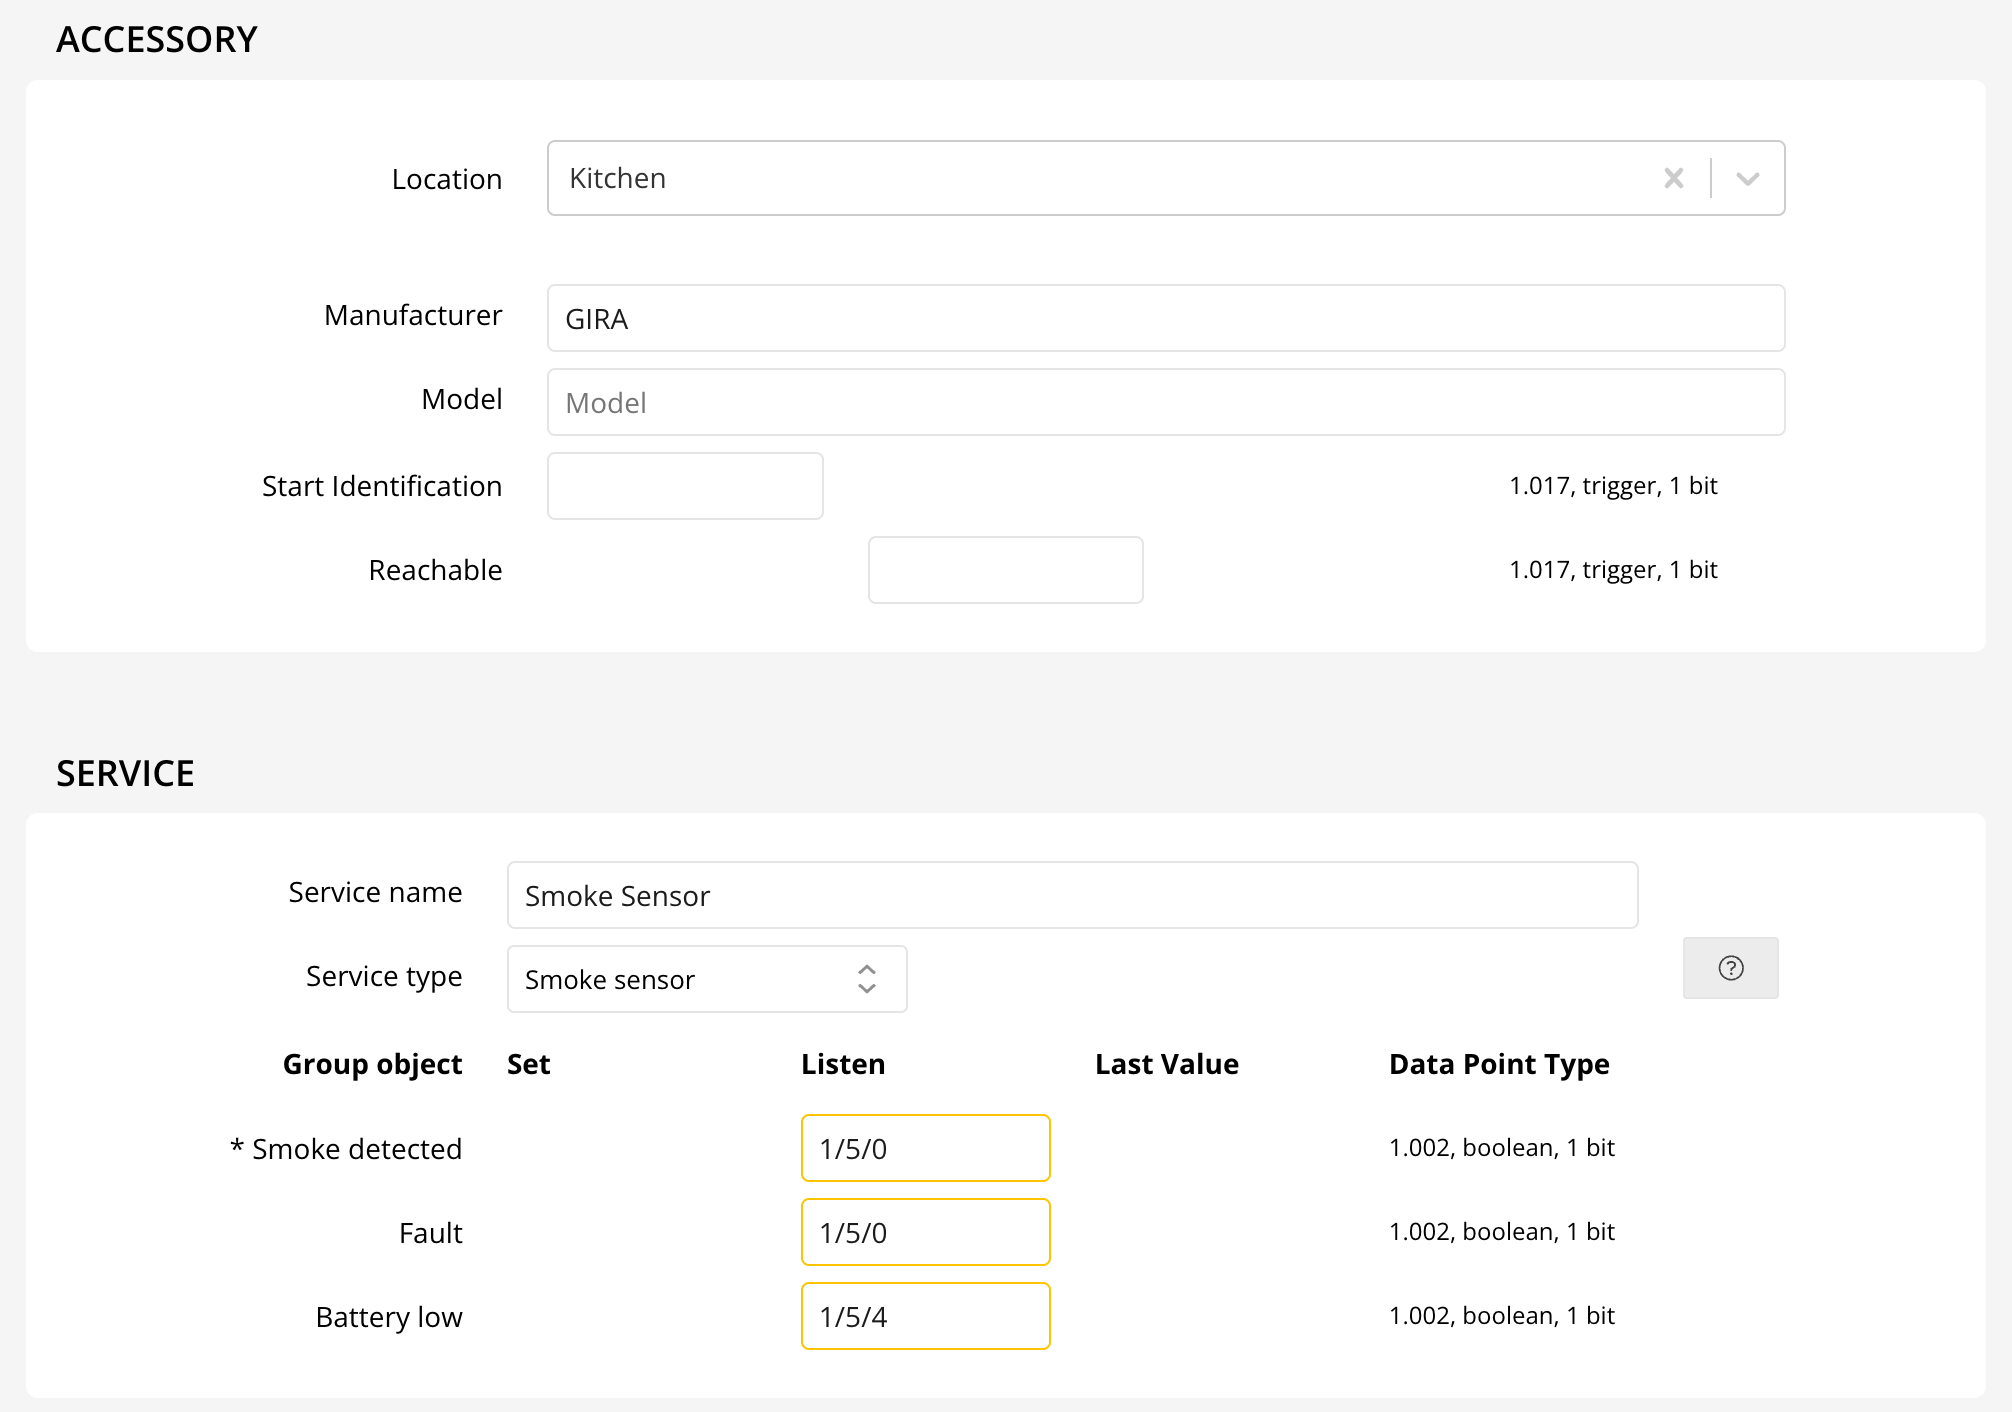
How Do I Configure My Smoke Sensor?
Setting up your smoke sensor is easy and essential for home safety. The smoke sensor is designed to swiftly detect smoke or fire and alert you immediately, helping protect your loved ones and property.
- Configure a Group Address: Assign a single group address to the sensor. This address will be used to indicate an alarm trigger.
- Get Instant Notifications: Once configured, you’ll receive real-time alerts on your phone whenever smoke or fire is detected.
- Create Smart Automations: Easily set up automations in your Home app. For example, you can program all your lights to turn on automatically if smoke is detected, ensuring quick visibility during emergencies.
Note: This smoke sensor is currently not available with Alexa, but Google Home integration is available for Beta users.
How Do I Configure My Switch?
Configuring your switch with KNX is simple and efficient. Switches allow you to control various devices—turning them on or off—making them perfect for appliances other than lightbulbs.
- Assign Two KNX Addresses: Each switch requires two separate KNX addresses:
- Status (Listen): Monitors whether the device is currently on or off.
- Switching (Set): Controls the action to turn your device on or off.
- Flexible Control: Use switches for any compatible device, from fans to heaters and more.
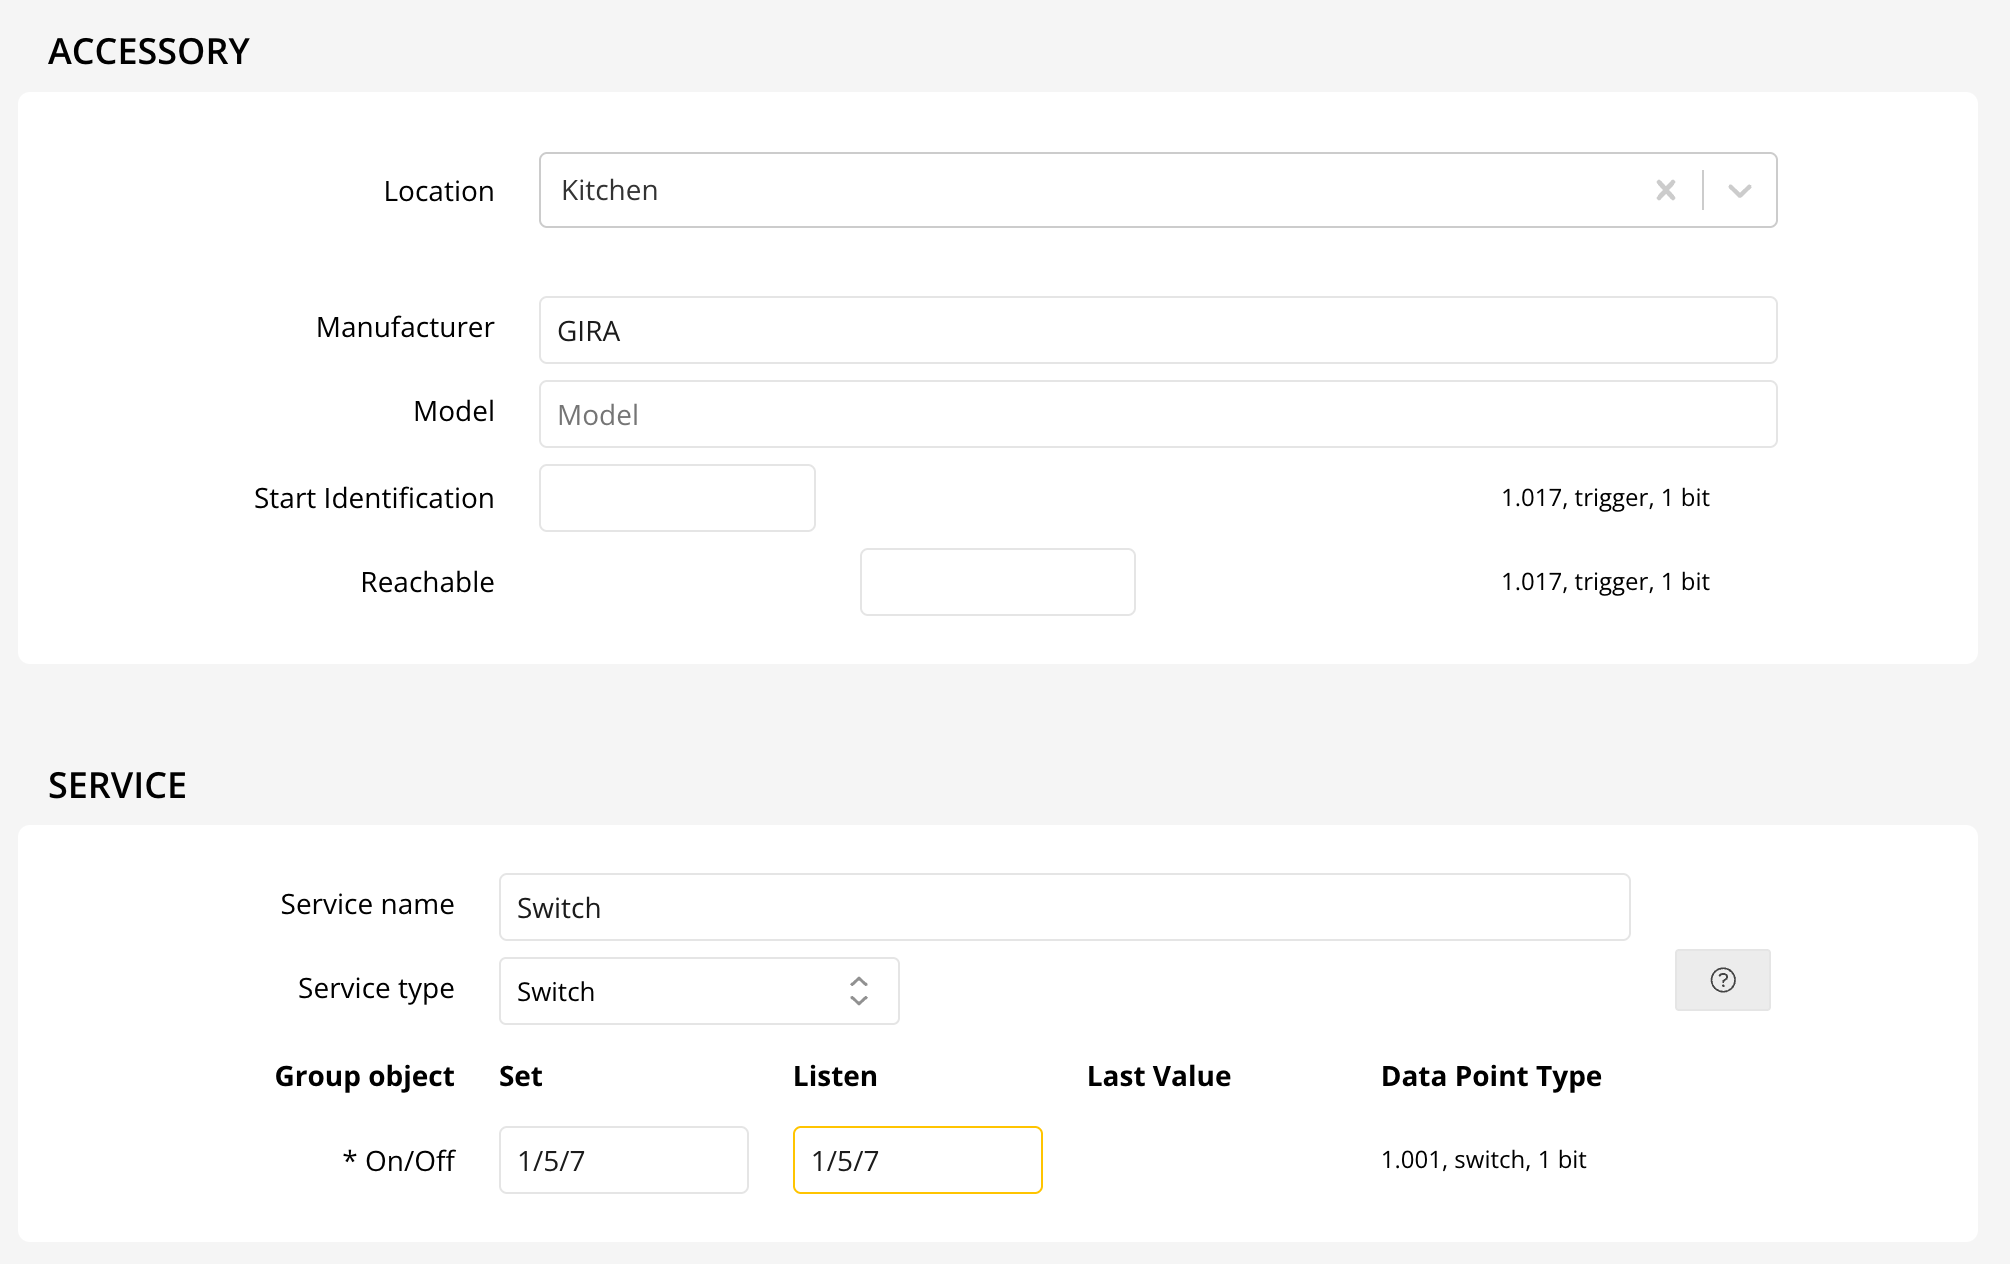
Looking to control a socket? Consider using an Outlet configuration for hassle-free socket management.
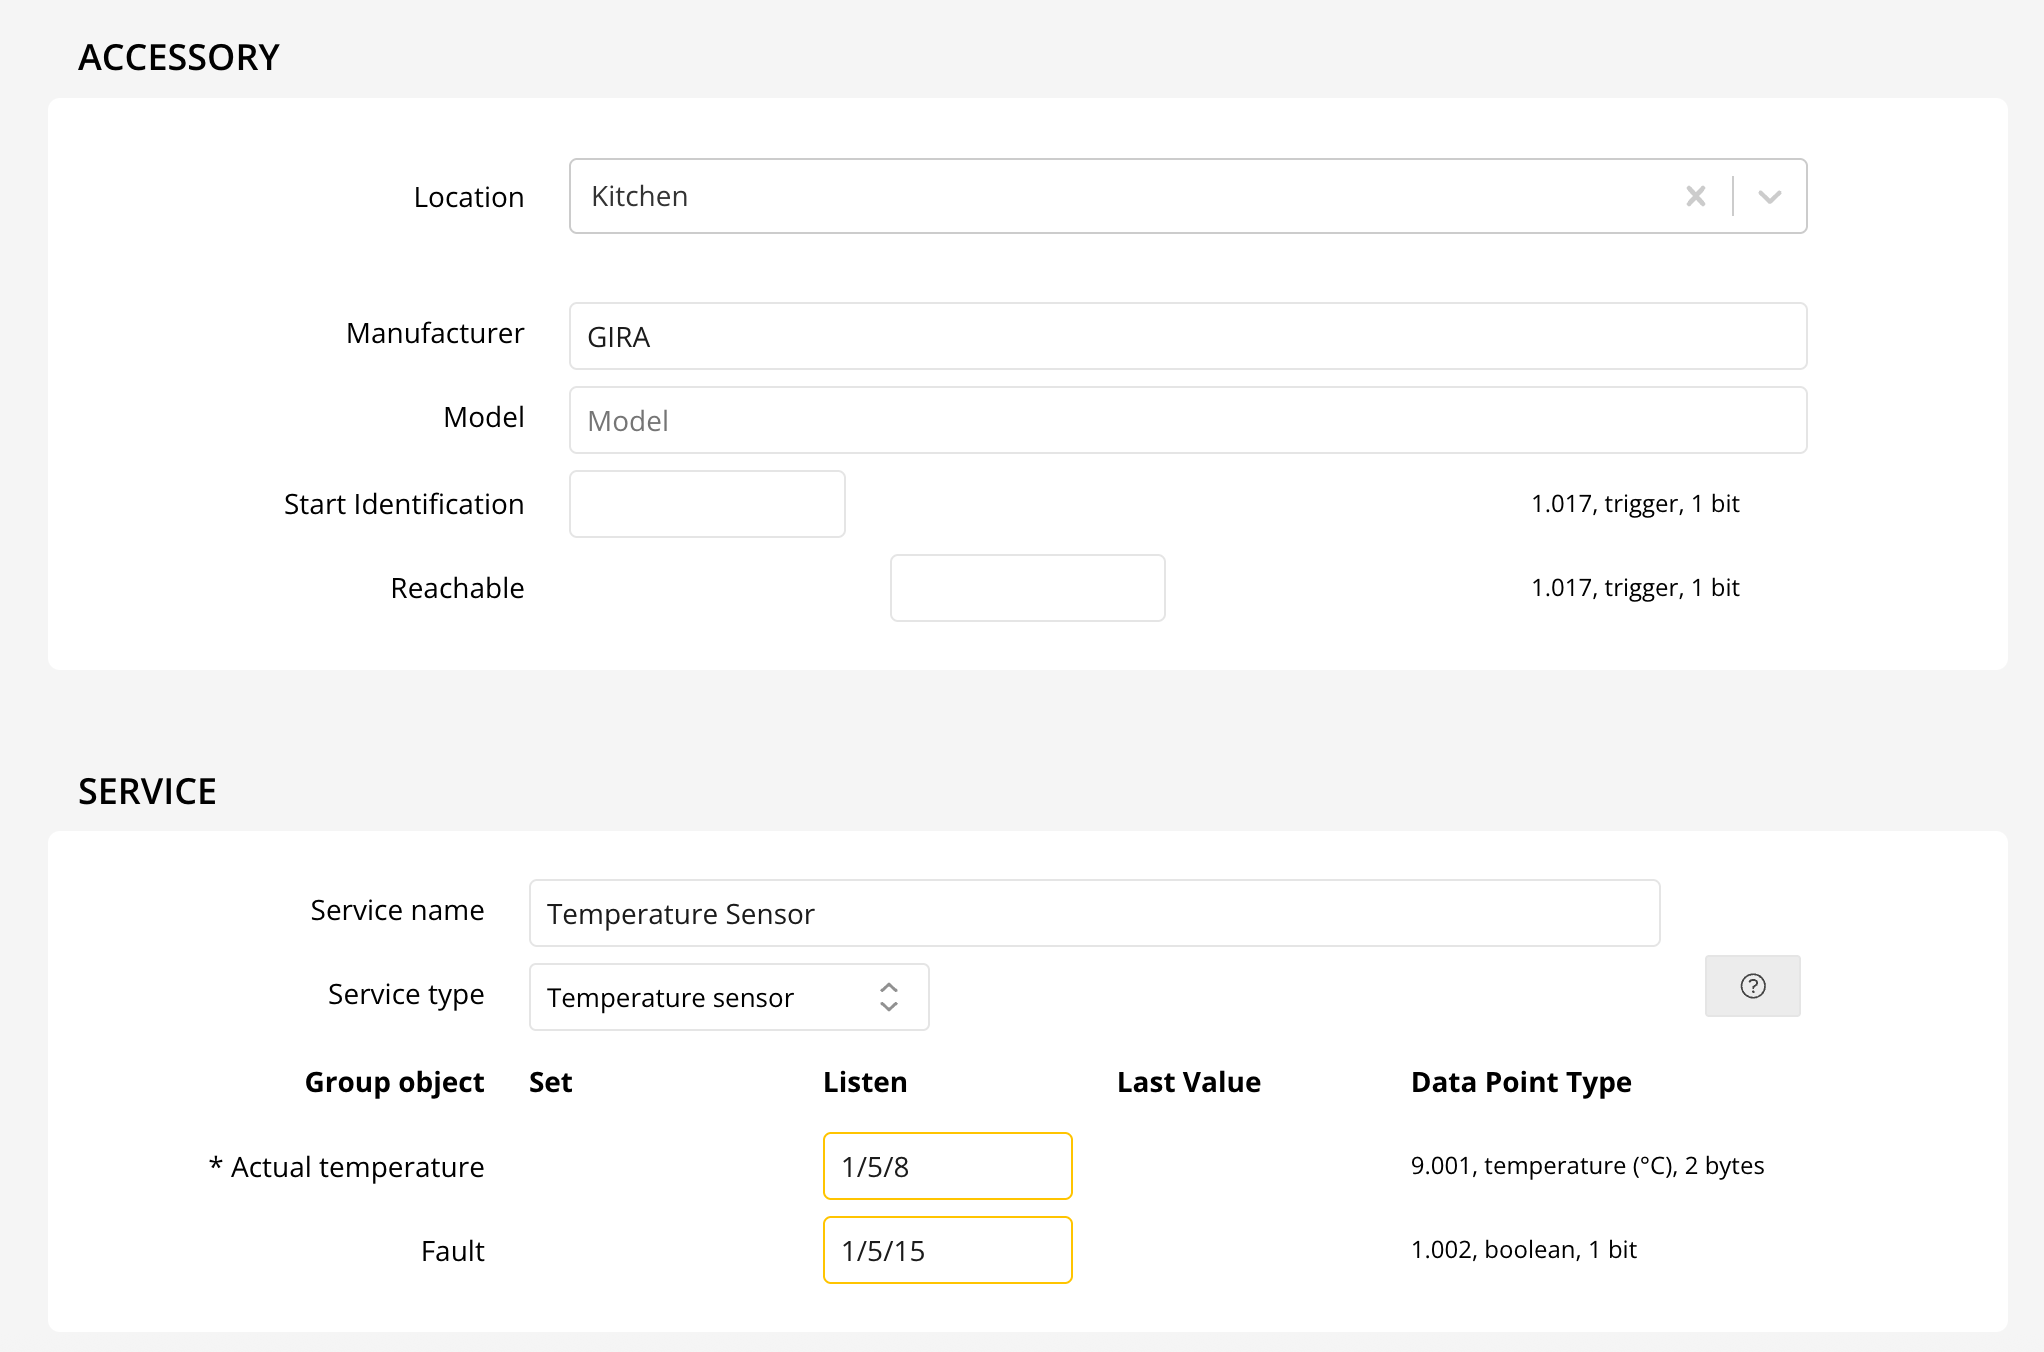
The current temperature can be displayed in the Apple Home, Google and Alexa. One group address needs to be configured. Useful for standalone temperature sensors, outside temperature sensors, or weather stations.
When you can also control the temperature with the device, use a Thermostat instead of a Temperature Sensor.
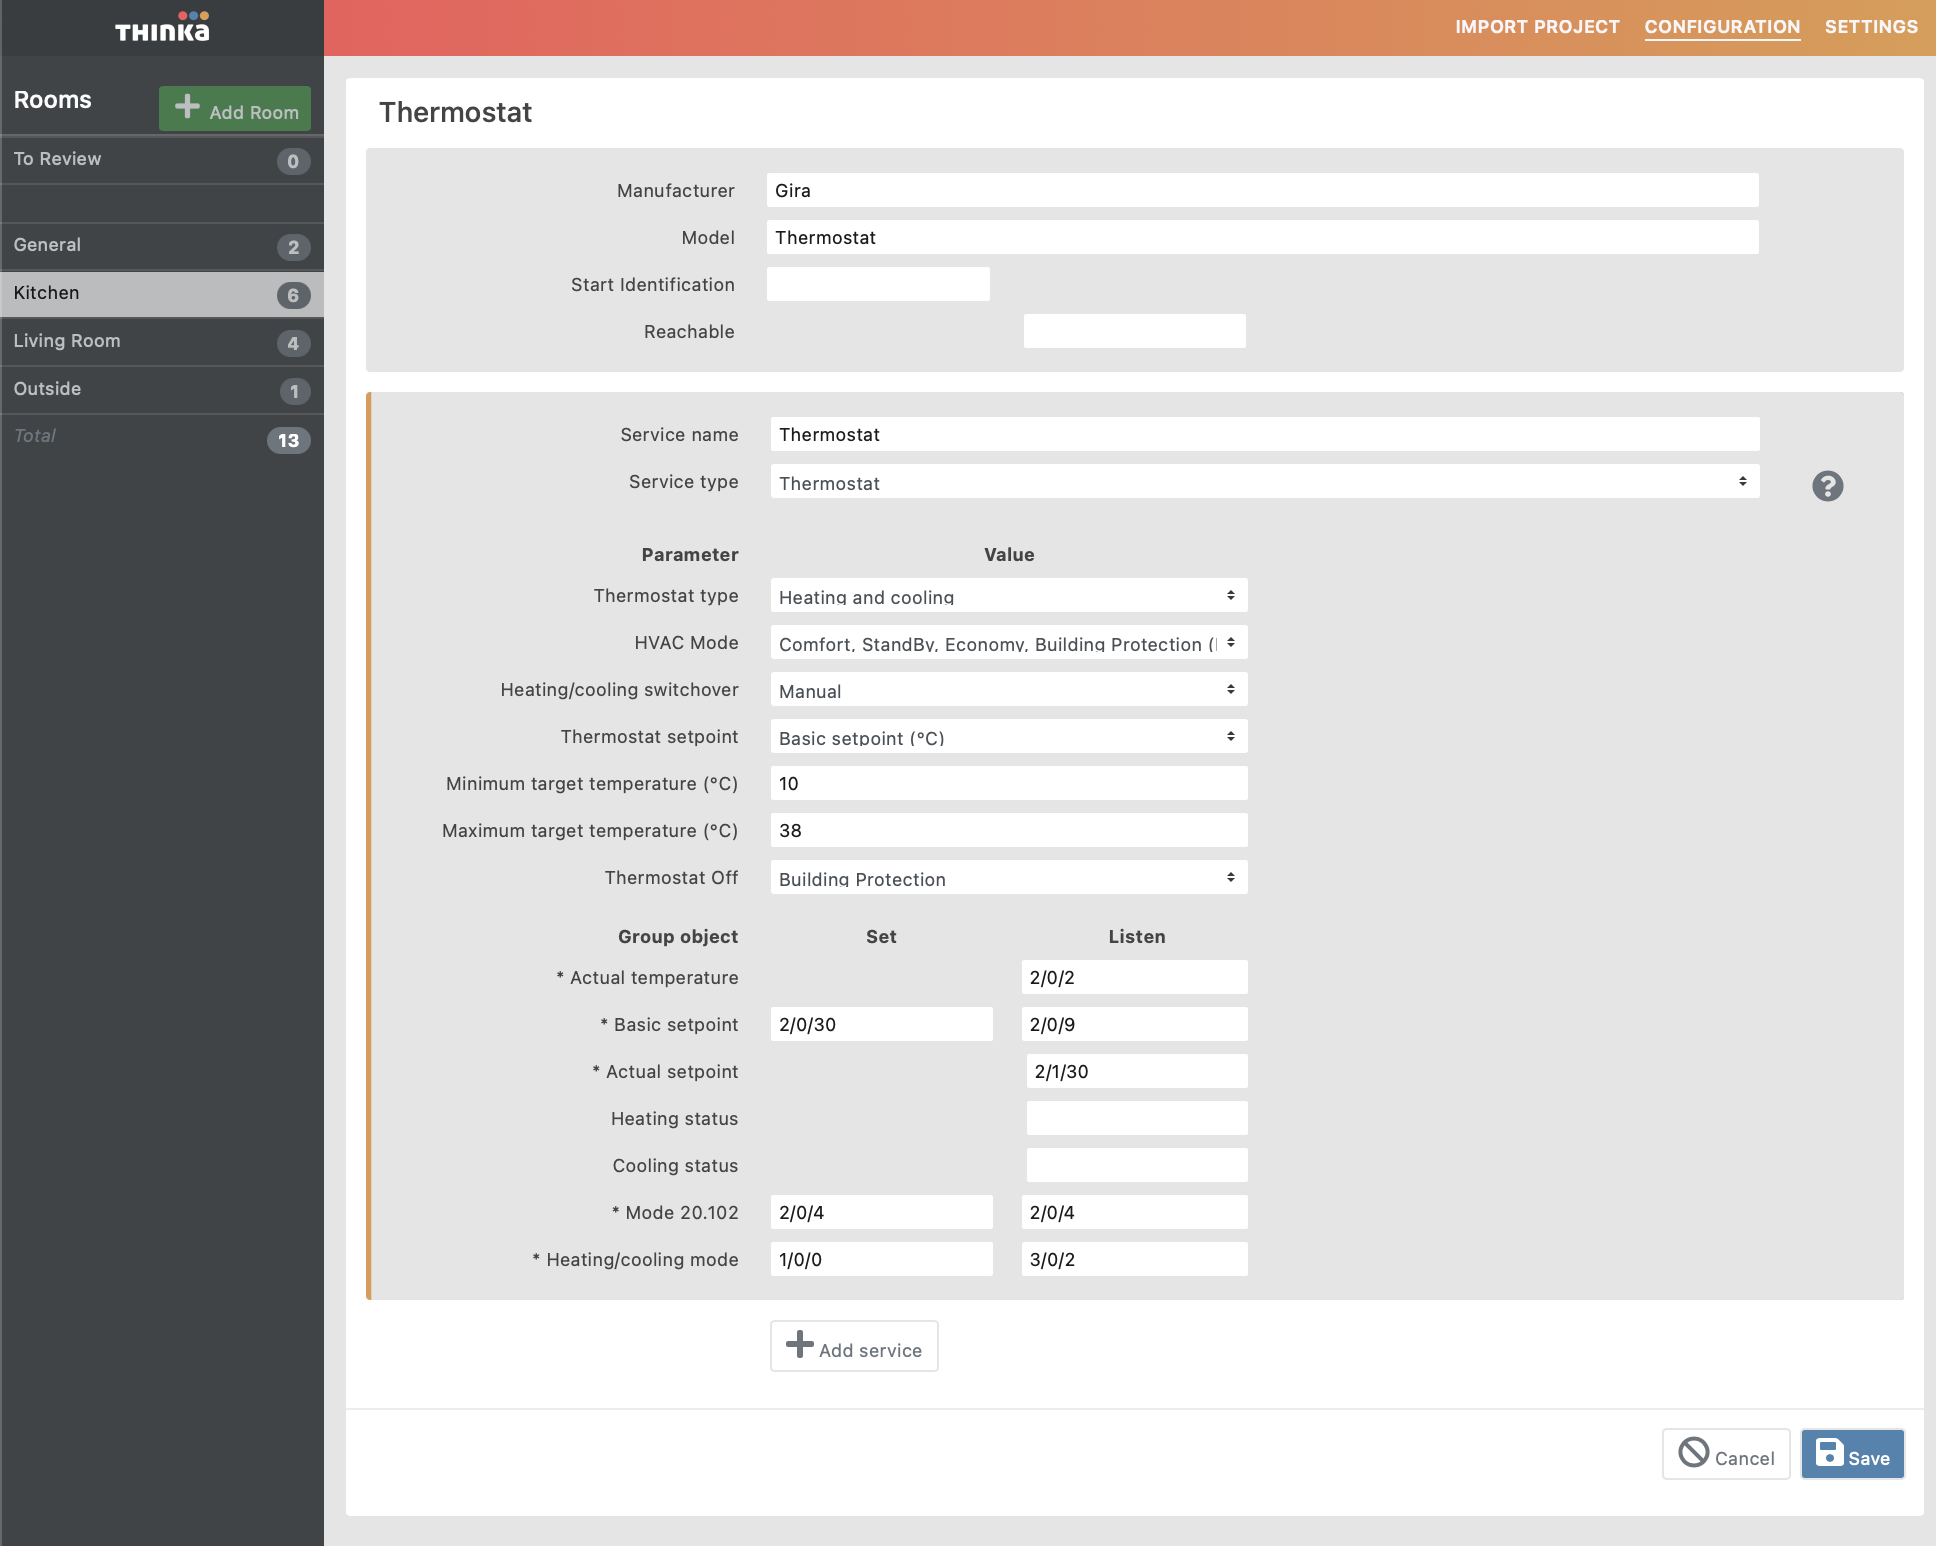
How Do I Configure My Thermostat?
Setting up your thermostat is simple and gives you full control over your home's comfort. Follow these easy steps to configure your thermostat for heating, cooling, or both:
- Select Thermostat Type: Choose between heating, cooling, or heating and cooling. If you choose both, decide if switching modes is manual or automatic.
- Pick the HVAC Mode: Options include basic On/Off, advanced KNX modes (20.102 for thermostats, 20.105 for air conditioning). KNX 20.102 offers Comfort, StandBy, Economy, and Building Protection. Mode 20.105 includes Auto, Heat, Cool, and Off.
- Adjust the Setpoint: Set the temperature directly or use a shift (by degrees or counter value). Ensure your setpoint shift matches your KNX thermostat setup.
- Set Temperature Range: Define your minimum and maximum target temperatures for easy control in your Home app.
- Configure Group Addresses: Assign addresses for:
- Actual temperature (room reading)
- Basic setpoint or setpoint shift (how you adjust the temp)
- Heating/Cooling messages (status updates)
- HVAC modes and heating/cooling switchover (for advanced setups)
Thinka offers flexible thermostat configuration—from basic temperature setting to advanced KNX integration. For more details, see our guides for Apple Home, Google Home, and Amazon Alexa.
Can I Use Thinka to Access My KNX System with ETS?
Yes, you can easily access your KNX system with ETS using Thinka!
- Thinka comes with a built-in KNX IP Gateway, allowing seamless integration with ETS software.
- No need to purchase an additional KNX IP gateway—Thinka provides this functionality out of the box.
- Enjoy hassle-free configuration and management of your KNX devices directly through ETS.
For more details, visit our Built-in IP Gateway FAQ.
How to Configure Your Thermostat Device
Setting up your thermostat is simple with our versatile configuration options, supporting multiple climate control modes for your comfort and efficiency.
- Heating Only: Keep your home warm by enabling only the heating function. Easily configure this mode as shown below.
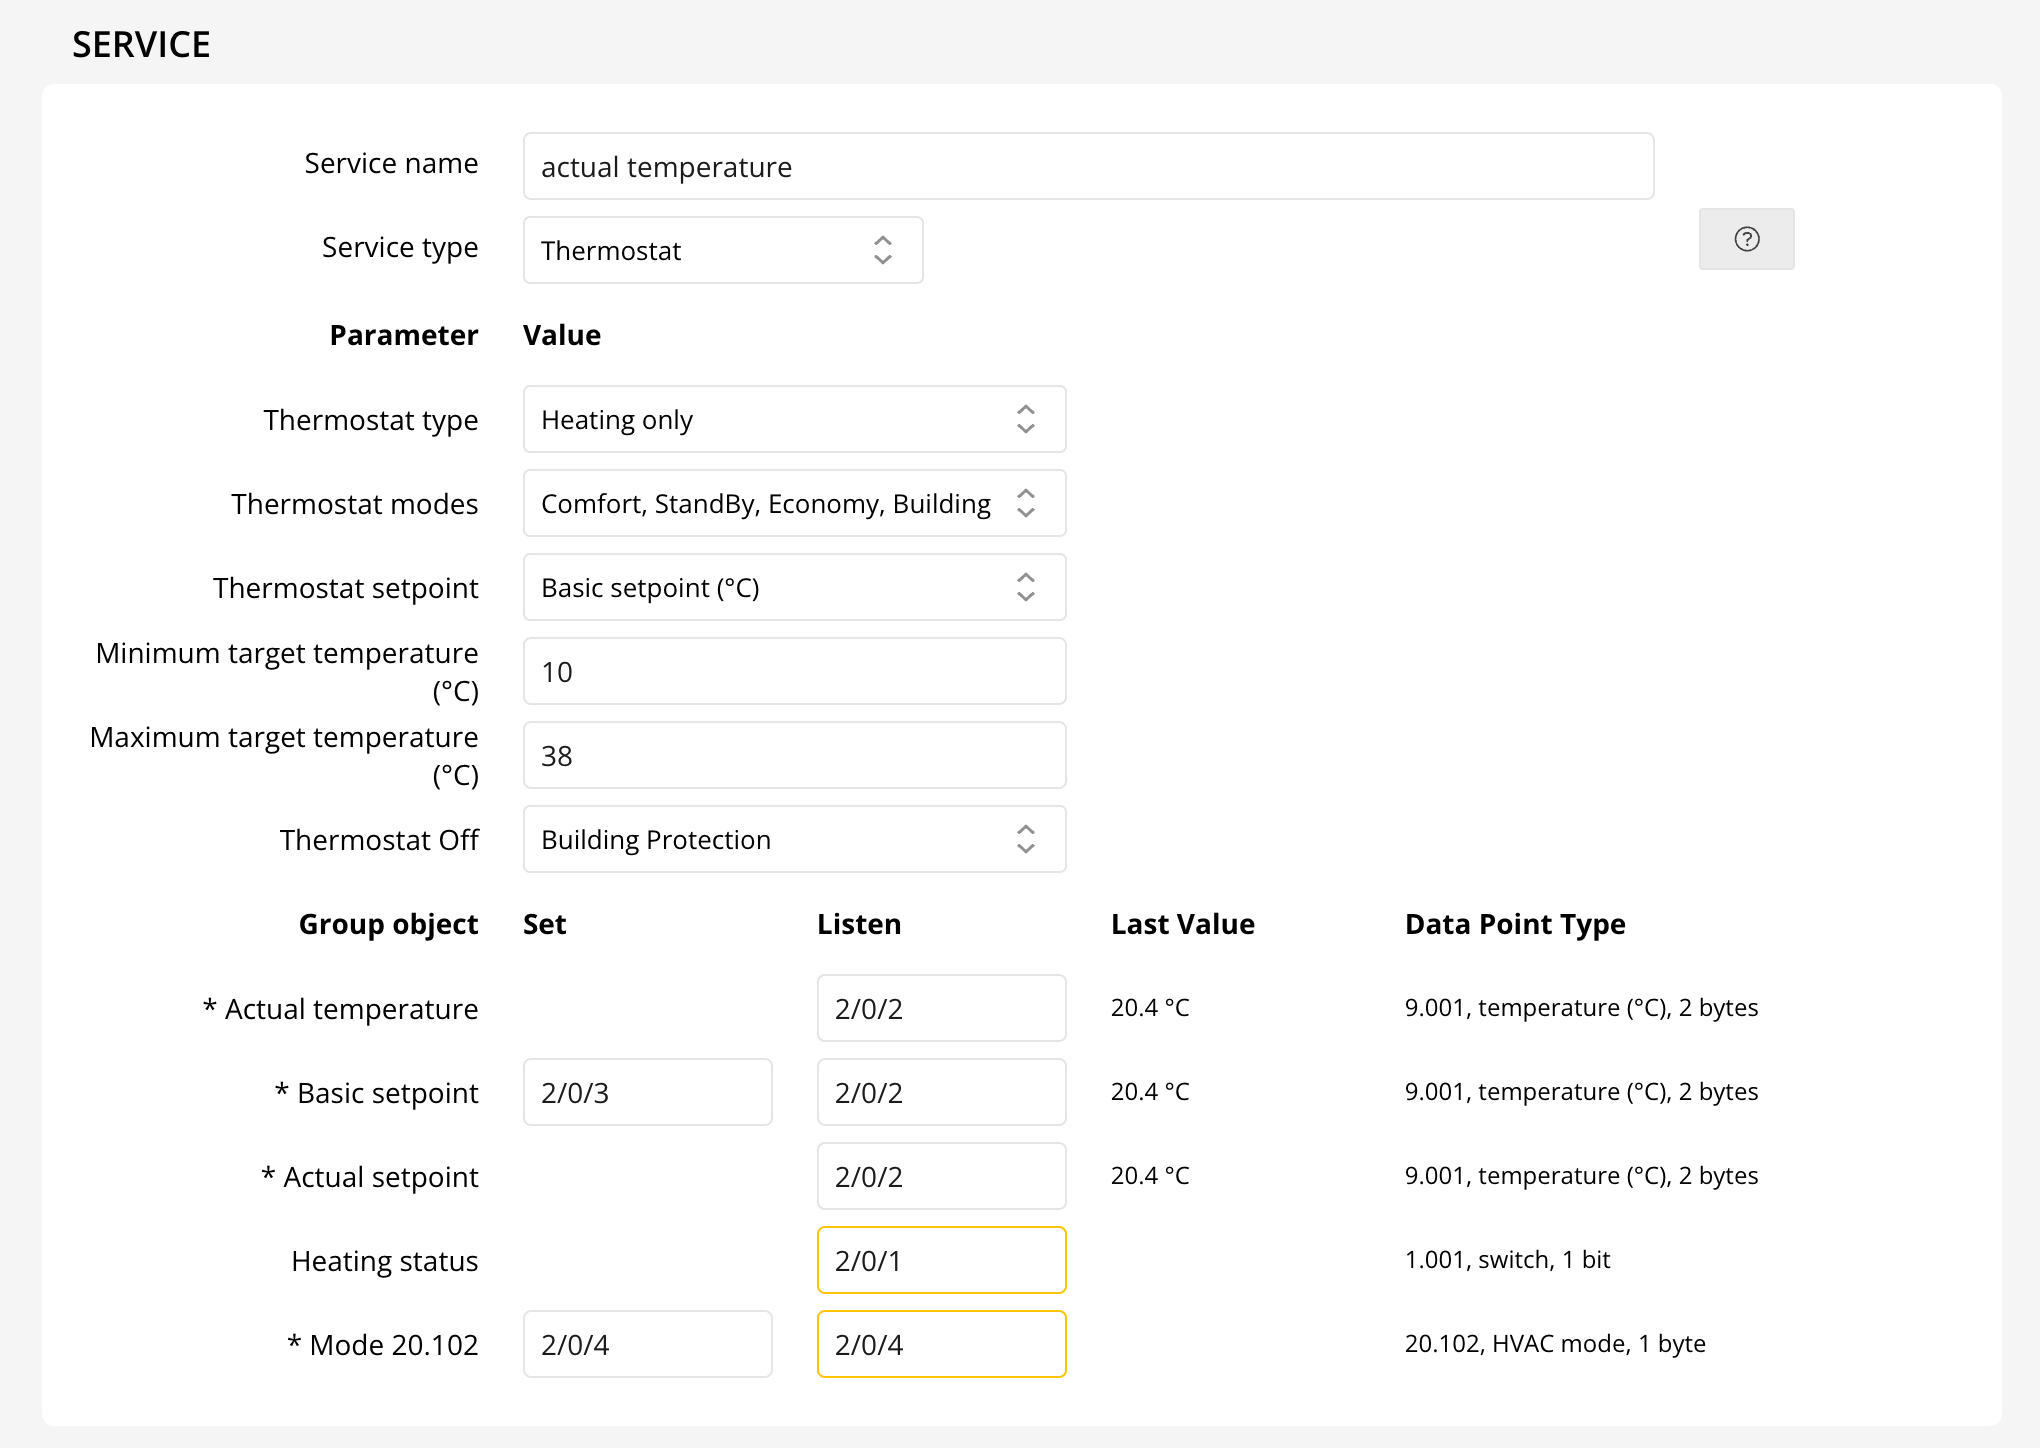
The Heating status indicates if heating is active.
- Cooling Only: Perfect for summer days, this mode activates just the cooling feature.

The Cooling status shows if cooling is running.
- Heating and Cooling: Enjoy year-round comfort with both heating and cooling. Choose manual or automatic switching for ultimate flexibility.
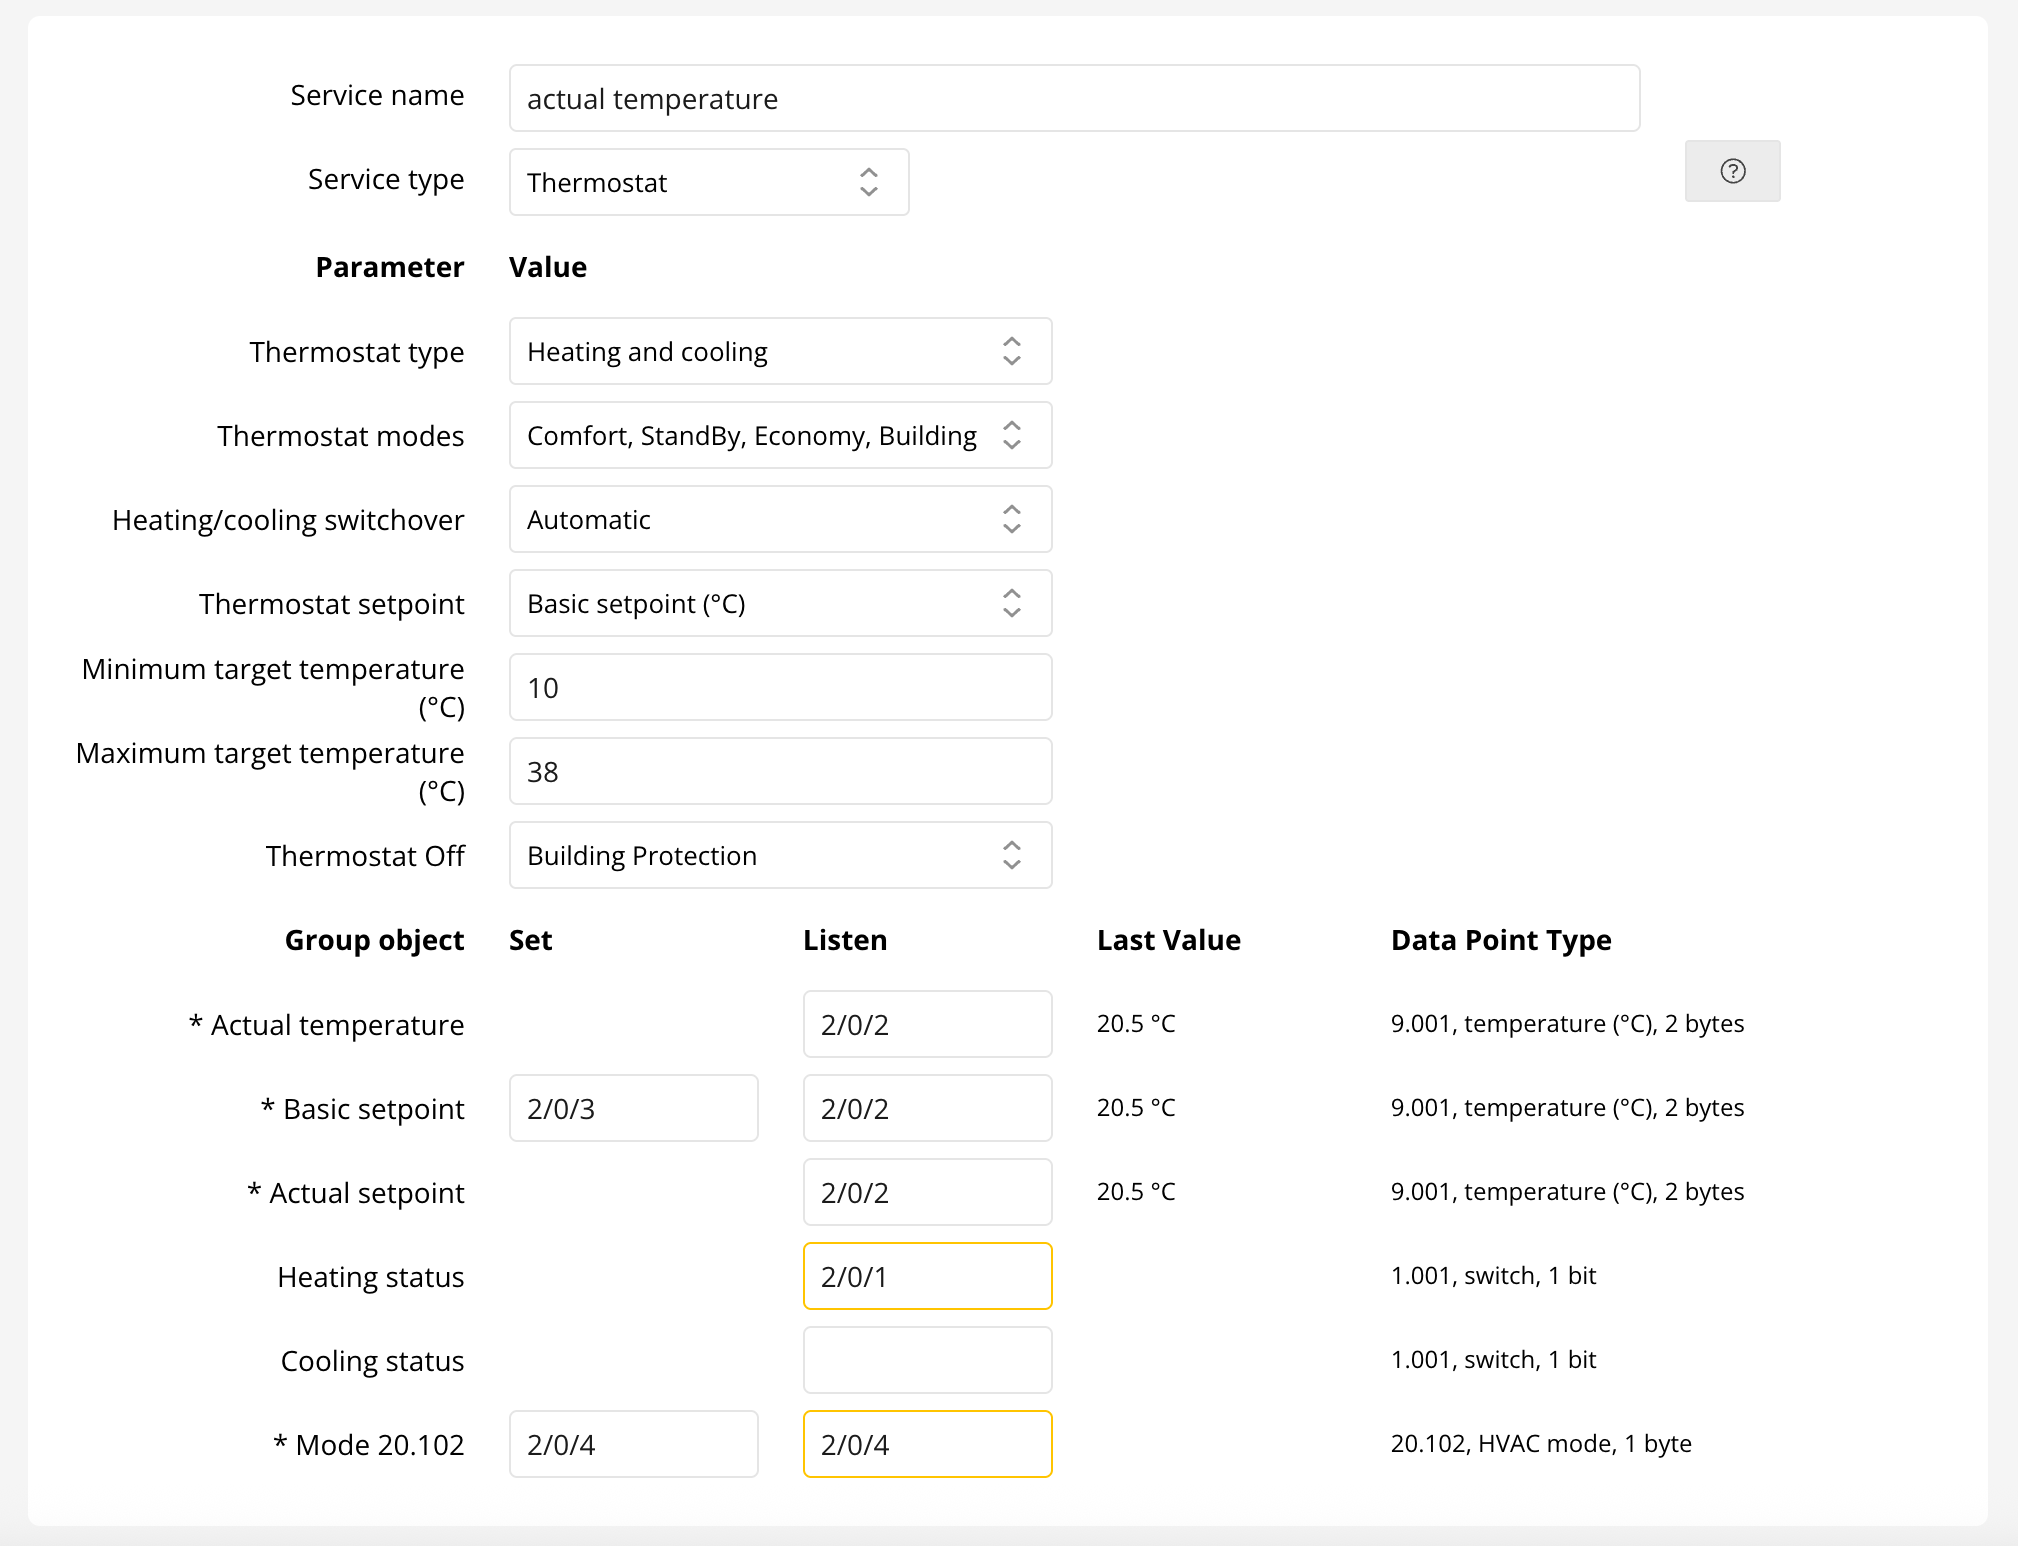
Manual mode allows you to set group addresses for heating/cooling. Both Heating and Cooling statuses can be monitored.


Advanced HVAC Modes
Choose from multiple HVAC modes to suit your needs:
- None
- On, Off
- Comfort, StandBy, Economy, Building Protection
- Auto, Heat, Cool, Off
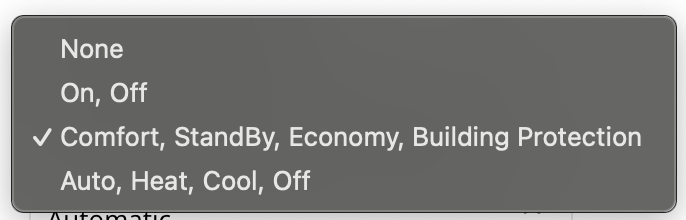
For "On, Off" mode, simply set the group addresses for basic on/off control.

Advanced modes like "Comfort, StandBy, Economy, Building Protection" and "Auto, Heat, Cool, Off" provide enhanced control for both thermostats and air conditioning units.


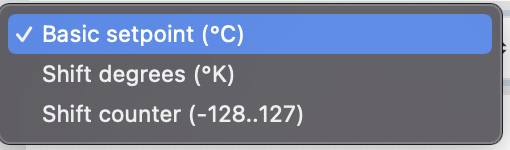
Thermostat Setpoint Settings
Adjust your preferred temperature directly or shift the setpoint by temperature difference or counter value. Ensure the step size matches your KNX thermostat parameters.
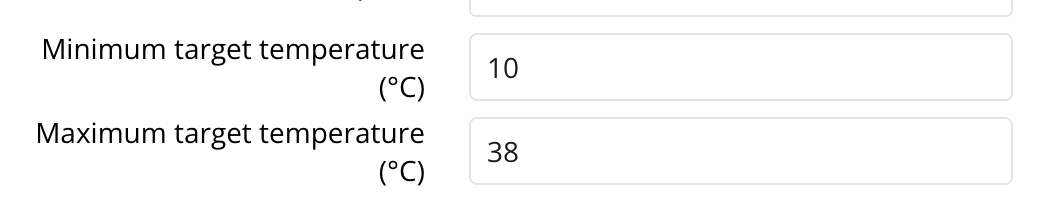
Minimum and Maximum Target Temperatures
Set your desired temperature range in the Home app for precise climate control.
Key Group Object Definitions
- Actual Temperature: Displays the current room temperature.
- Basic Setpoint: Controls your main temperature setting.
- Setpoint Shift: Adjusts the temperature incrementally.
- Actual Setpoint: Reflects the final set temperature.
- Heating/Cooling Status: Shows if heating or cooling is active.
- HVAC Modes (20.102 & 20.105): Advanced climate modes for greater flexibility.
- On/Off: Instantly power your thermostat on or off.
Note: Thinka offers flexible and easy-to-use thermostat configuration options. For simple operation, set your target temperature or use a sensor for read-only temperature monitoring.
For step-by-step guides using your favorite smart home platforms, visit our FAQs for Apple Home, Google Home, or Alexa.
Note: window coverings are shown as a switch in Alexa. Turn the switch off (0%) to fully close the window covering. Turn the switch on (100%) to fully open. Window coverings can only be controlled by voice for Google Home, this is a limitation of the Google Home app. Slat position is currently not supported in Alexa and Google.
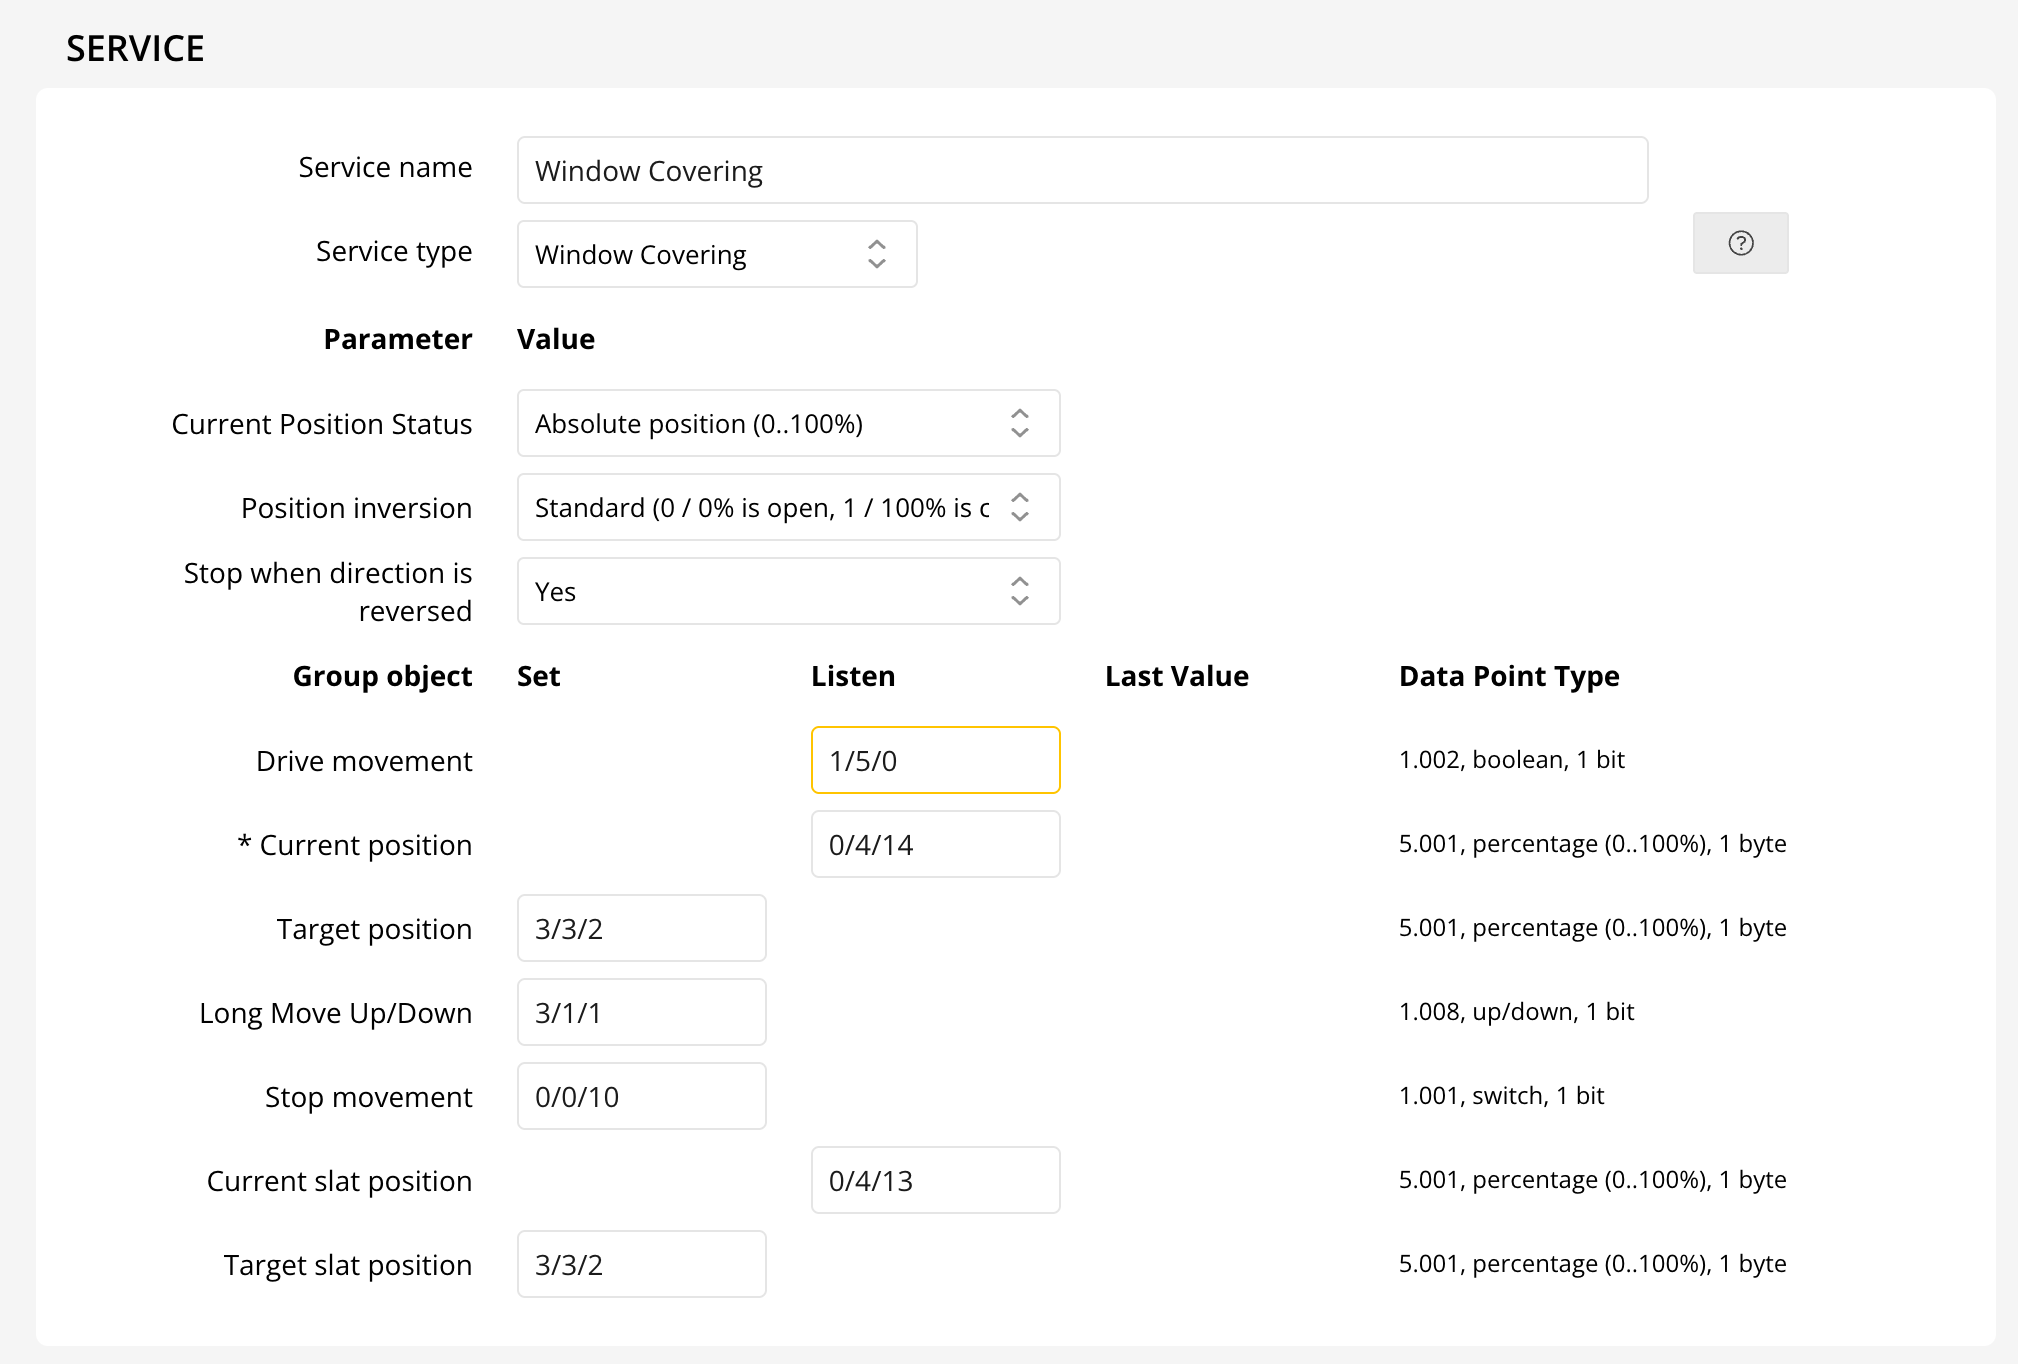
Use the window covering service for anything that covers the windows: blinds, shades, curtains, sun screens, etc. This service works best when your KNX actuator provides a status object for the window covering’s current position (0-100%).
Window covering actuator with position status object
Select "Absolute Position (0..100%)" for the "Current Position Status" parameter. Enter the group address of the current position status object and either the target position group object (1-byte, 0-100%) or the long move up/down (1-bit, up/down) group address. In the latter case you will only be able to fully open or close the window covering.
For blinds with slats you must also provide the current and target slat position (both 0-100%) group addresses.
Window covering actuator without position status object
When no postion status object is available you can still control the window covering from Thinka. However, you can only fully open or close the window covering. To configure this, select the "No status feedback" option for the "Current Position Status" parameter. Select the approximate time it takes to fully open or close the window covering for the "Time for up/down movement" parameter. This is the time the window covering will be considered in motion when opening or closing. Enter the group address of the long move up/down (1-bit, up/down) group address.
For blinds with slats you must also provide the current and target slat position (both 0-100%) group addresses.
Below you can find a short video of the window covering configuration. The video does not yet include the parameter selection options.
Can I Manage My KNX System Remotely with Thinka?
Absolutely! With the Thinka for KNX Pro version, you can securely control and monitor your entire KNX smart home system from anywhere in the world. Thanks to the built-in IP Gateway and VPN Server, remote access is safe, reliable, and seamless.
- Remote Access: Control your KNX devices and scenes from your smartphone, tablet, or computer—wherever you are.
- Enhanced Security: The integrated VPN Server ensures all your remote connections are encrypted and protected.
- Easy Setup: Setting up remote management is quick and user-friendly with detailed step-by-step guidance.
Want to get started? Learn how to connect to the VPN server here and enjoy secure, remote access to your Thinka-powered KNX system today!
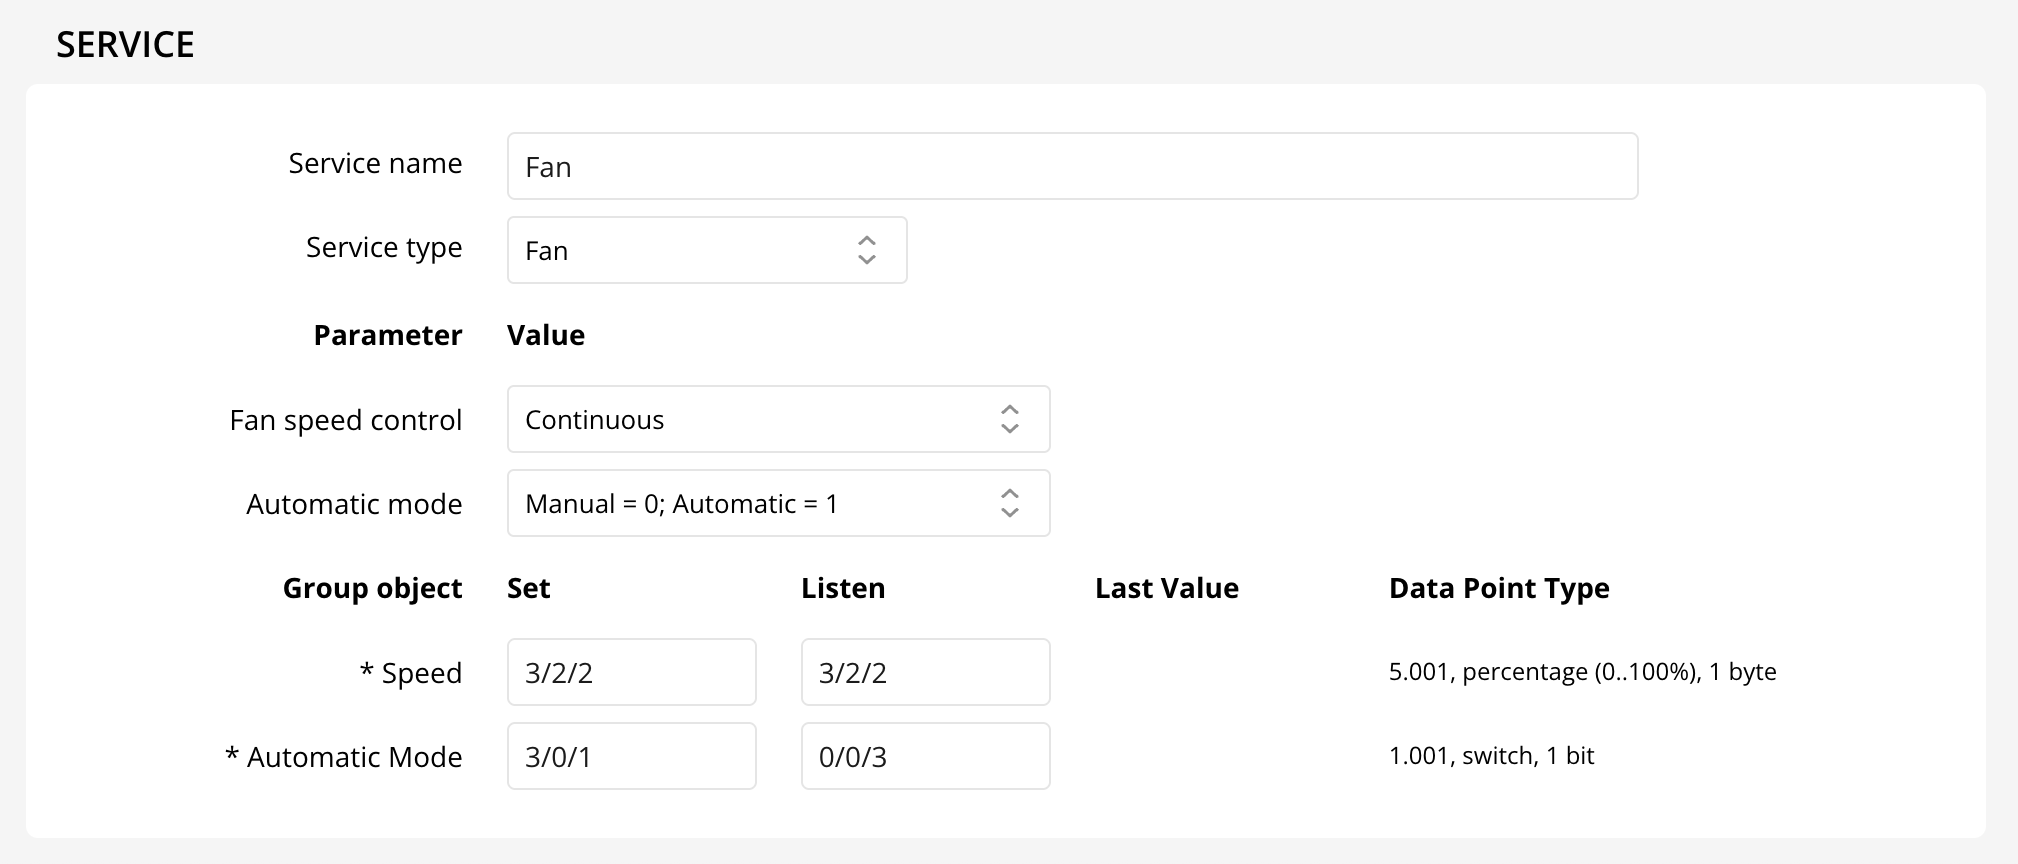
How Can I Configure My Fan?
Configuring your fan is simple and flexible, allowing you to tailor performance to your needs. Whether you want precise speed control or convenient automation, our system makes it easy!
Fan Speed Control Options
- Continuous Speed: Adjust your fan’s speed smoothly from 0-100% with a 5.001 DataPointType set and listen address.
- Airflow Control: Use a DPT 9.009 set and listen address to specify minimum and maximum airflow.
- Step Levels: Choose 1-4 fan speed levels, easily managed with DPT 5.010 or individually via DPT 1.001.
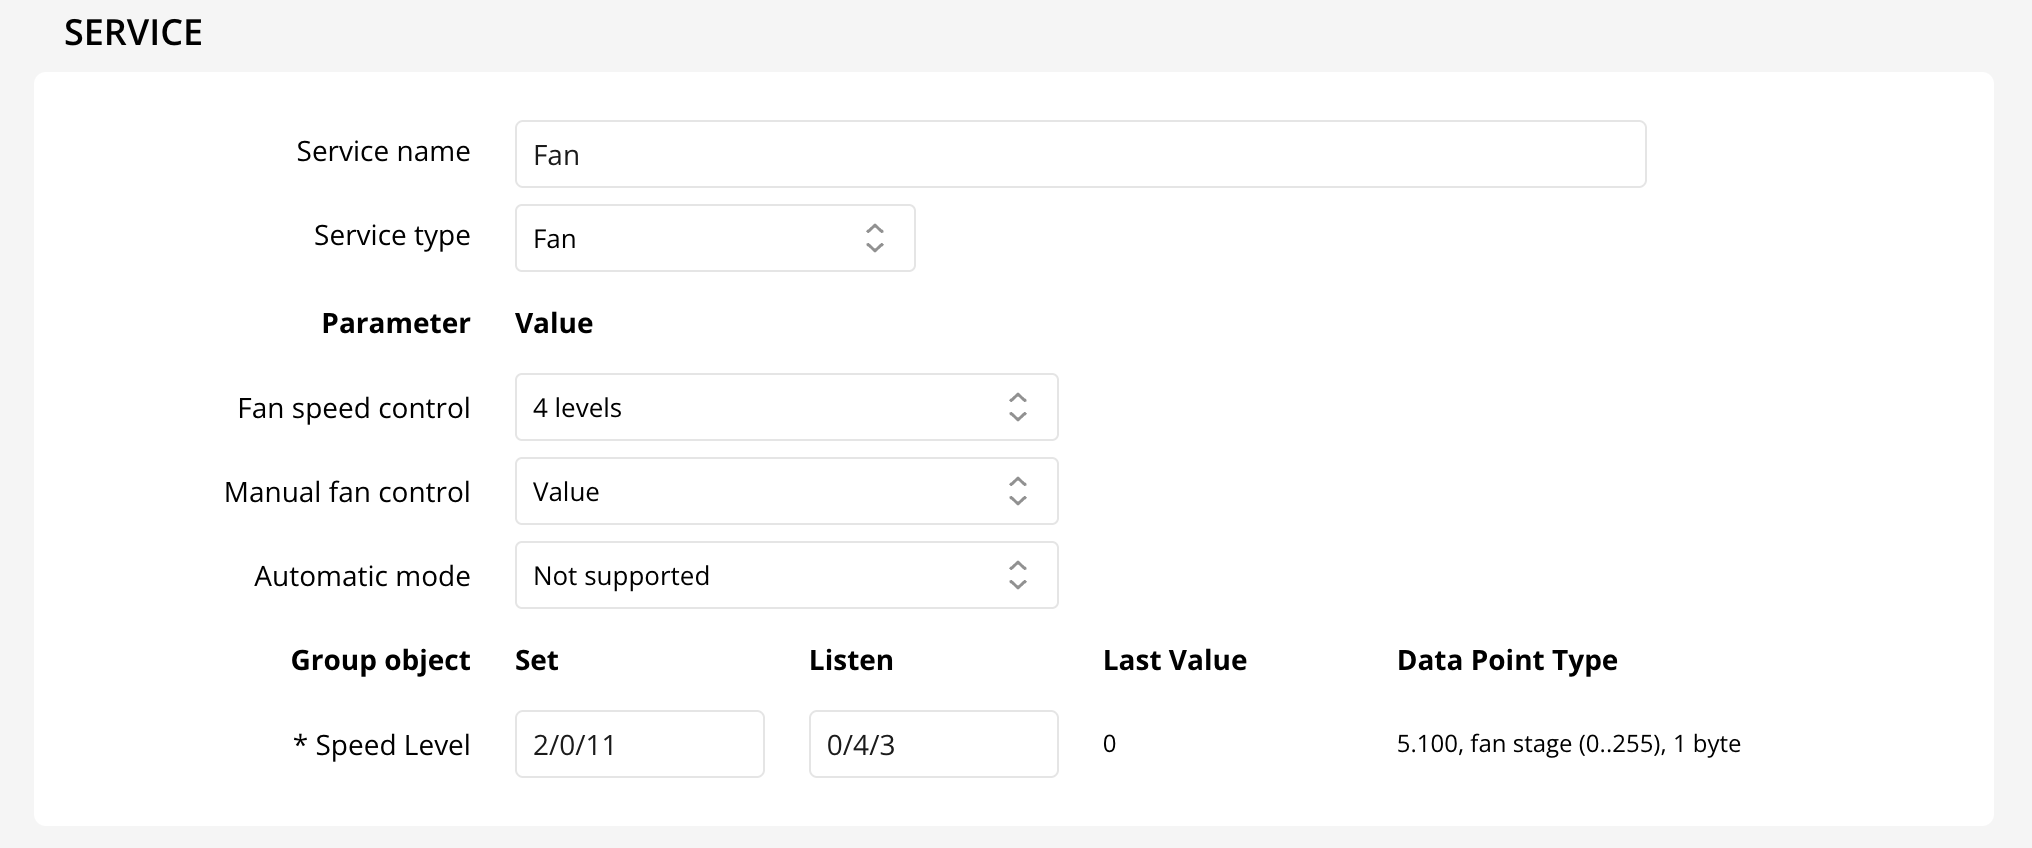
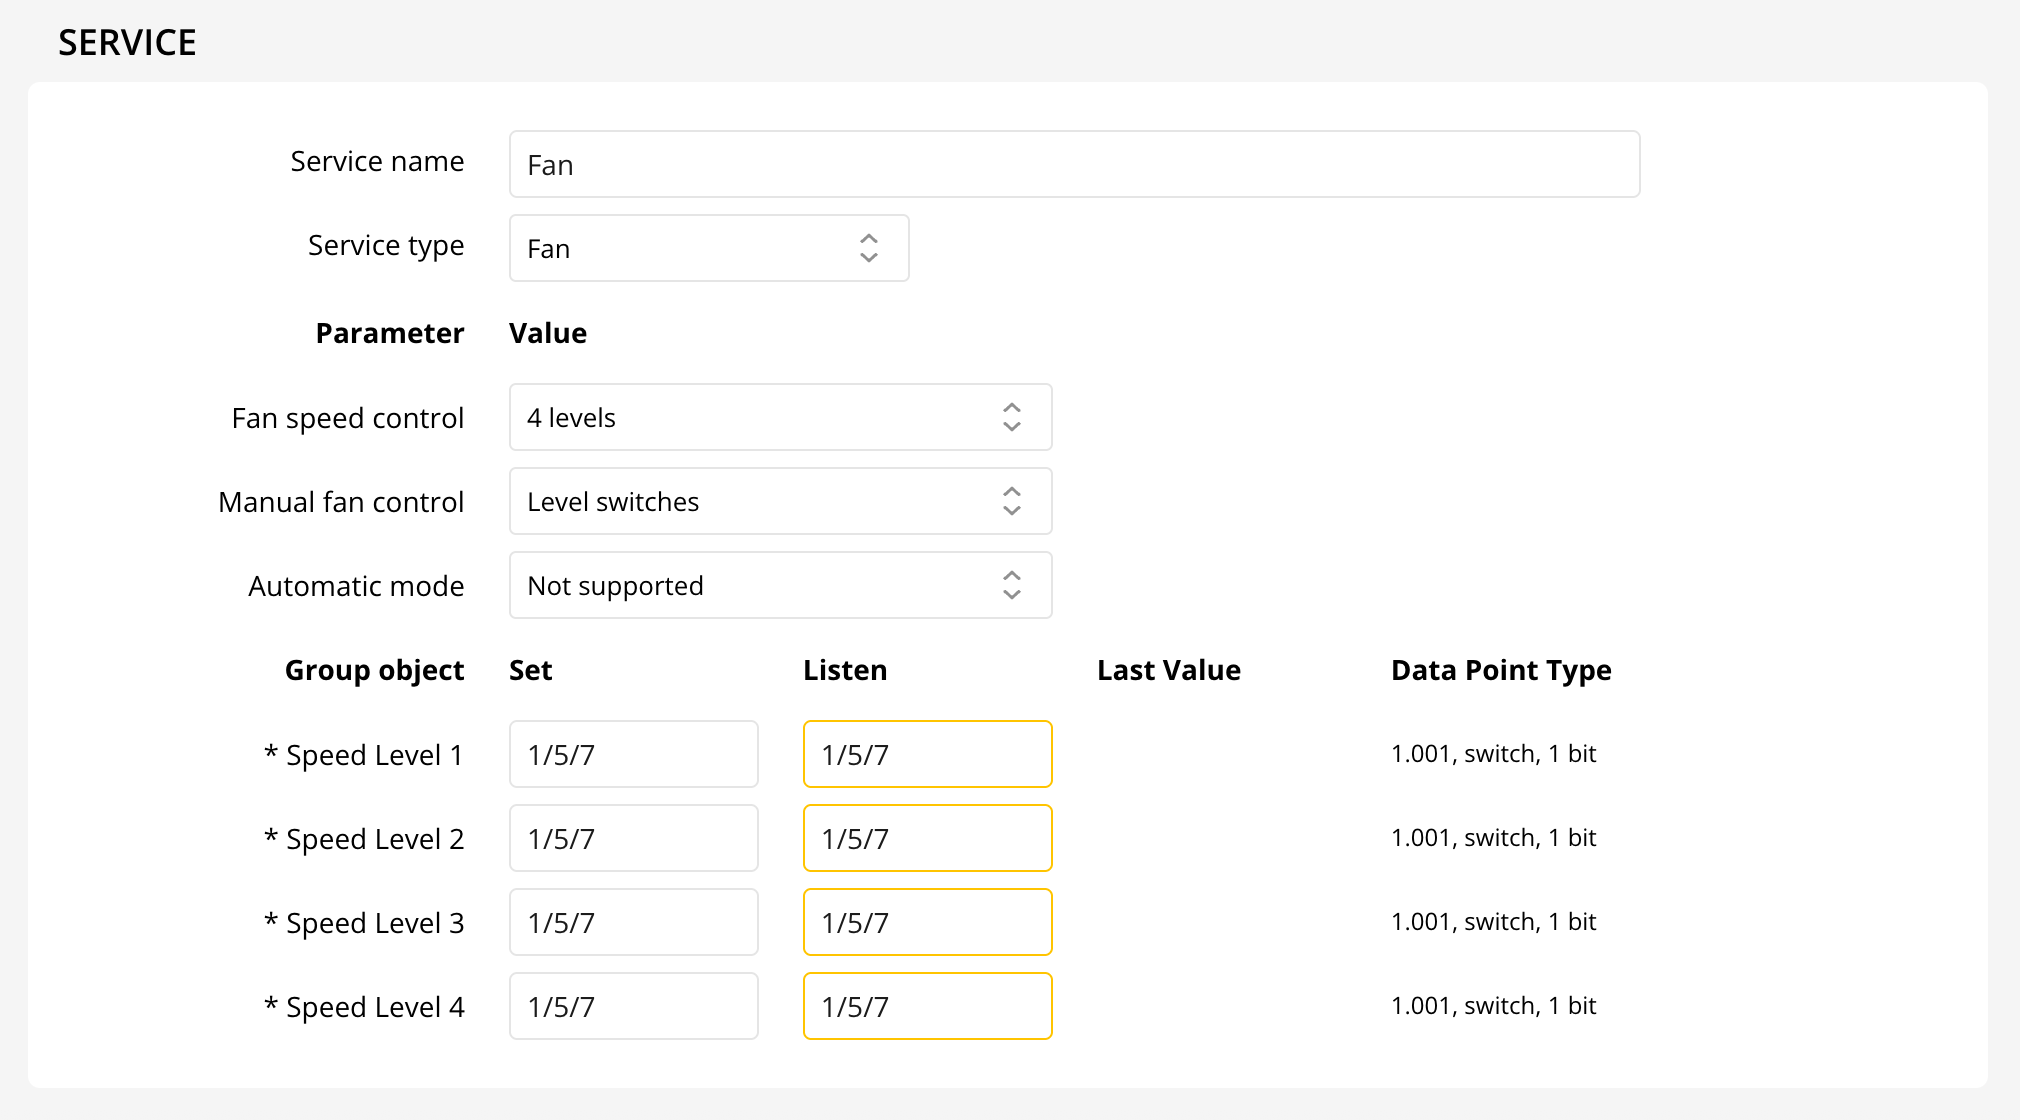
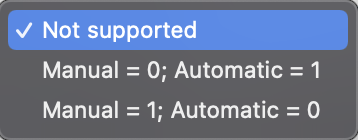
Automatic Mode
Enable automatic mode for hands-free comfort. Specify two group addresses (DPT 1.001) for setting and listening to your fan’s mode.
You can even control your fan directly from HomeKit for ultimate convenience!
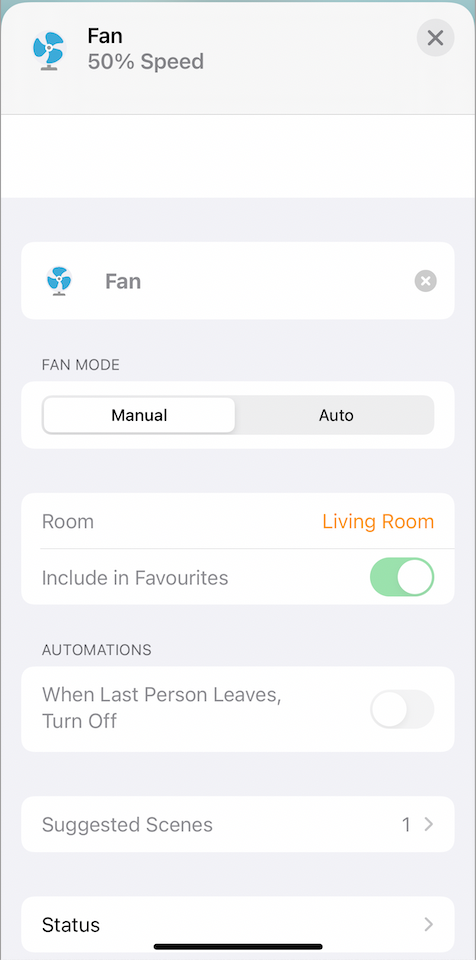
Enjoy customizable comfort and intelligent fan control in your smart home!
How to Configure Your KNX Garage Door Opener
Setting up your KNX garage door opener is simple when you know the right steps. Follow this guide to ensure seamless operation and real-time status updates for your garage door.
- Assign Two Key Group Addresses:
- Open/Close Command: Set a group address for controlling the door, using DataPointType 1.008.
- Up/Down Status: Set a group address to monitor the current position, using DataPointType 5.001.
- Optional Feature:
- Add a Listen address for Obstruction Detection with DataPointType 1.002 for extra safety.
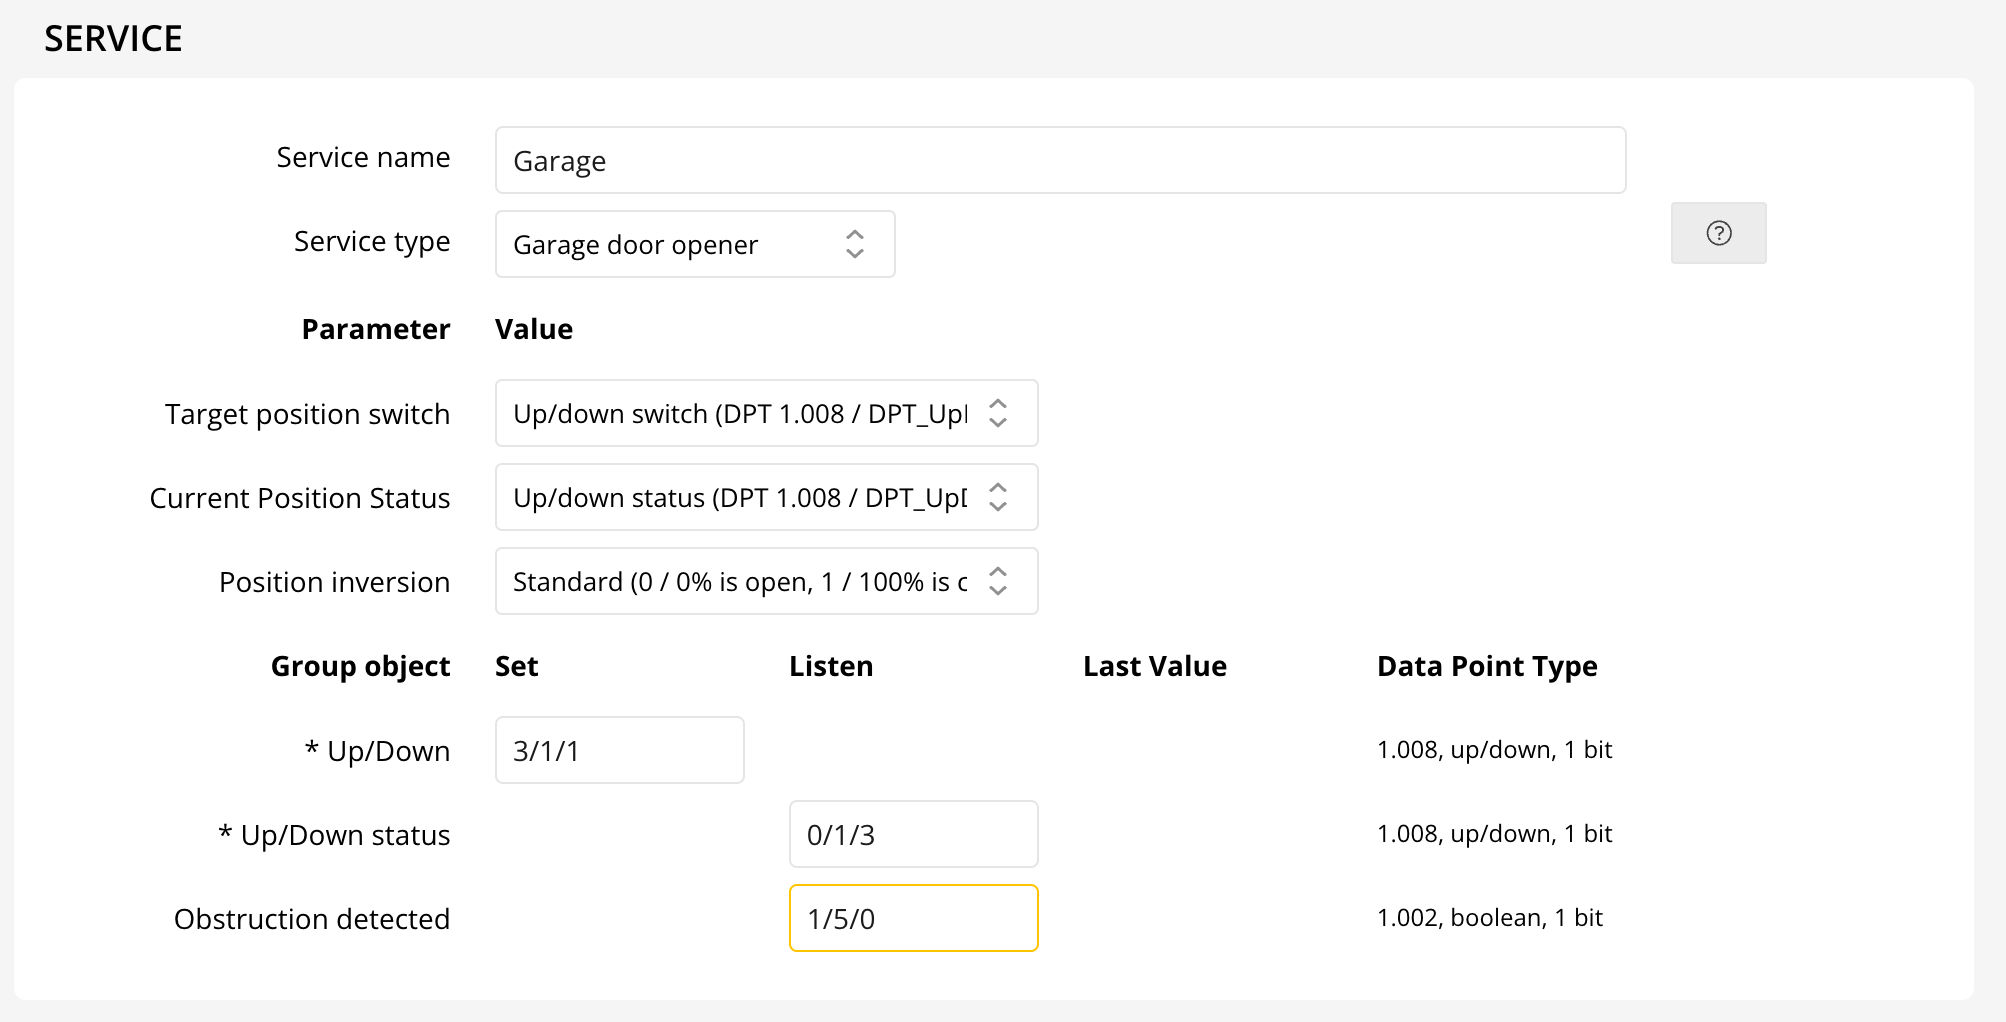
For the Current Position Status parameter, you have two configuration options:

- Two Separate Status Objects (DPT 1.002): Configure group addresses for both Open and Closed statuses, along with Up/Down control.
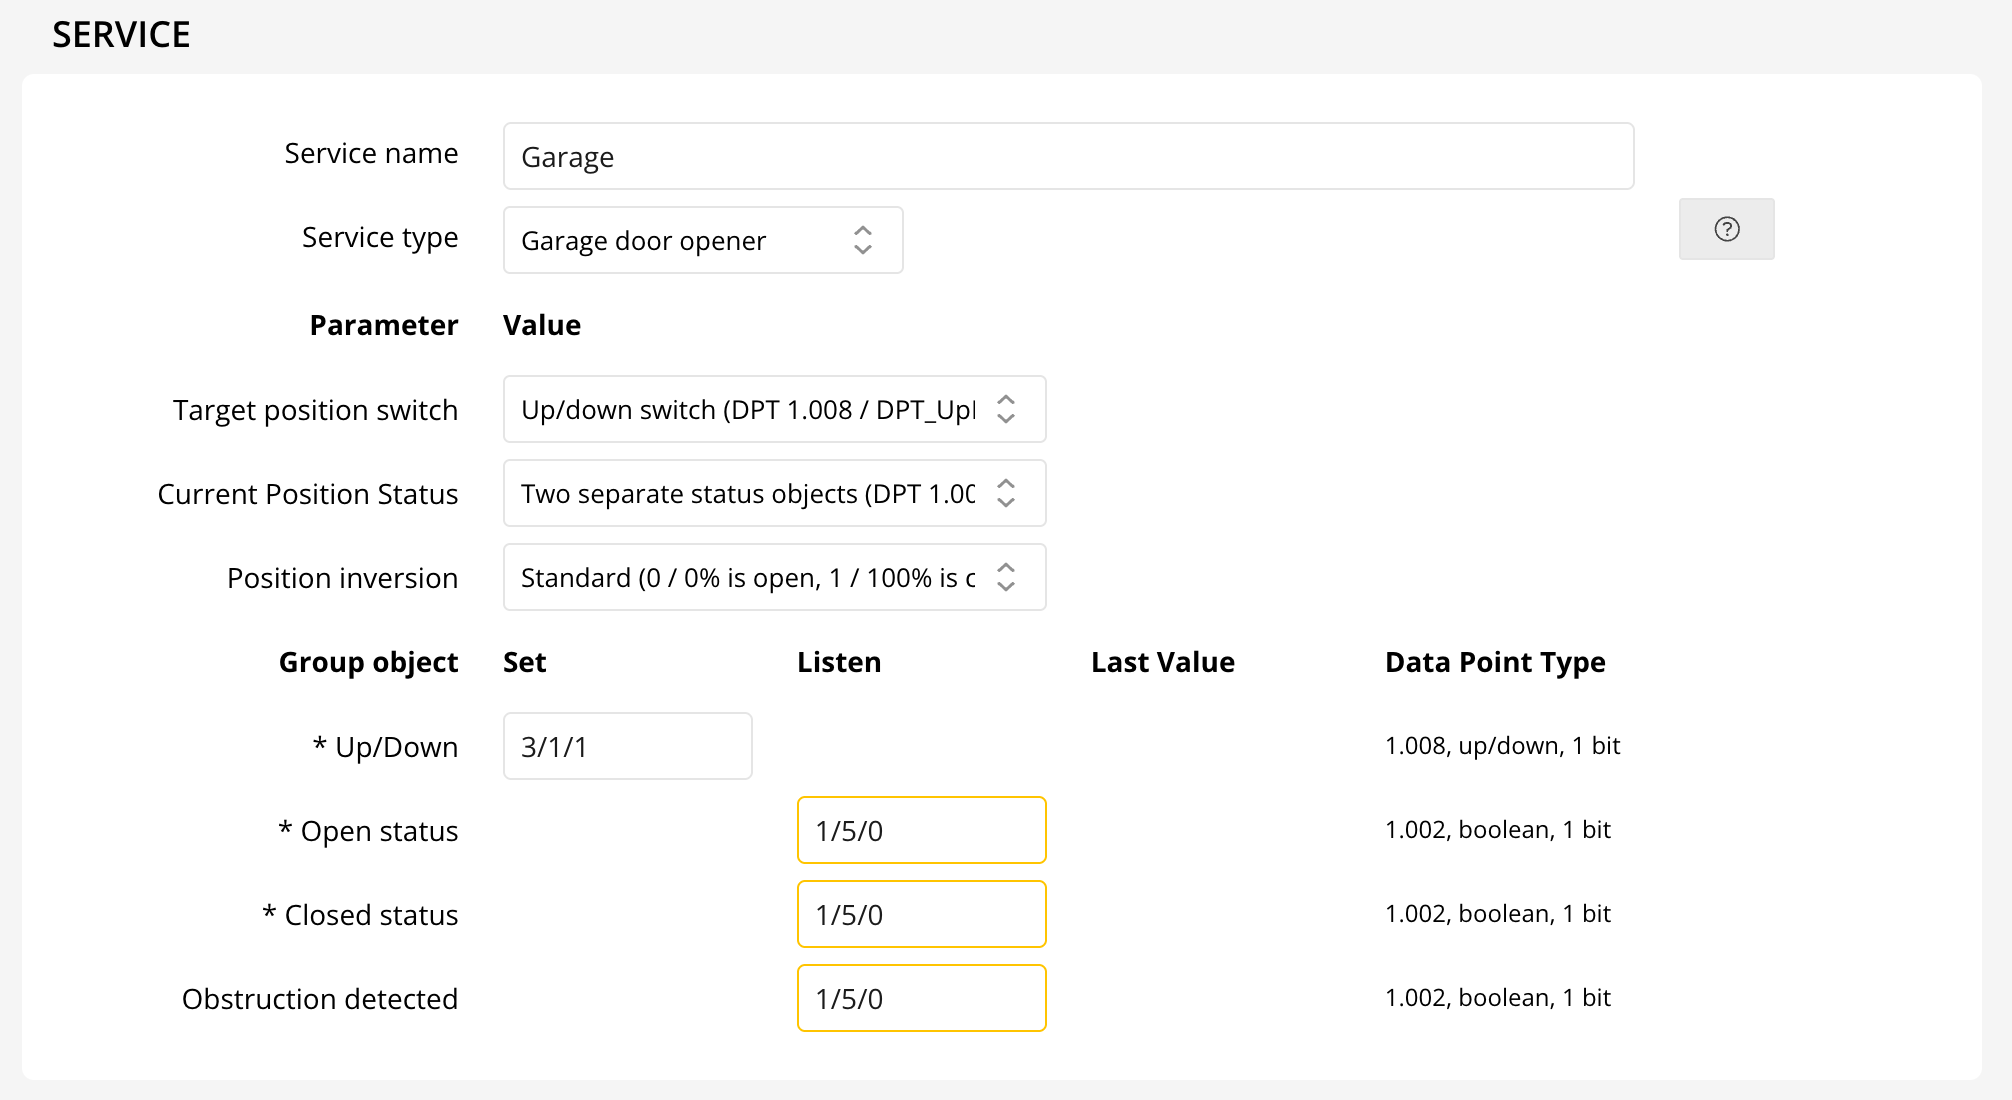
- Up/Down (DPT 1.008): Enter group addresses for Up/Down commands and statuses.
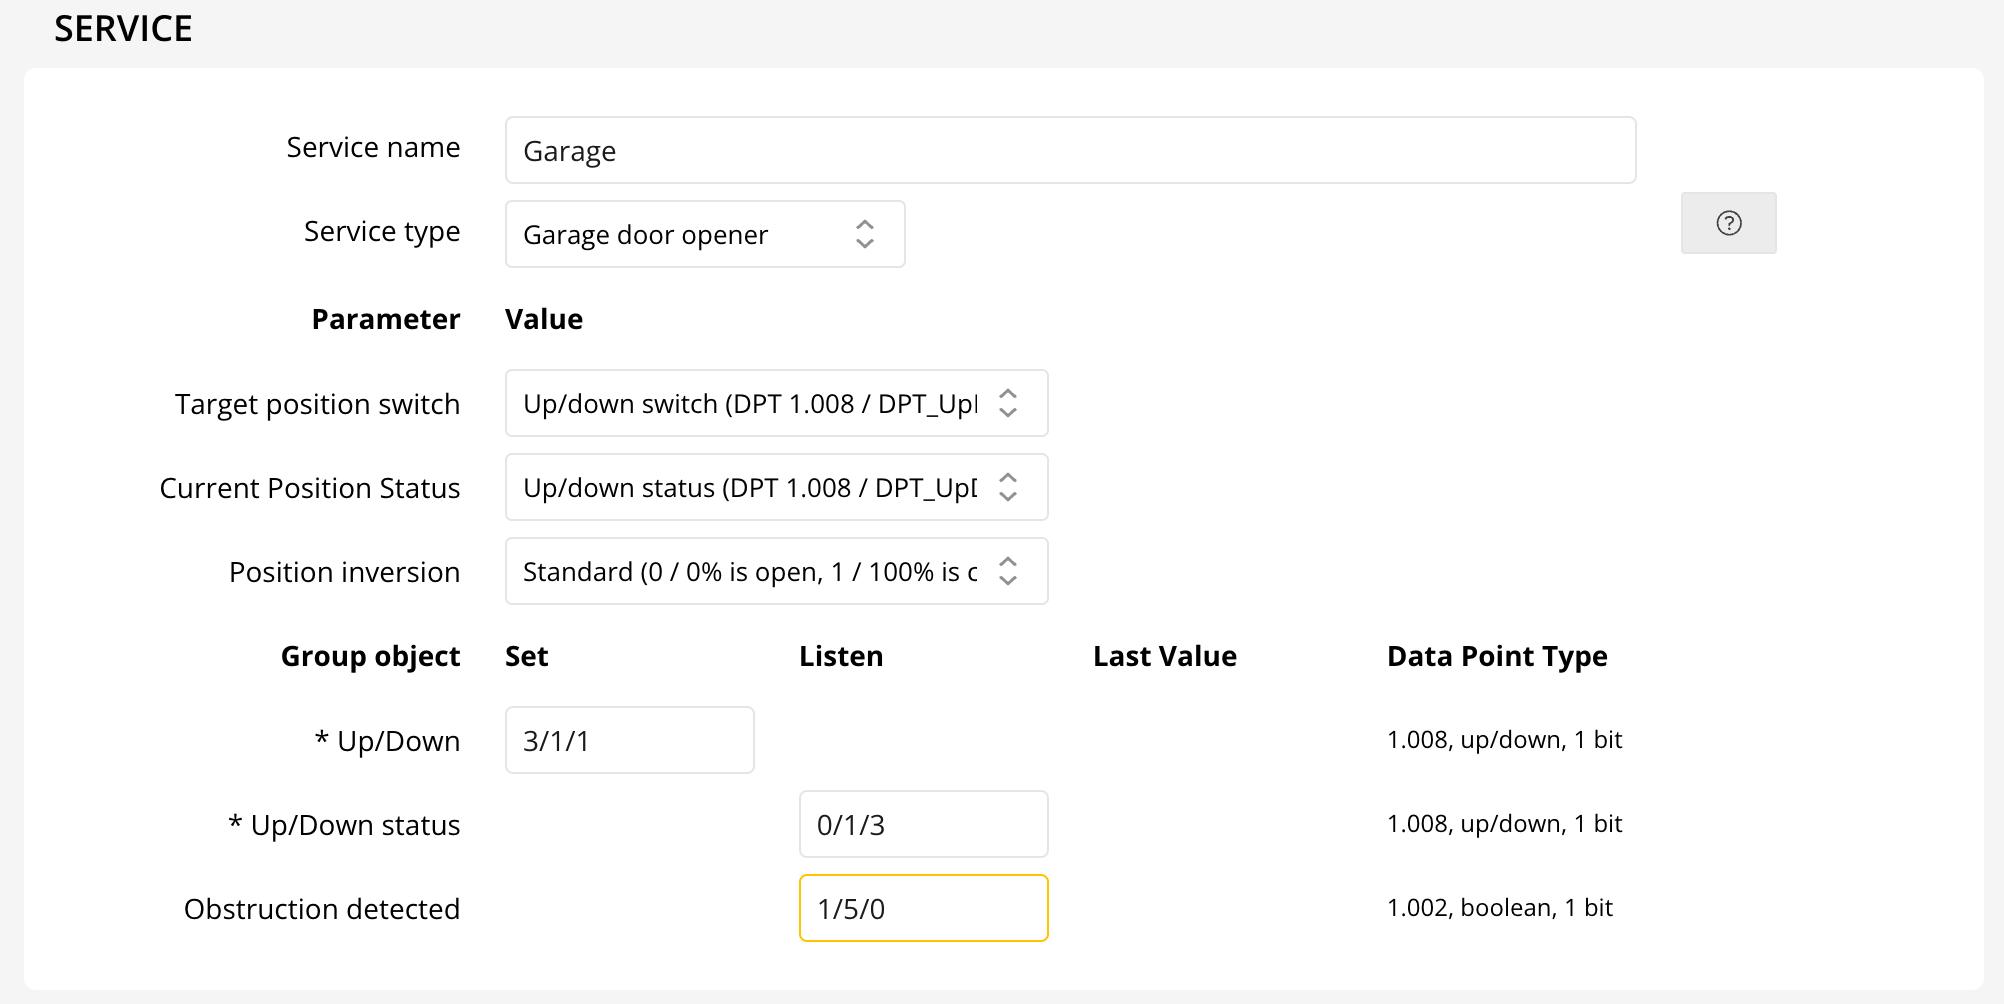
Finally, set the Position Inversion parameter to match your specific device’s behavior, ensuring accurate position feedback.

With these steps, your KNX garage door opener will be configured for reliable, smart home integration!
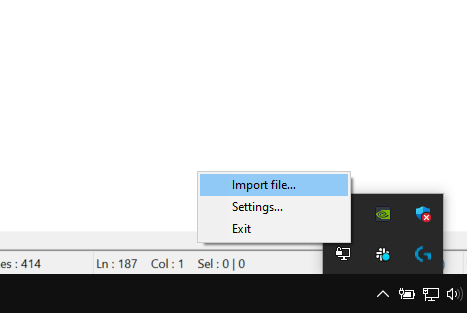
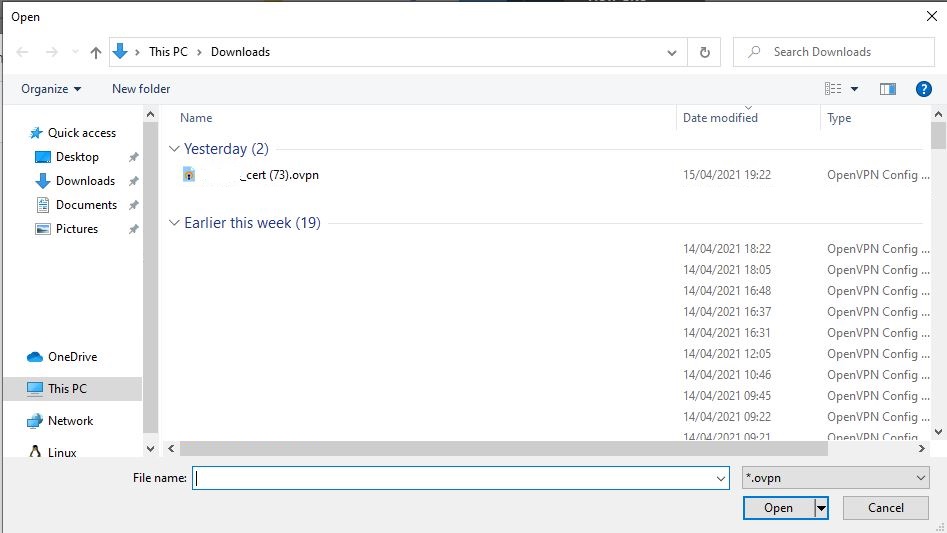
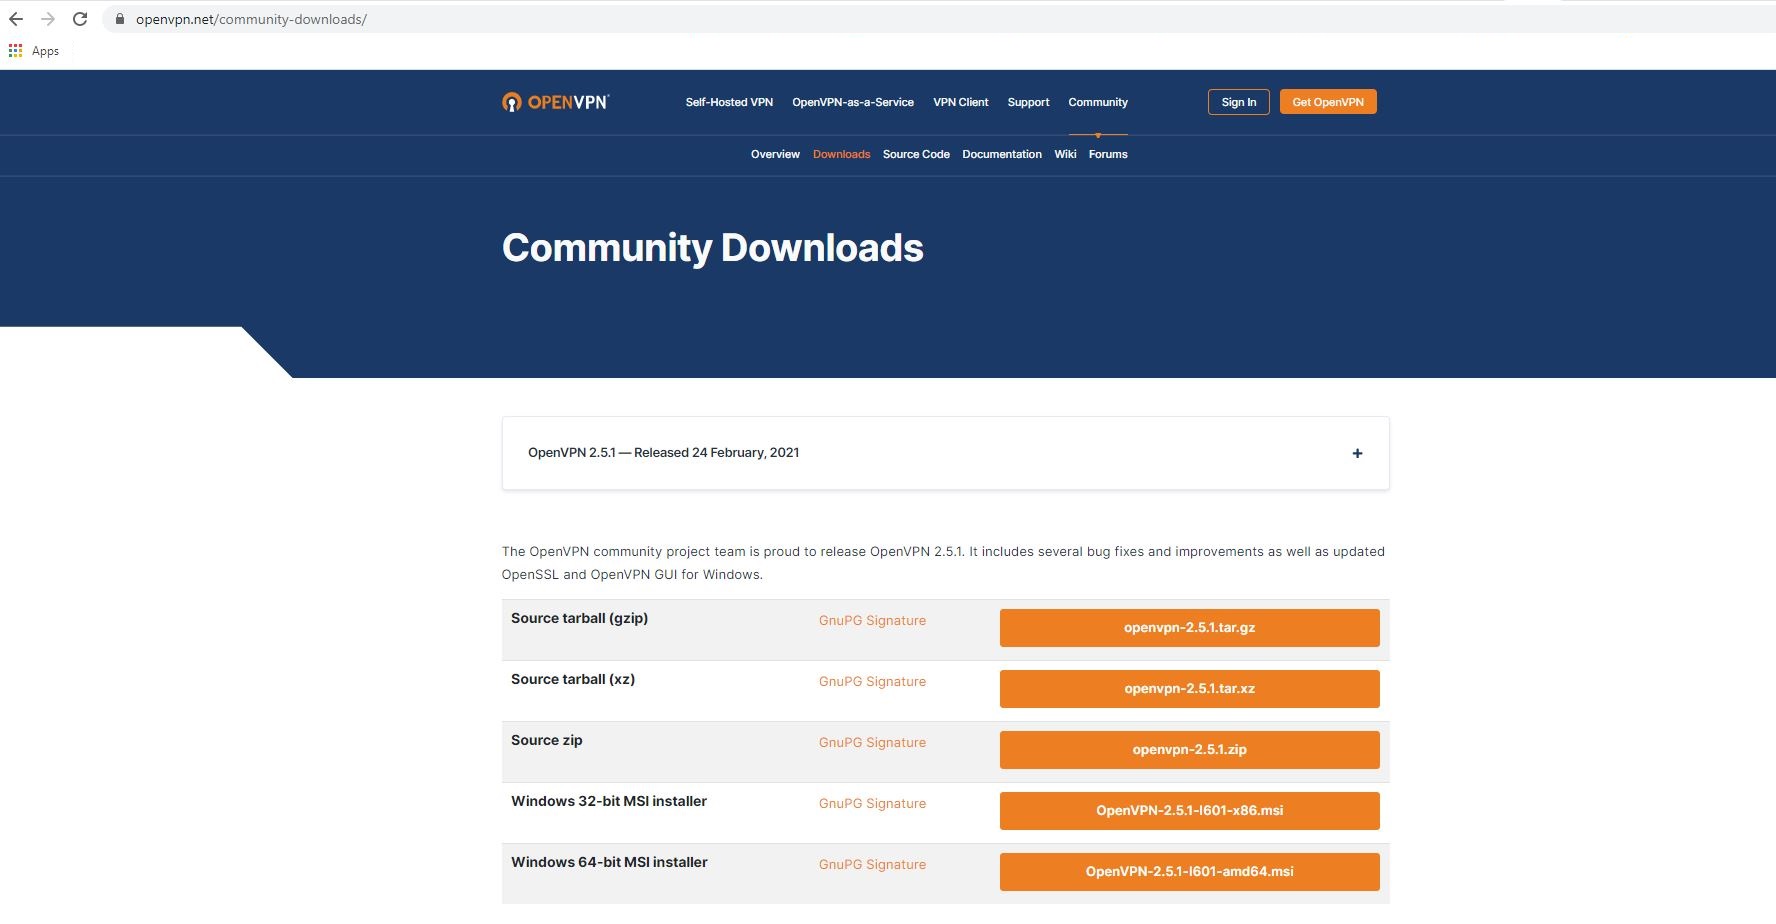
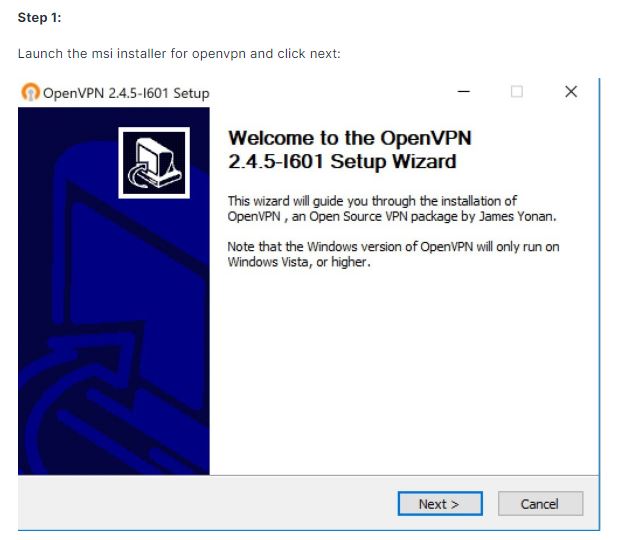
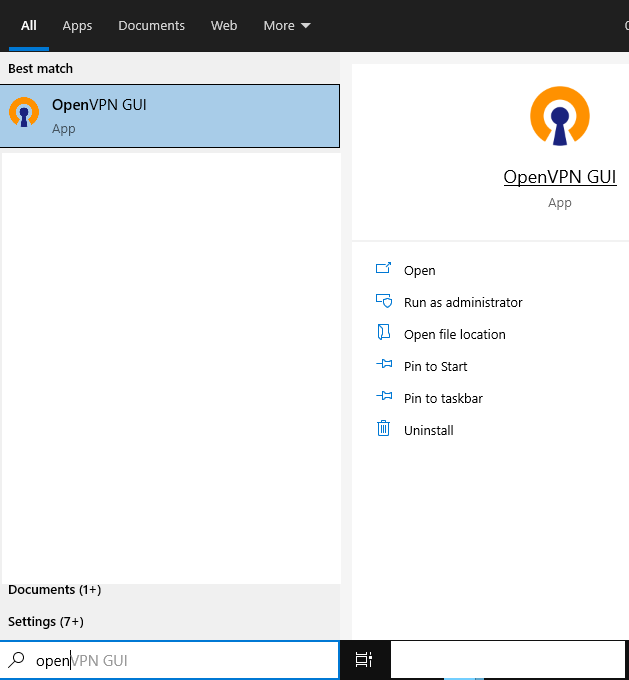
How to Easily Install a VPN Client (OpenVPN) on Windows
Protect your online privacy and access restricted content in minutes by installing the OpenVPN client on your Windows computer. Follow this simple step-by-step guide:
- Download the OpenVPN Installer: Choose the right installer for your system:
- For most users (64-bit Windows): Download 64-bit version
- For older or 32-bit systems: Download 32-bit version
- Run the Installer: Follow the prompts to set up OpenVPN. For detailed instructions, check the official installation guide here.
- Launch OpenVPN: After installation, find the OpenVPN icon in your system tray (bottom right of your screen).
- Import Your VPN Configuration File: Right-click the tray icon and select Import file to add your VPN profile.

You're now ready to enjoy secure and private browsing with your VPN client!
KNX Secure with Thinka — Setup Guide
Before Thinka can control KNX Secure devices, it needs to be granted access to the secure group addresses associated with these devices. Finally, the encryption keys need to be loaded into Thinka. This involved 6 discrete steps:
- Import the "Thinka HomeKit bridge" into your ETS Catalog once
- Add the "Thinka HomeKit bridge" to your ETS project
- Associate the secure group address with the "Thinka HomeKit bridge"
- Download the configuration to affected devices
- Export the `.knxkeys` encryption keys from ETS
- Import the `.knxkeys` encryption keys in Thinka
Import Thinka device into the ETS Catalog
Add Thinka your ETS project

Then set the Individual Address in the Properties panel of ETS to the same address that you configured on the Thinka Settings page under KNX > Individual Address. In the example below, the Individual Address is 1.1.3.

Associate secure group addresses with Thinka

Download the configuration to affected devices

Export the `.knxkeys` encryption keys from ETS

Import the `.knxkeys` encryption keys in Thinka


Is There a KNX (.knxprod) Datasheet for Thinka Gateway?
At this time, there is no official KNX (.knxprod) datasheet available for the Thinka Gateway. While many KNX devices offer a .knxprod file for easy integration, Thinka Gateway connects seamlessly with your smart home setup without the need for a dedicated KNX device datasheet.
- Easy Integration: Thinka Gateway is designed to work with KNX systems without requiring a .knxprod file.
- User-Friendly Setup: Our intuitive interface ensures straightforward configuration and compatibility with your smart home devices.
- Comprehensive Support: If you need help or have questions about your KNX setup, our expert support team is ready to assist.
For the latest updates or alternative integration options, please contact our support team or visit the Thinka website. We’re here to help you get the most out of your smart home experience!
Connect Google Home with Thinka Using Matter – Easy Step-by-Step Guide
Unlock seamless smart home control by connecting your Google Home to Thinka via the Matter protocol. With Matter integration, Google Home and Amazon Alexa can operate locally and independently from the cloud, ensuring faster response and enhanced privacy. For Apple Home users, we recommend sticking with Apple HomeKit to avoid device duplication, as using Matter alongside HomeKit may cause overlapping devices.
How to Join the Matter Beta:
- Contact our support team to request access to the Matter beta.
- Once accepted, find the new Matter tab under Settings in the Thinka web interface.

Connecting Google Home to Thinka via Matter
- Open the Google Home app and tap the Add button in Devices.
Select the Matter-enabled device option.
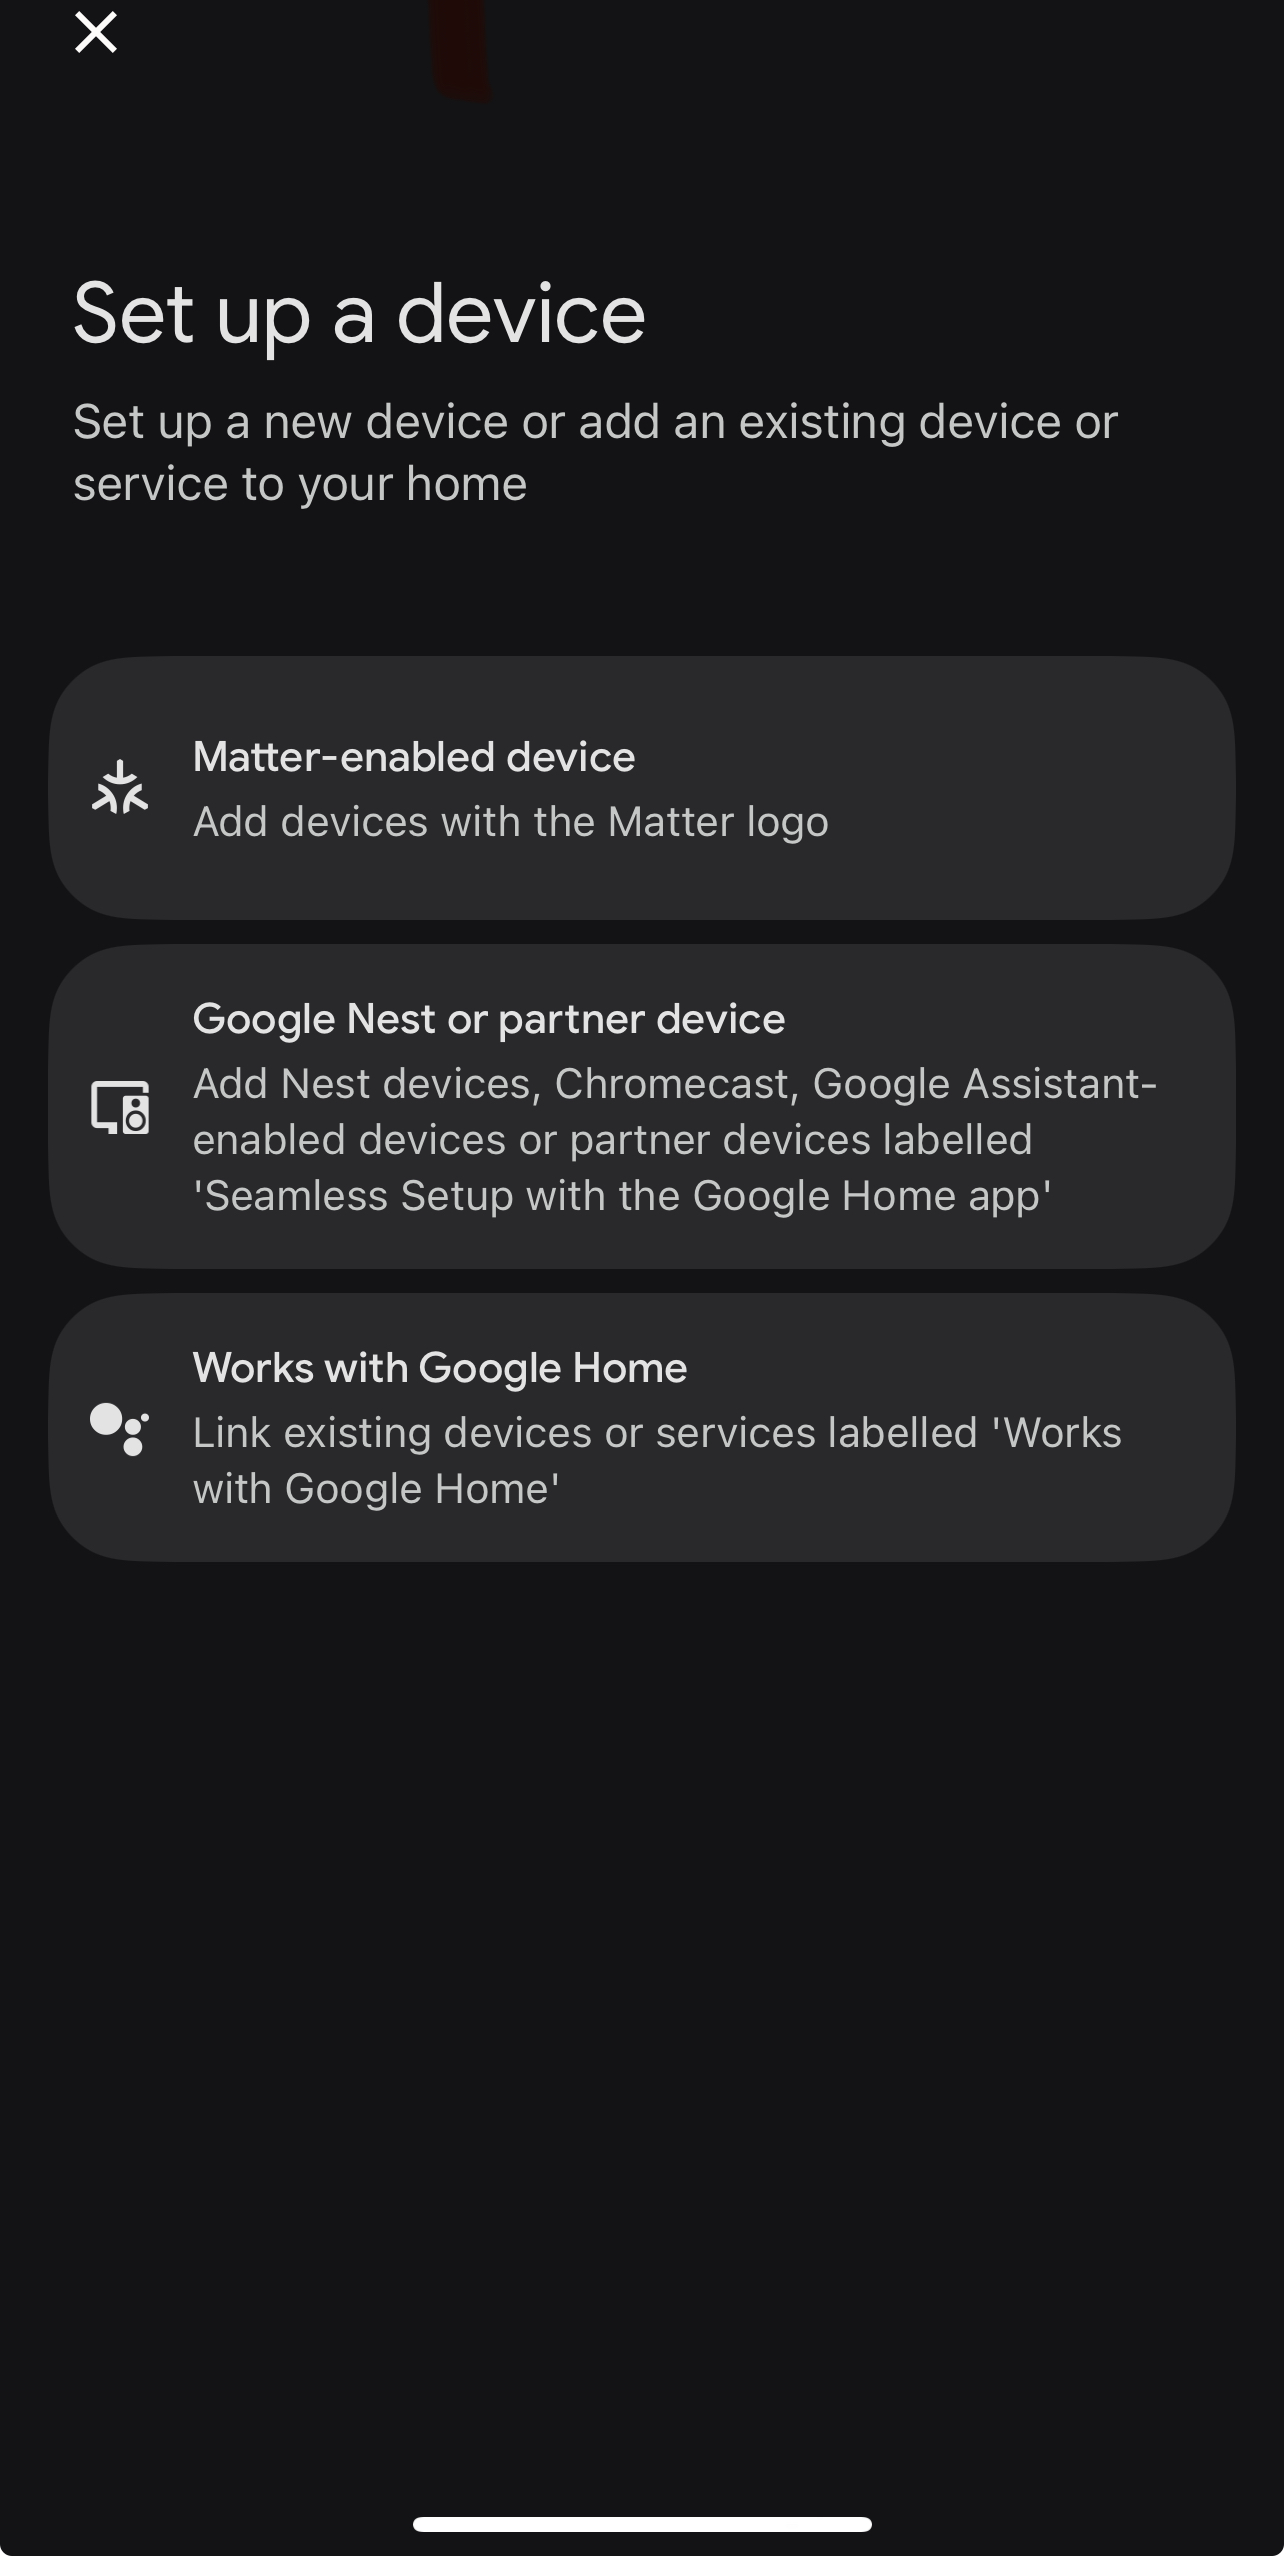
- Use the QR code (scan from Thinka UI) or choose "Set up without QR code" for manual pairing.
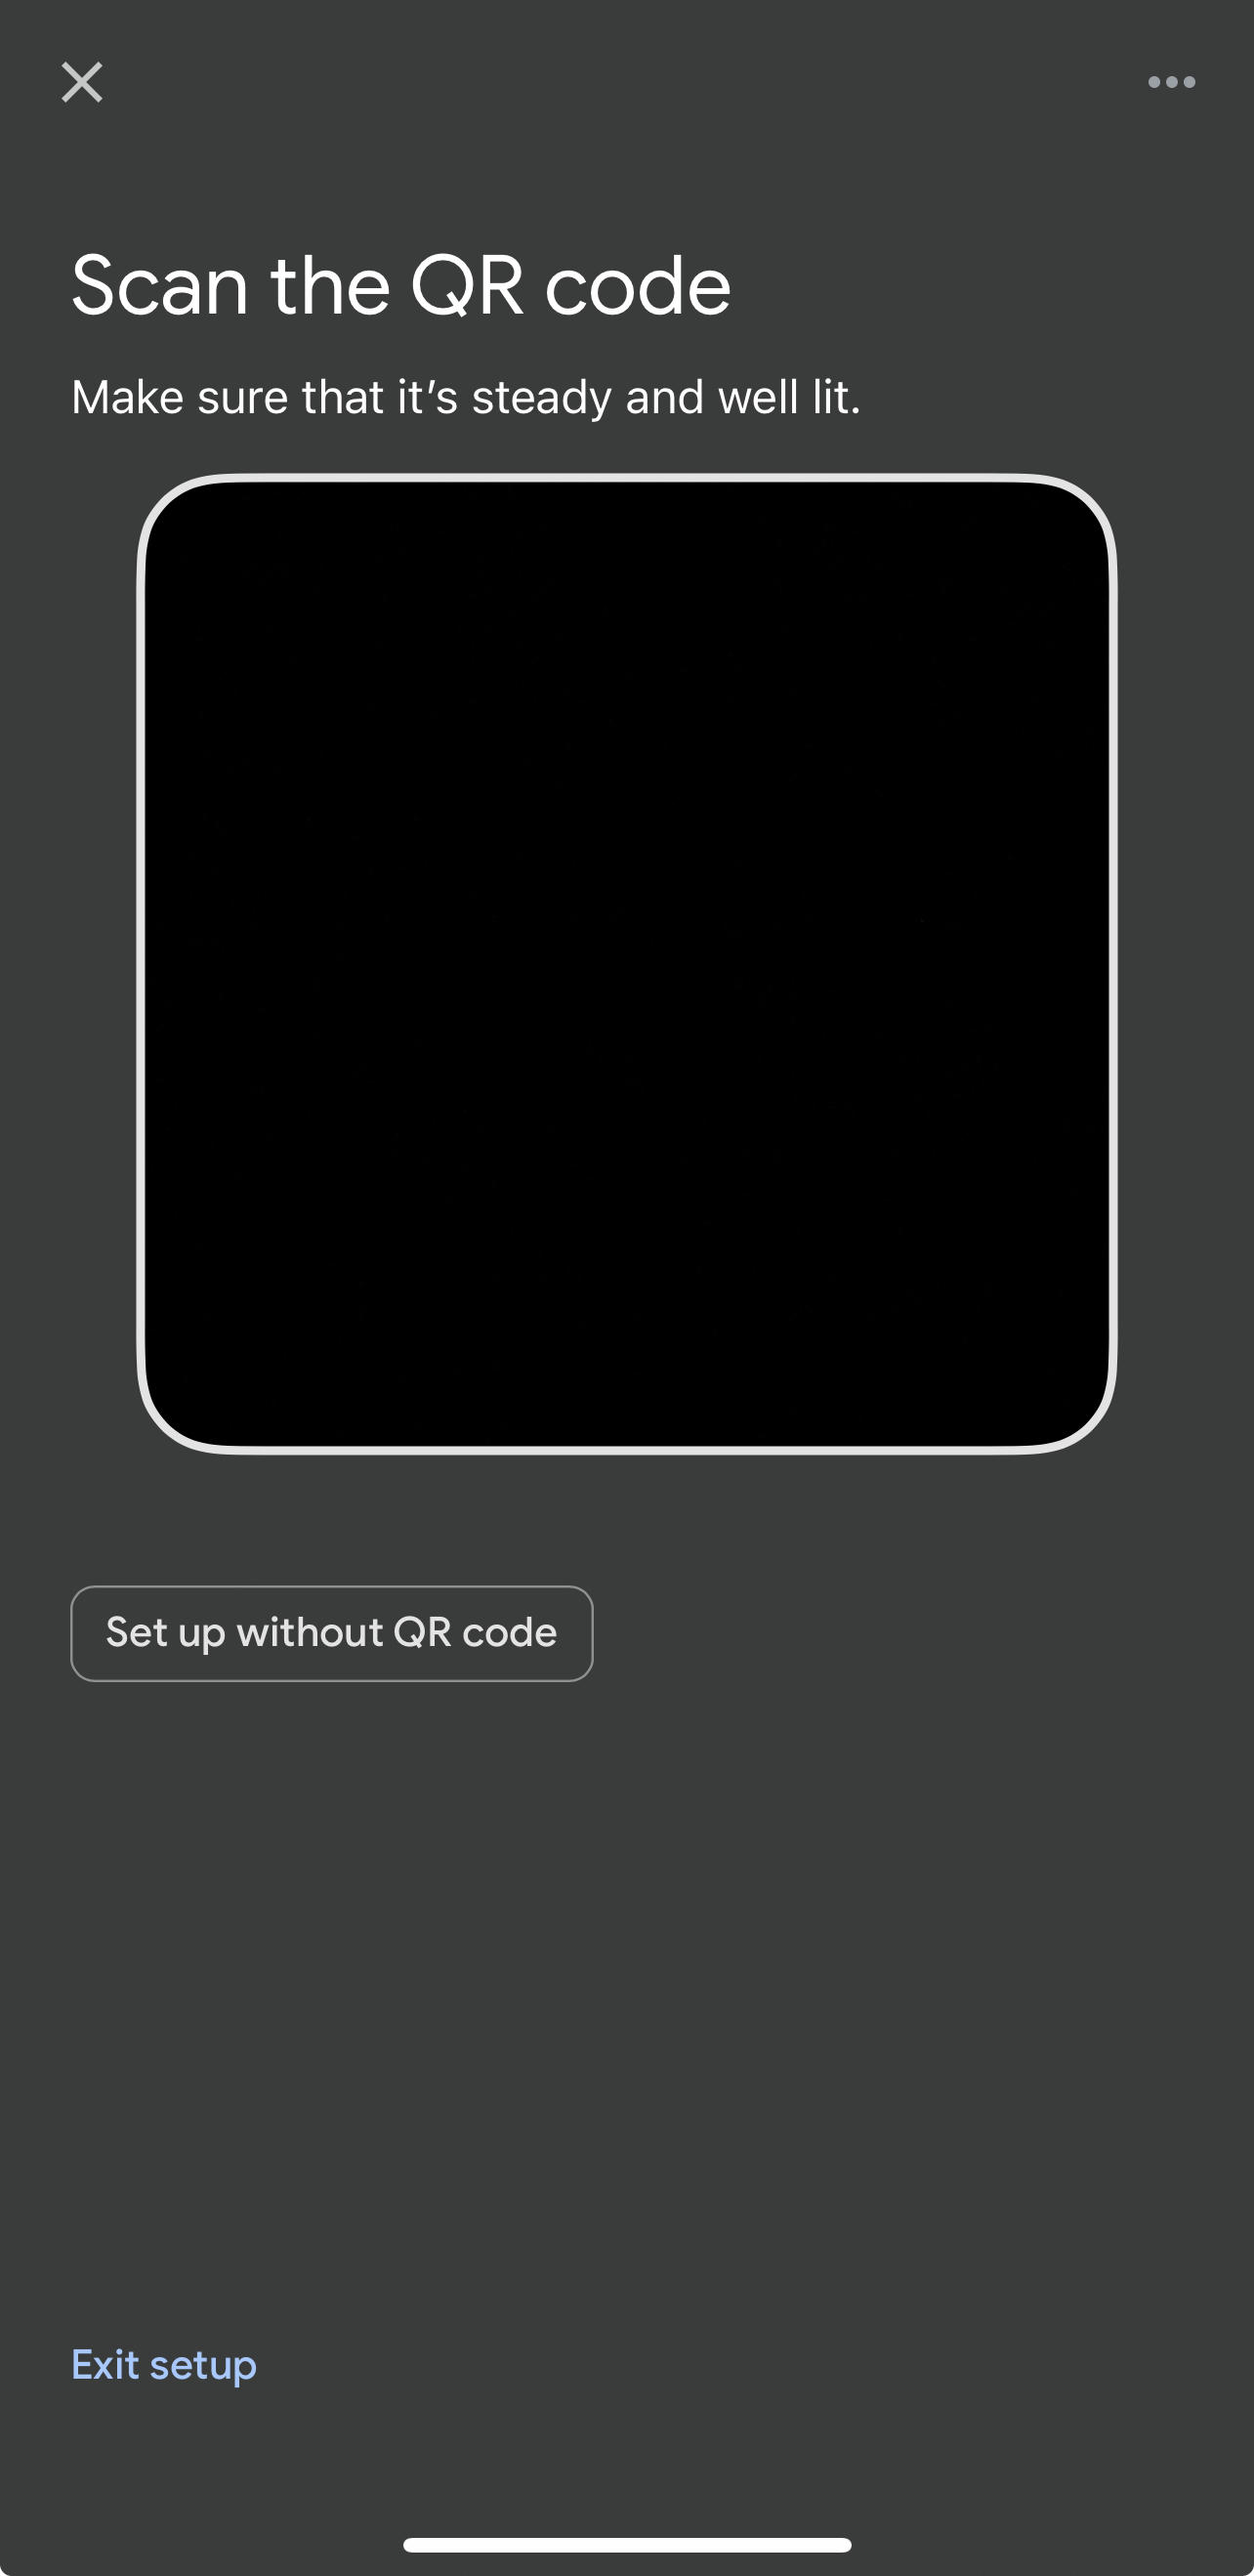
Manual Pairing Code: Enter the code from Thinka UI or the app already commissioned.

- Follow the on-screen steps, clicking Add Anyway when prompted.
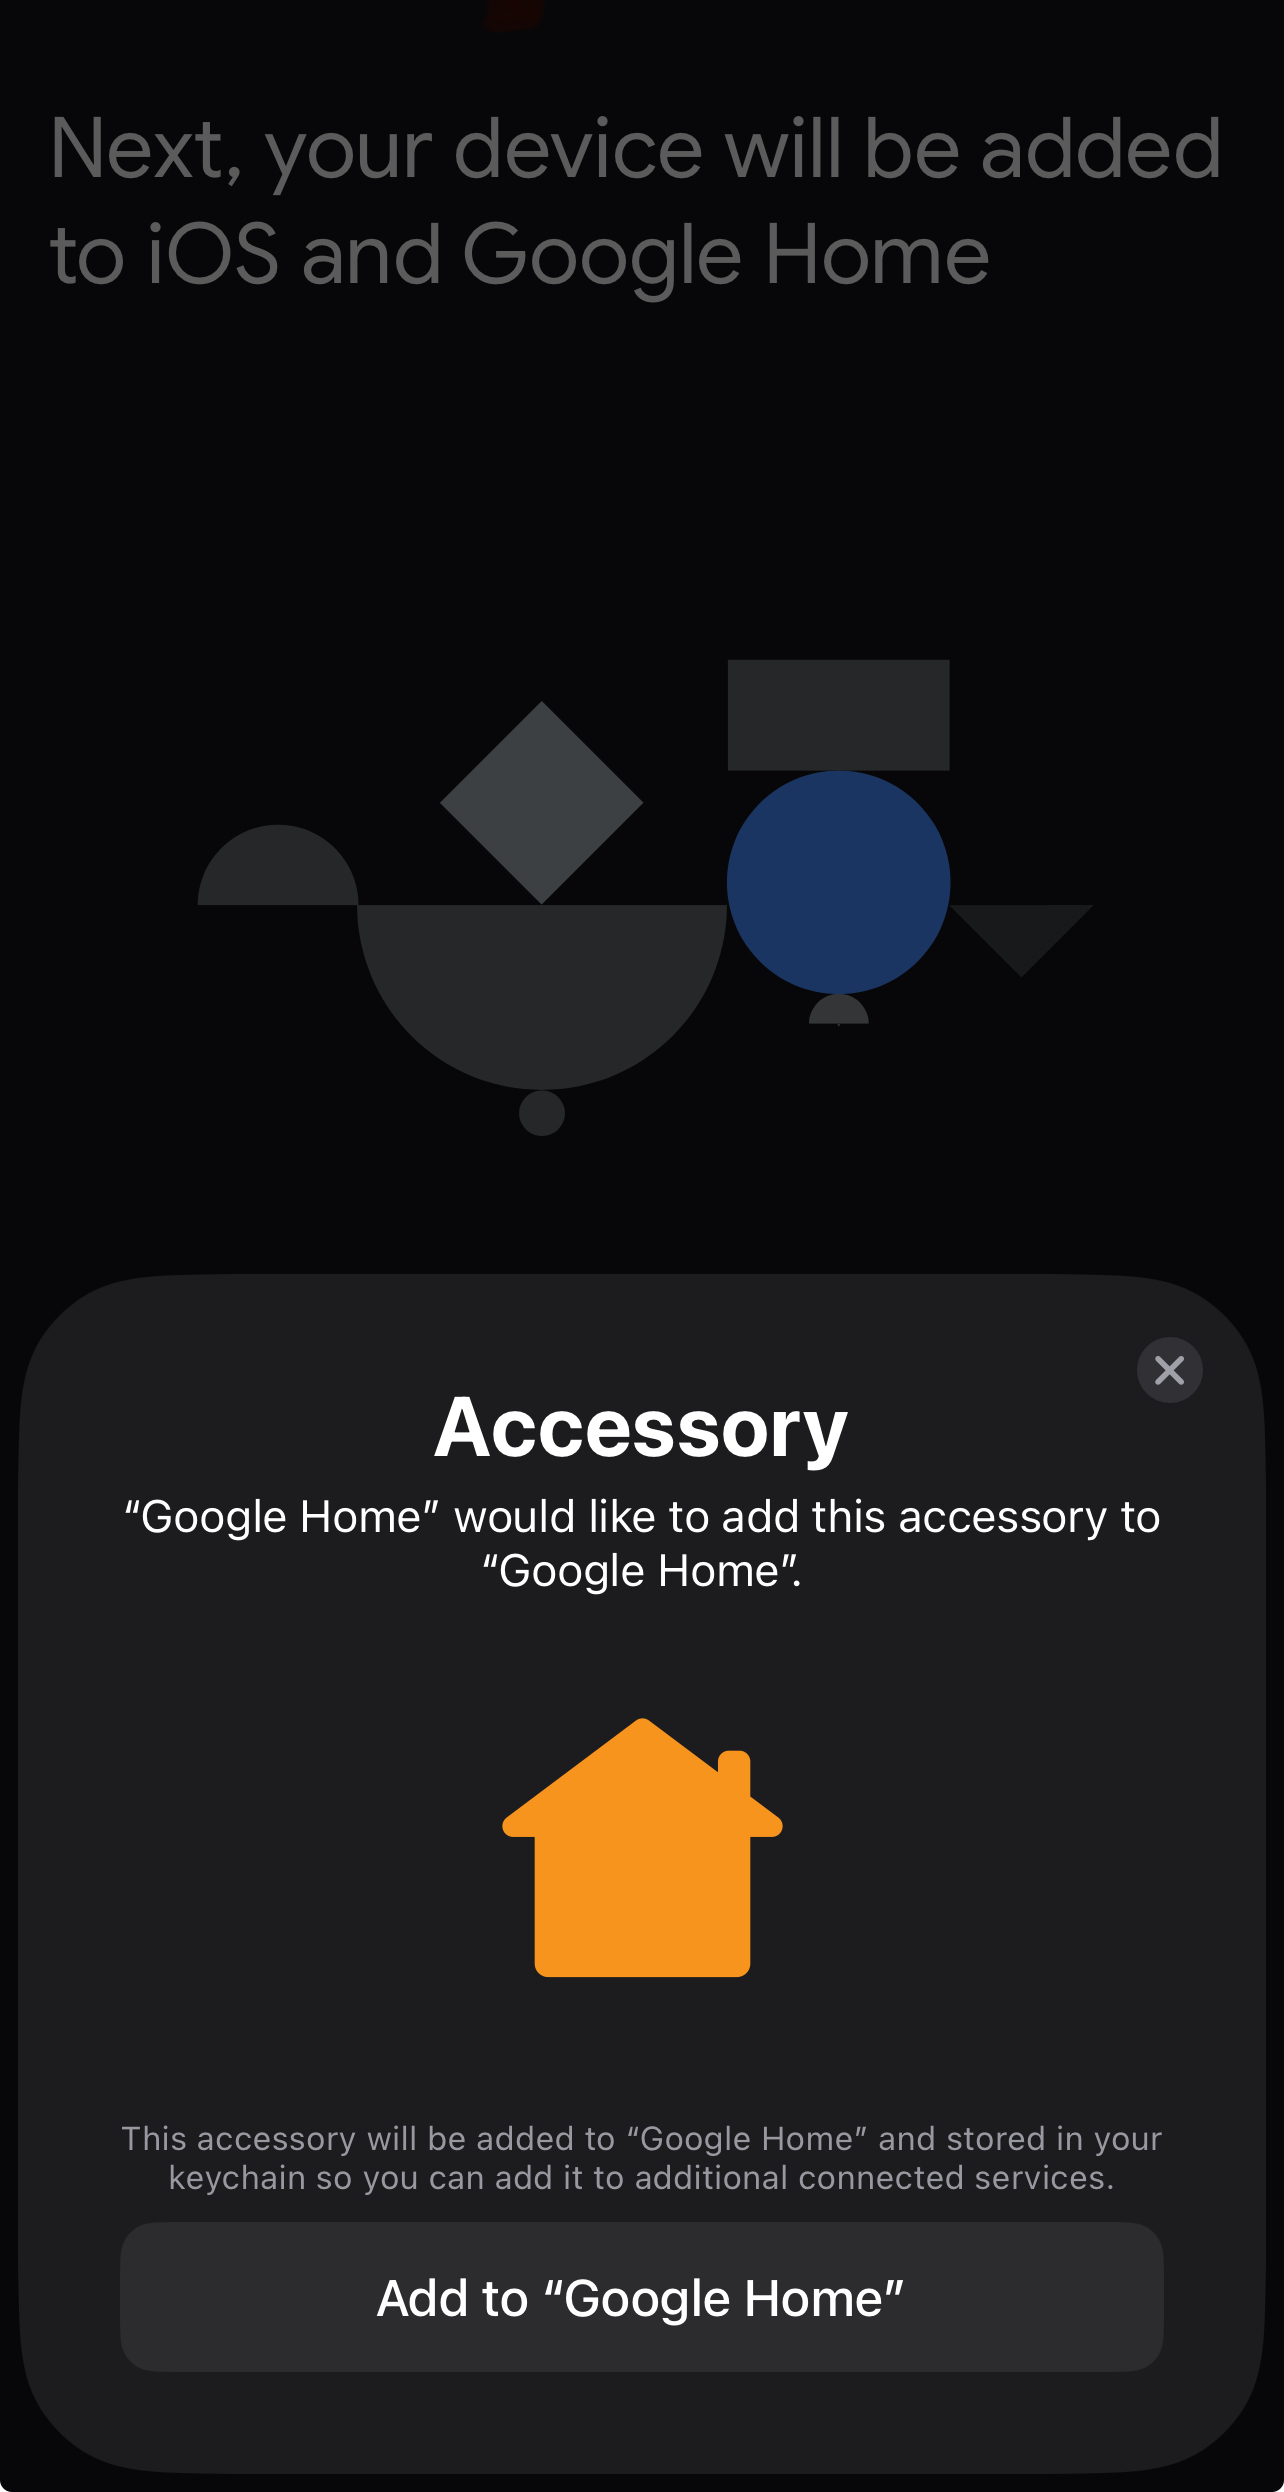
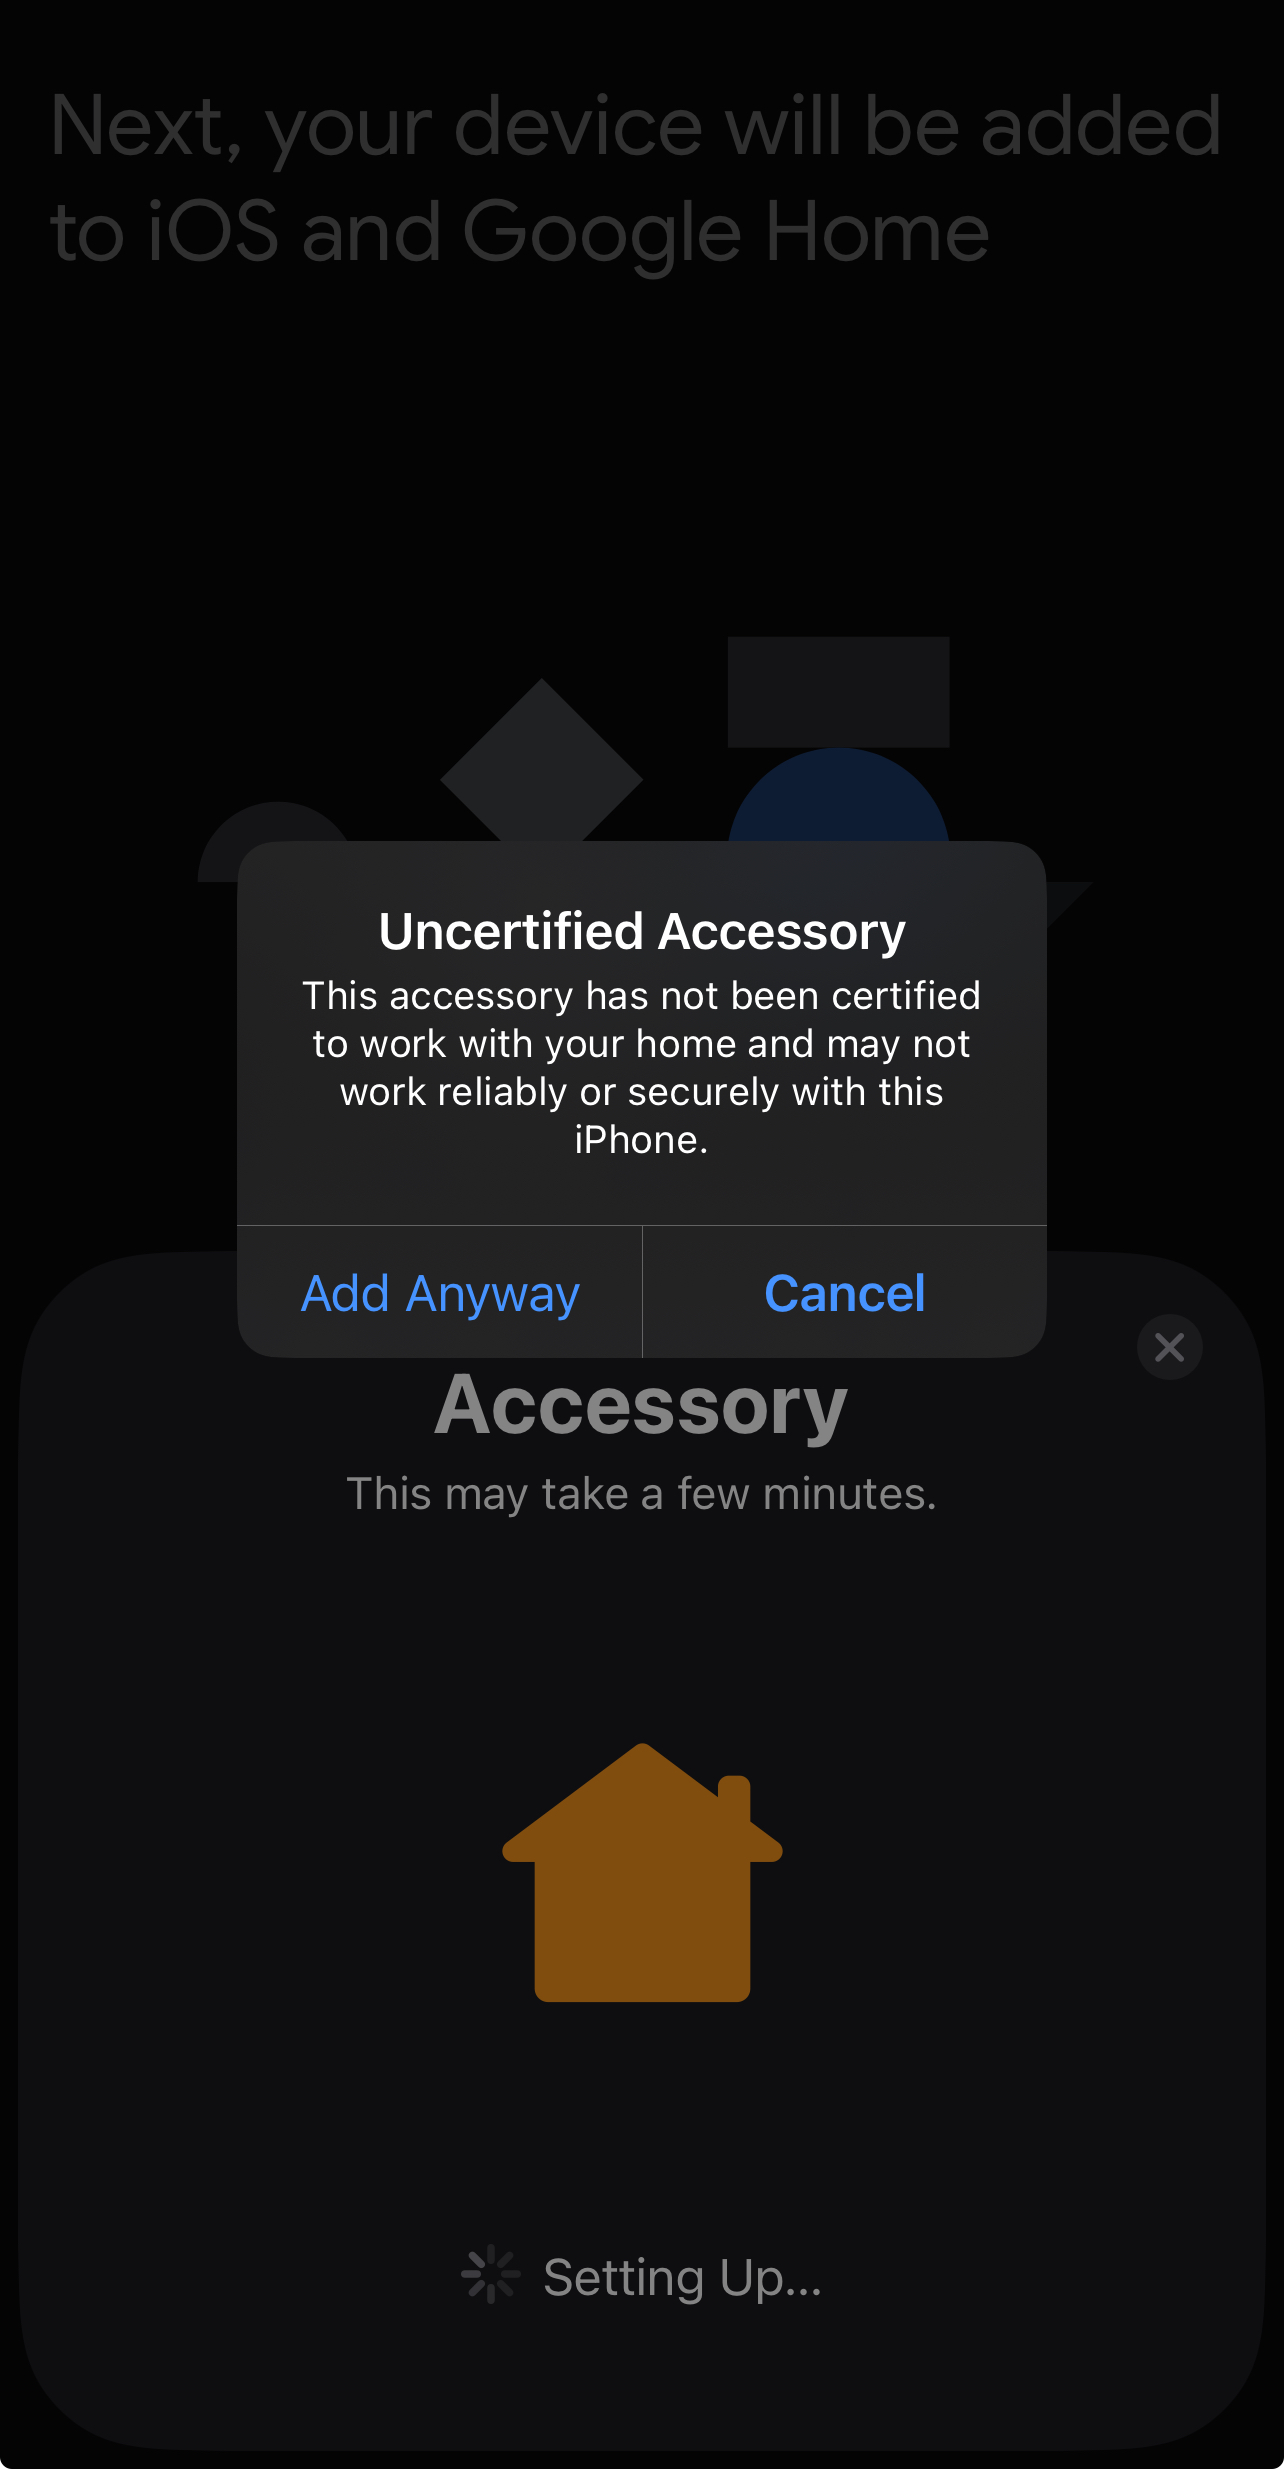
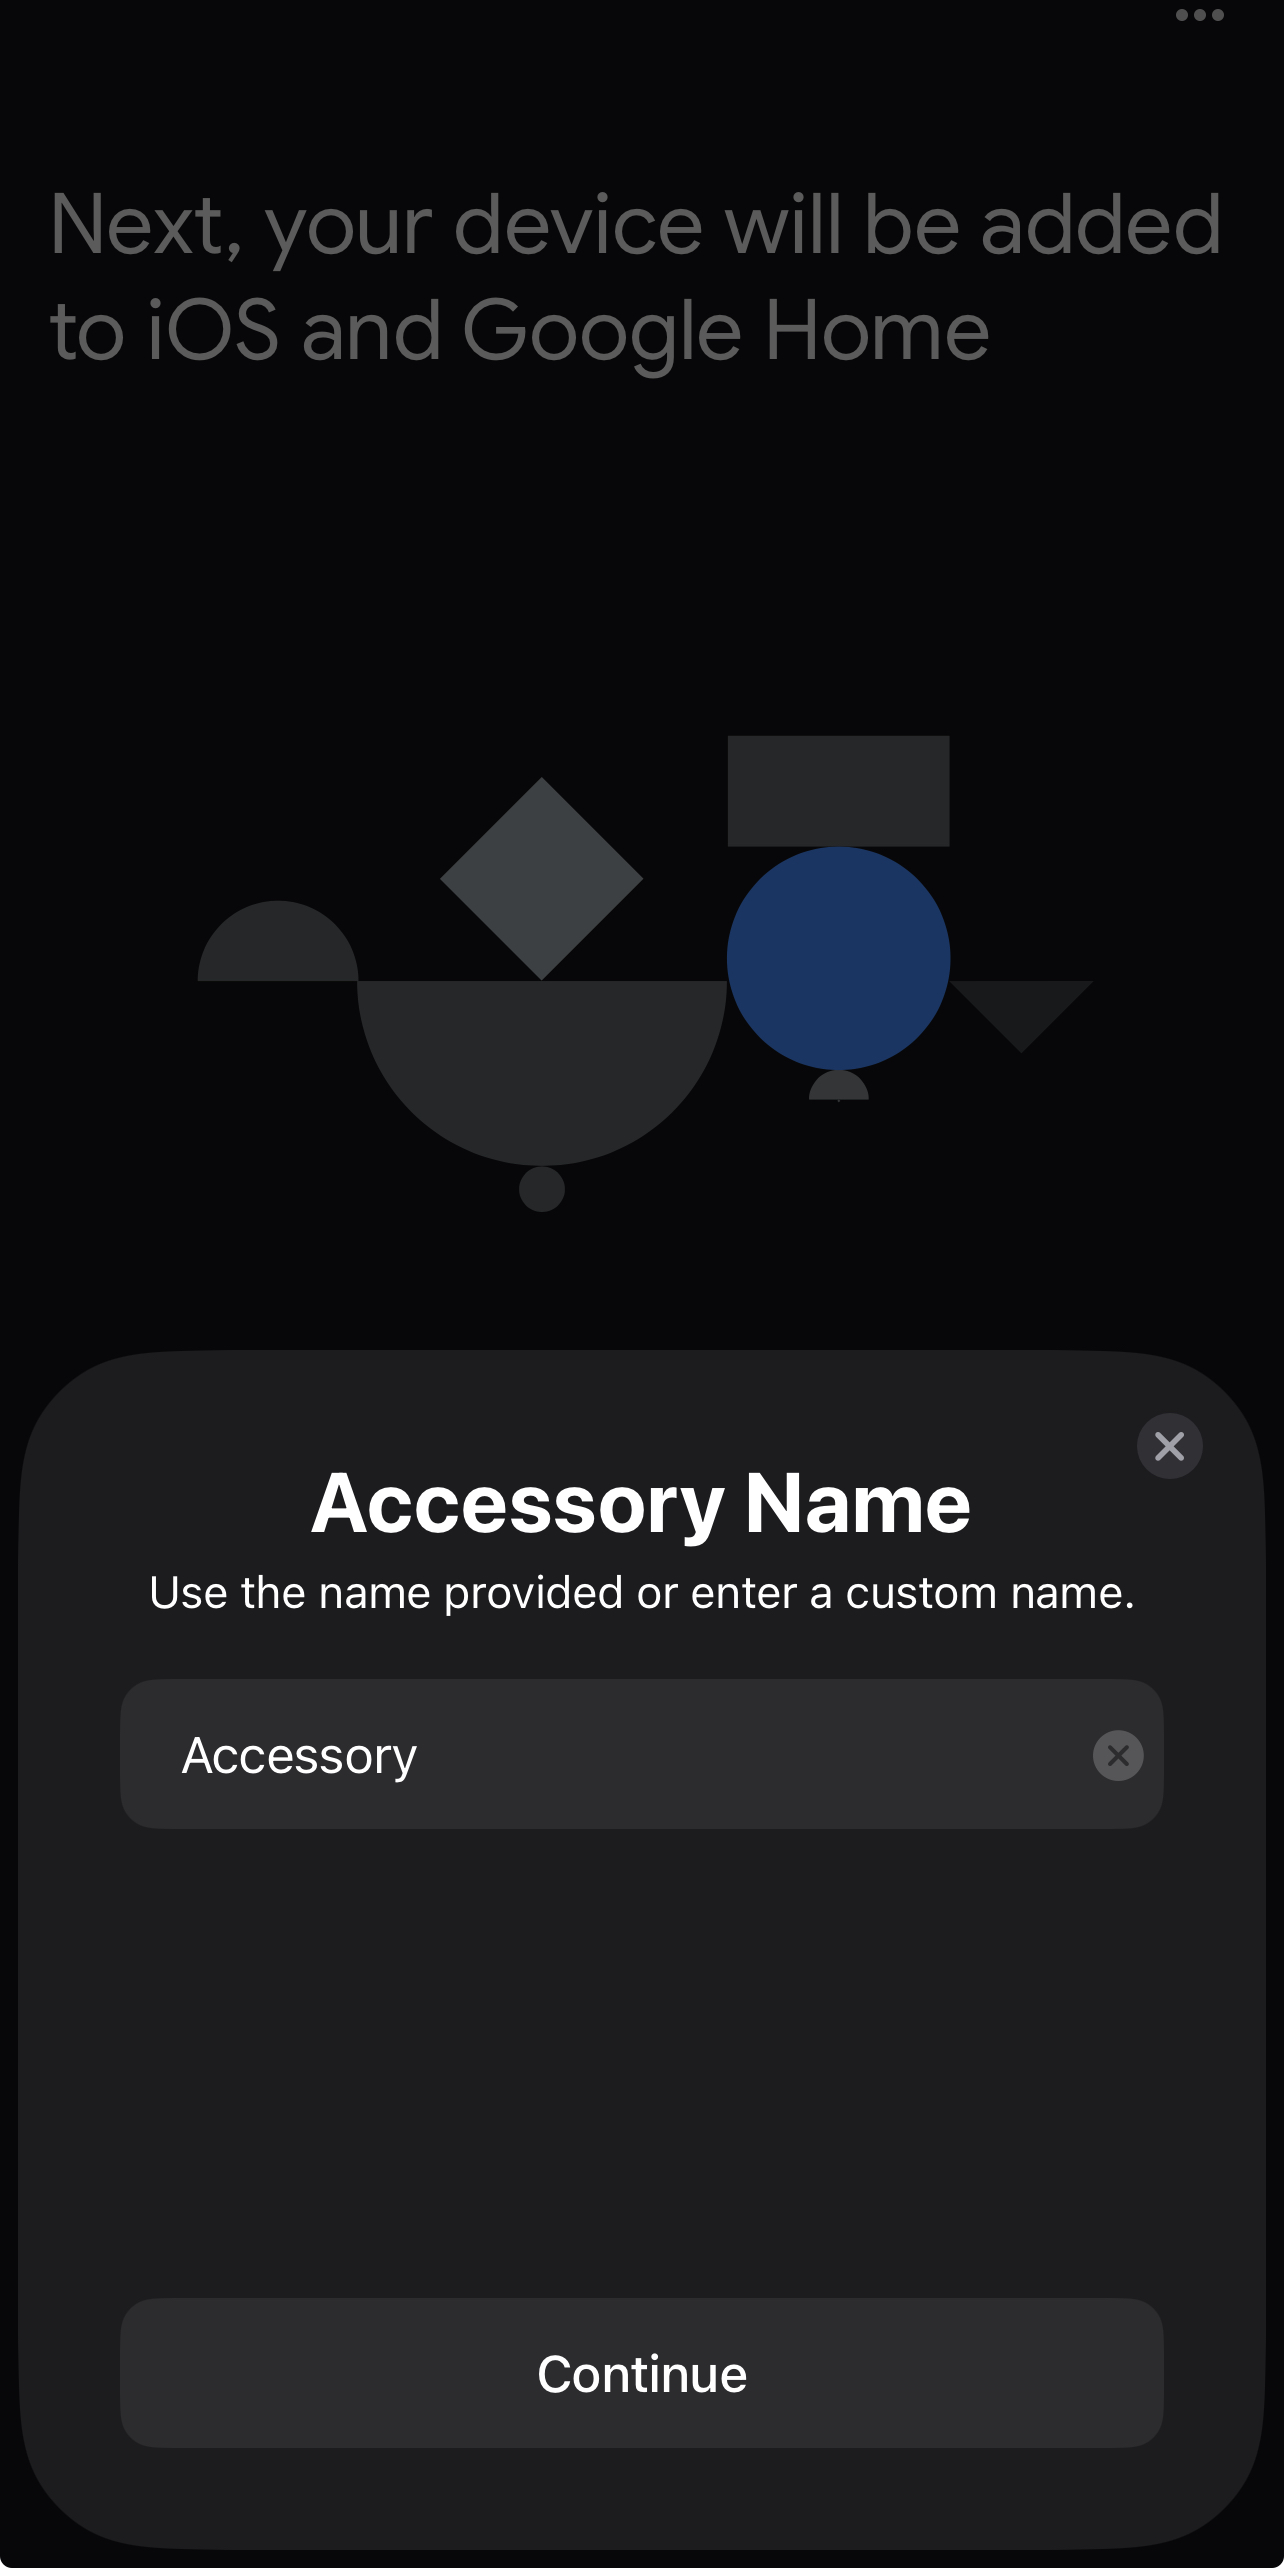
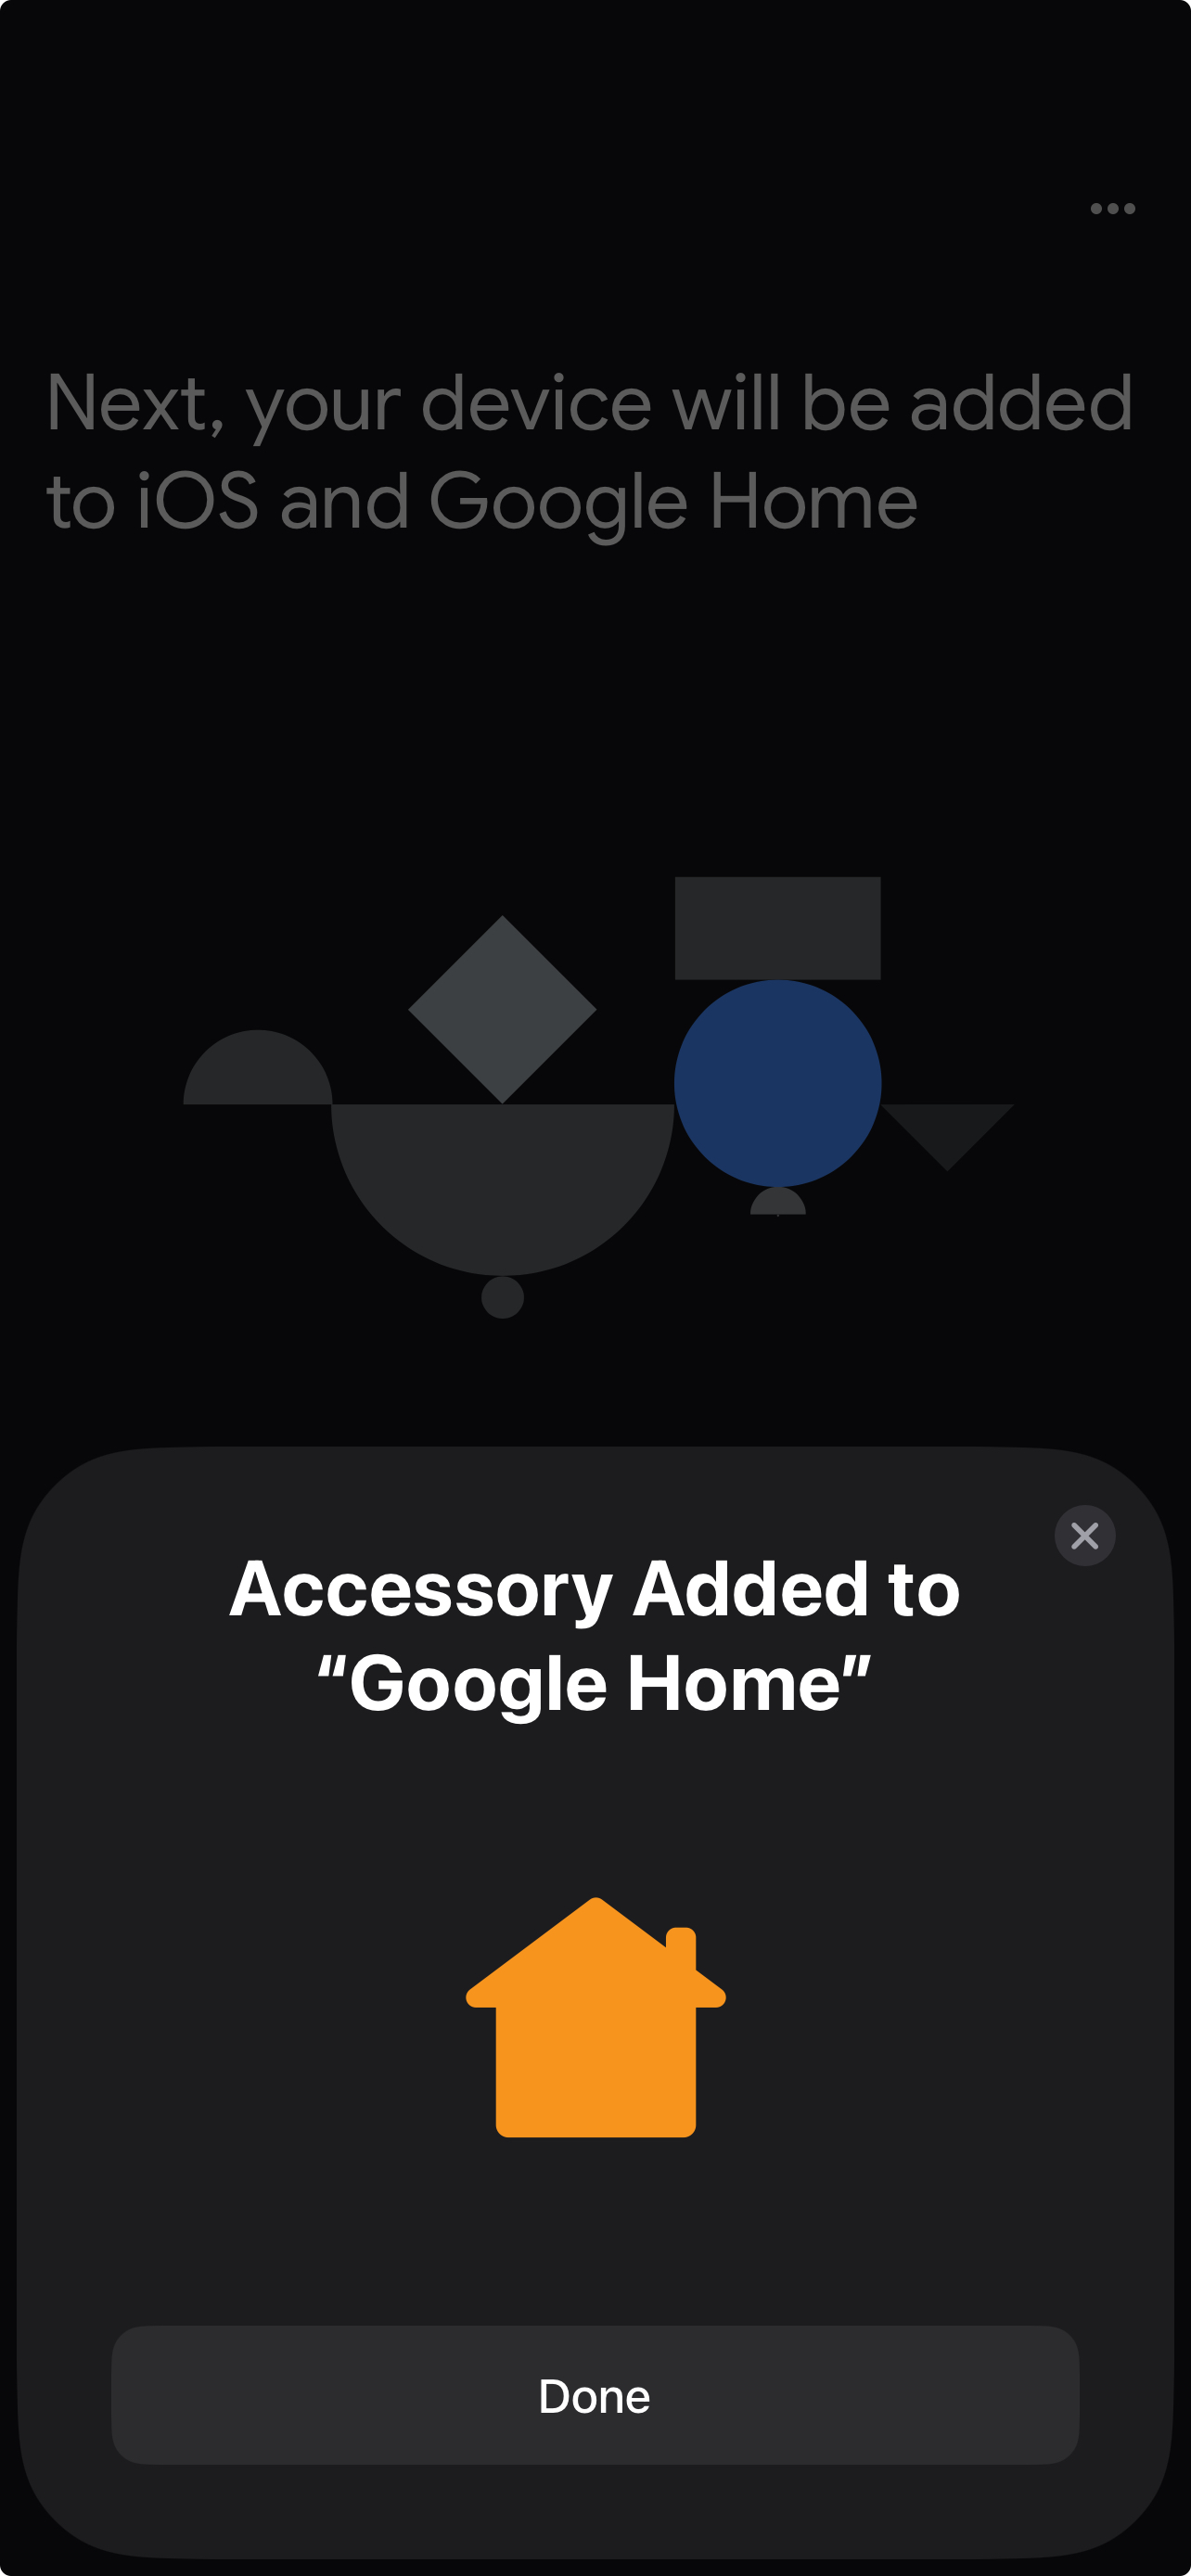
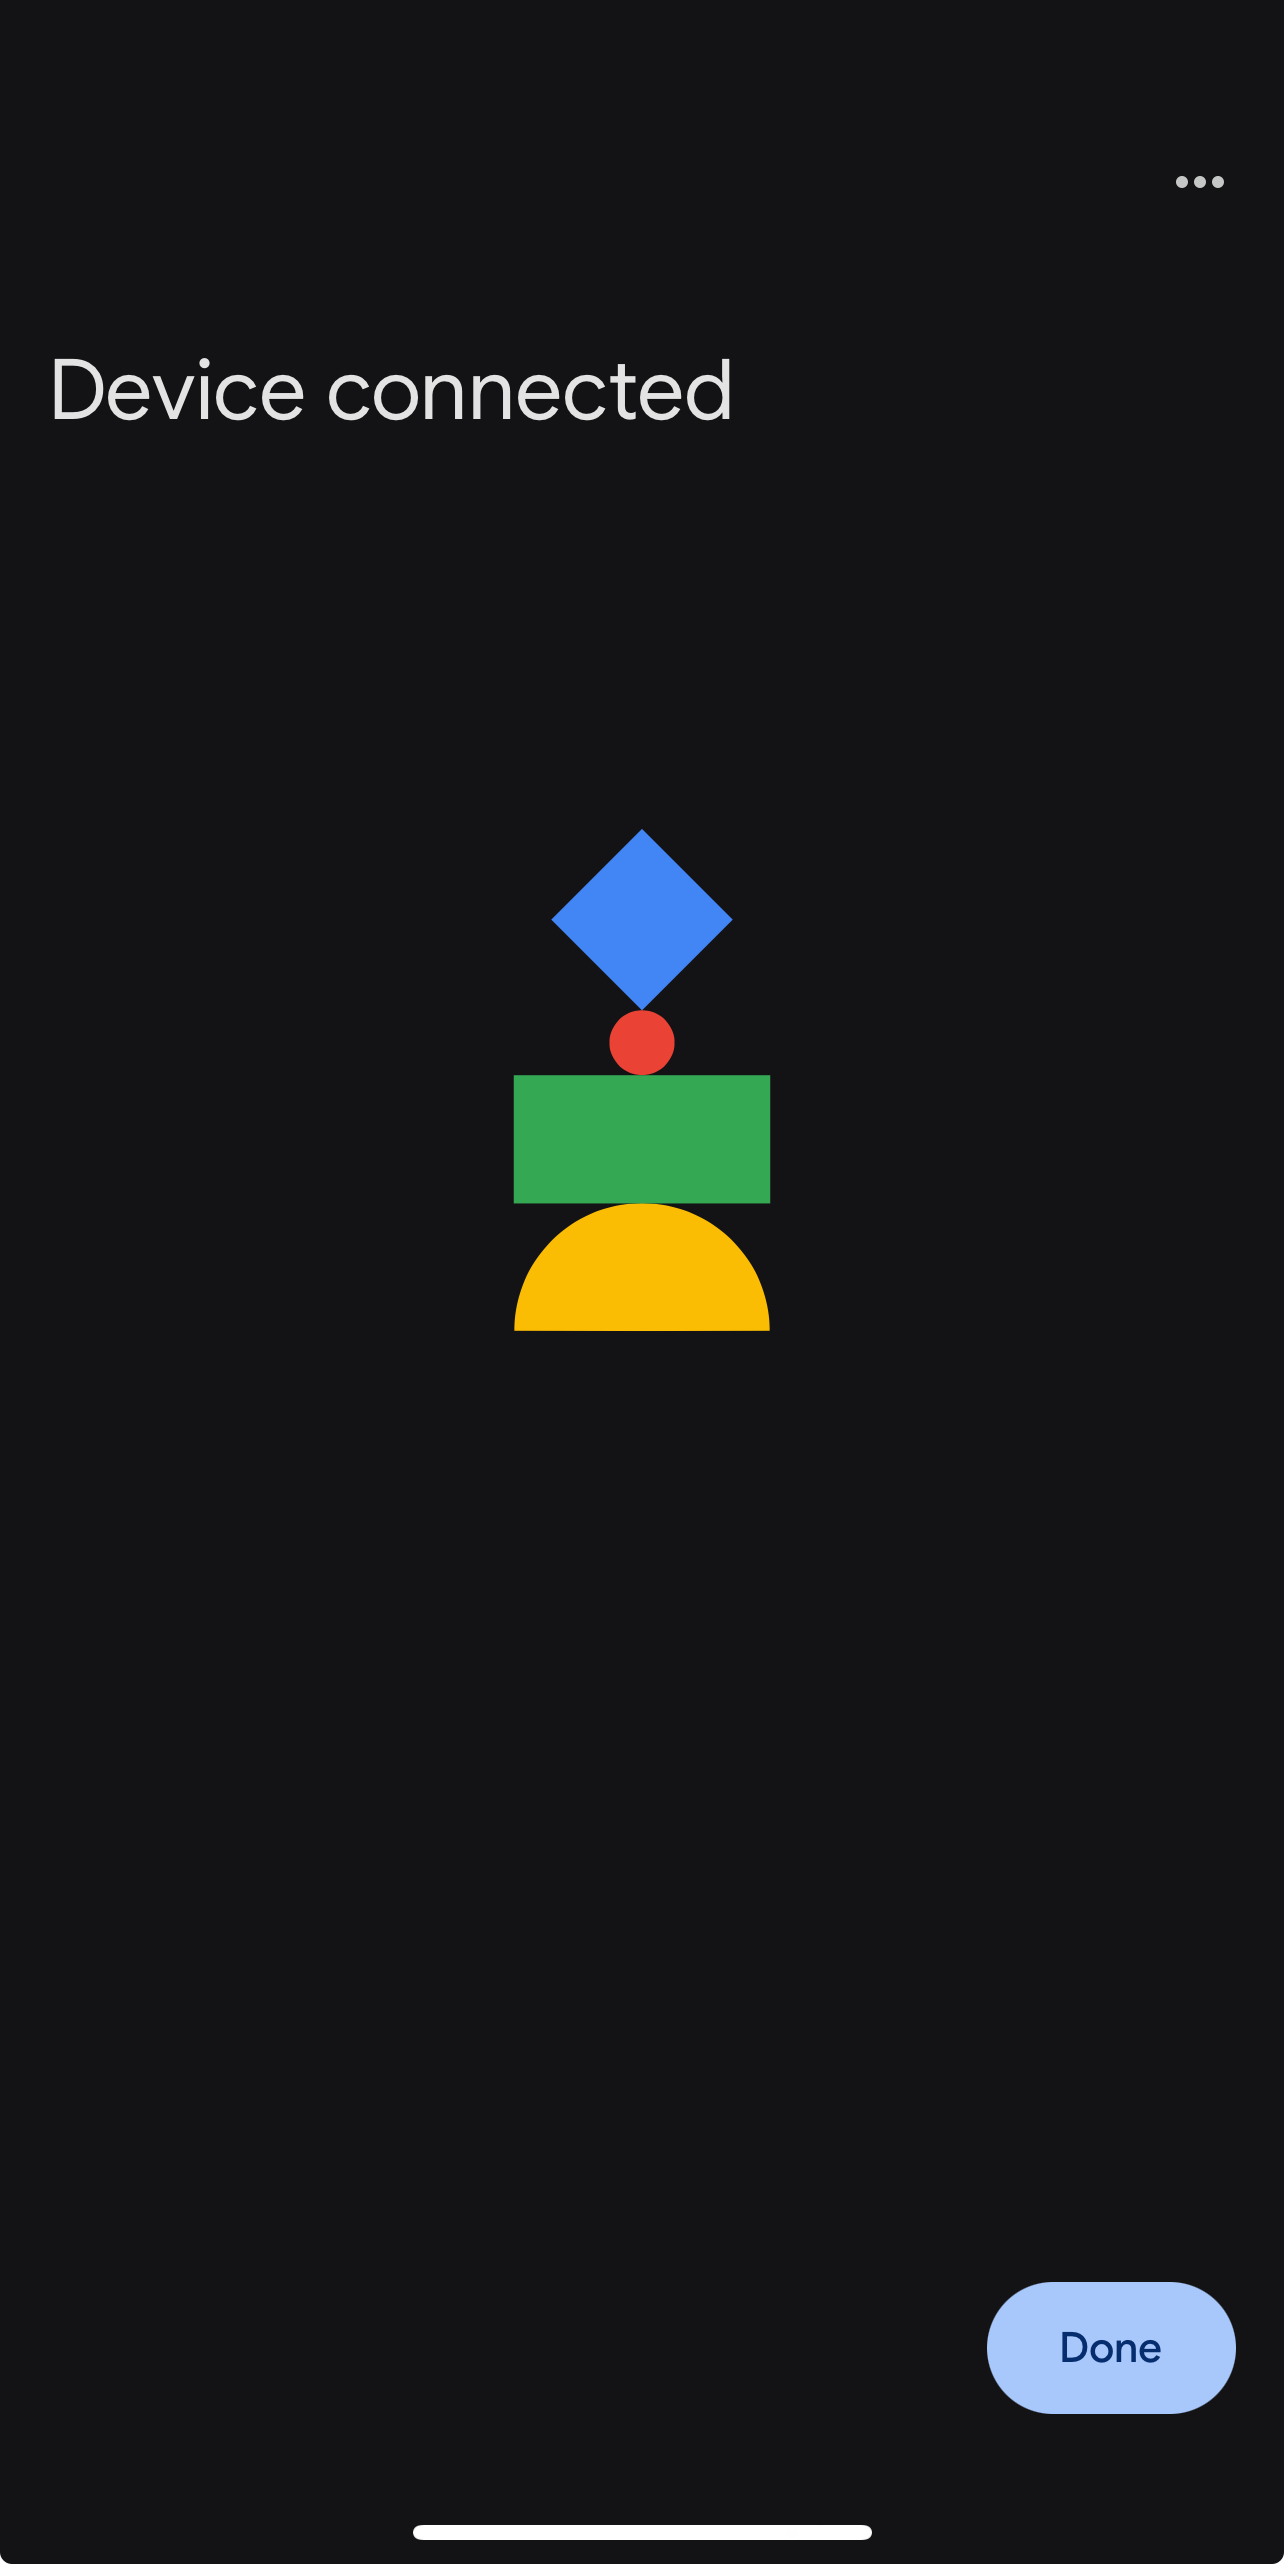
- After clicking Done, your accessories will appear in Google Home.
- Already Commissioned by Another Matter App?
If your Thinka Hub is already set up with Apple Home, SmartThings, Alexa, or another Matter app, simply share the setup code from the first app. In Apple Home, go to Home Settings → Home Hubs & Bridges → Matter Accessory, enable Pairing Mode, and copy the code.
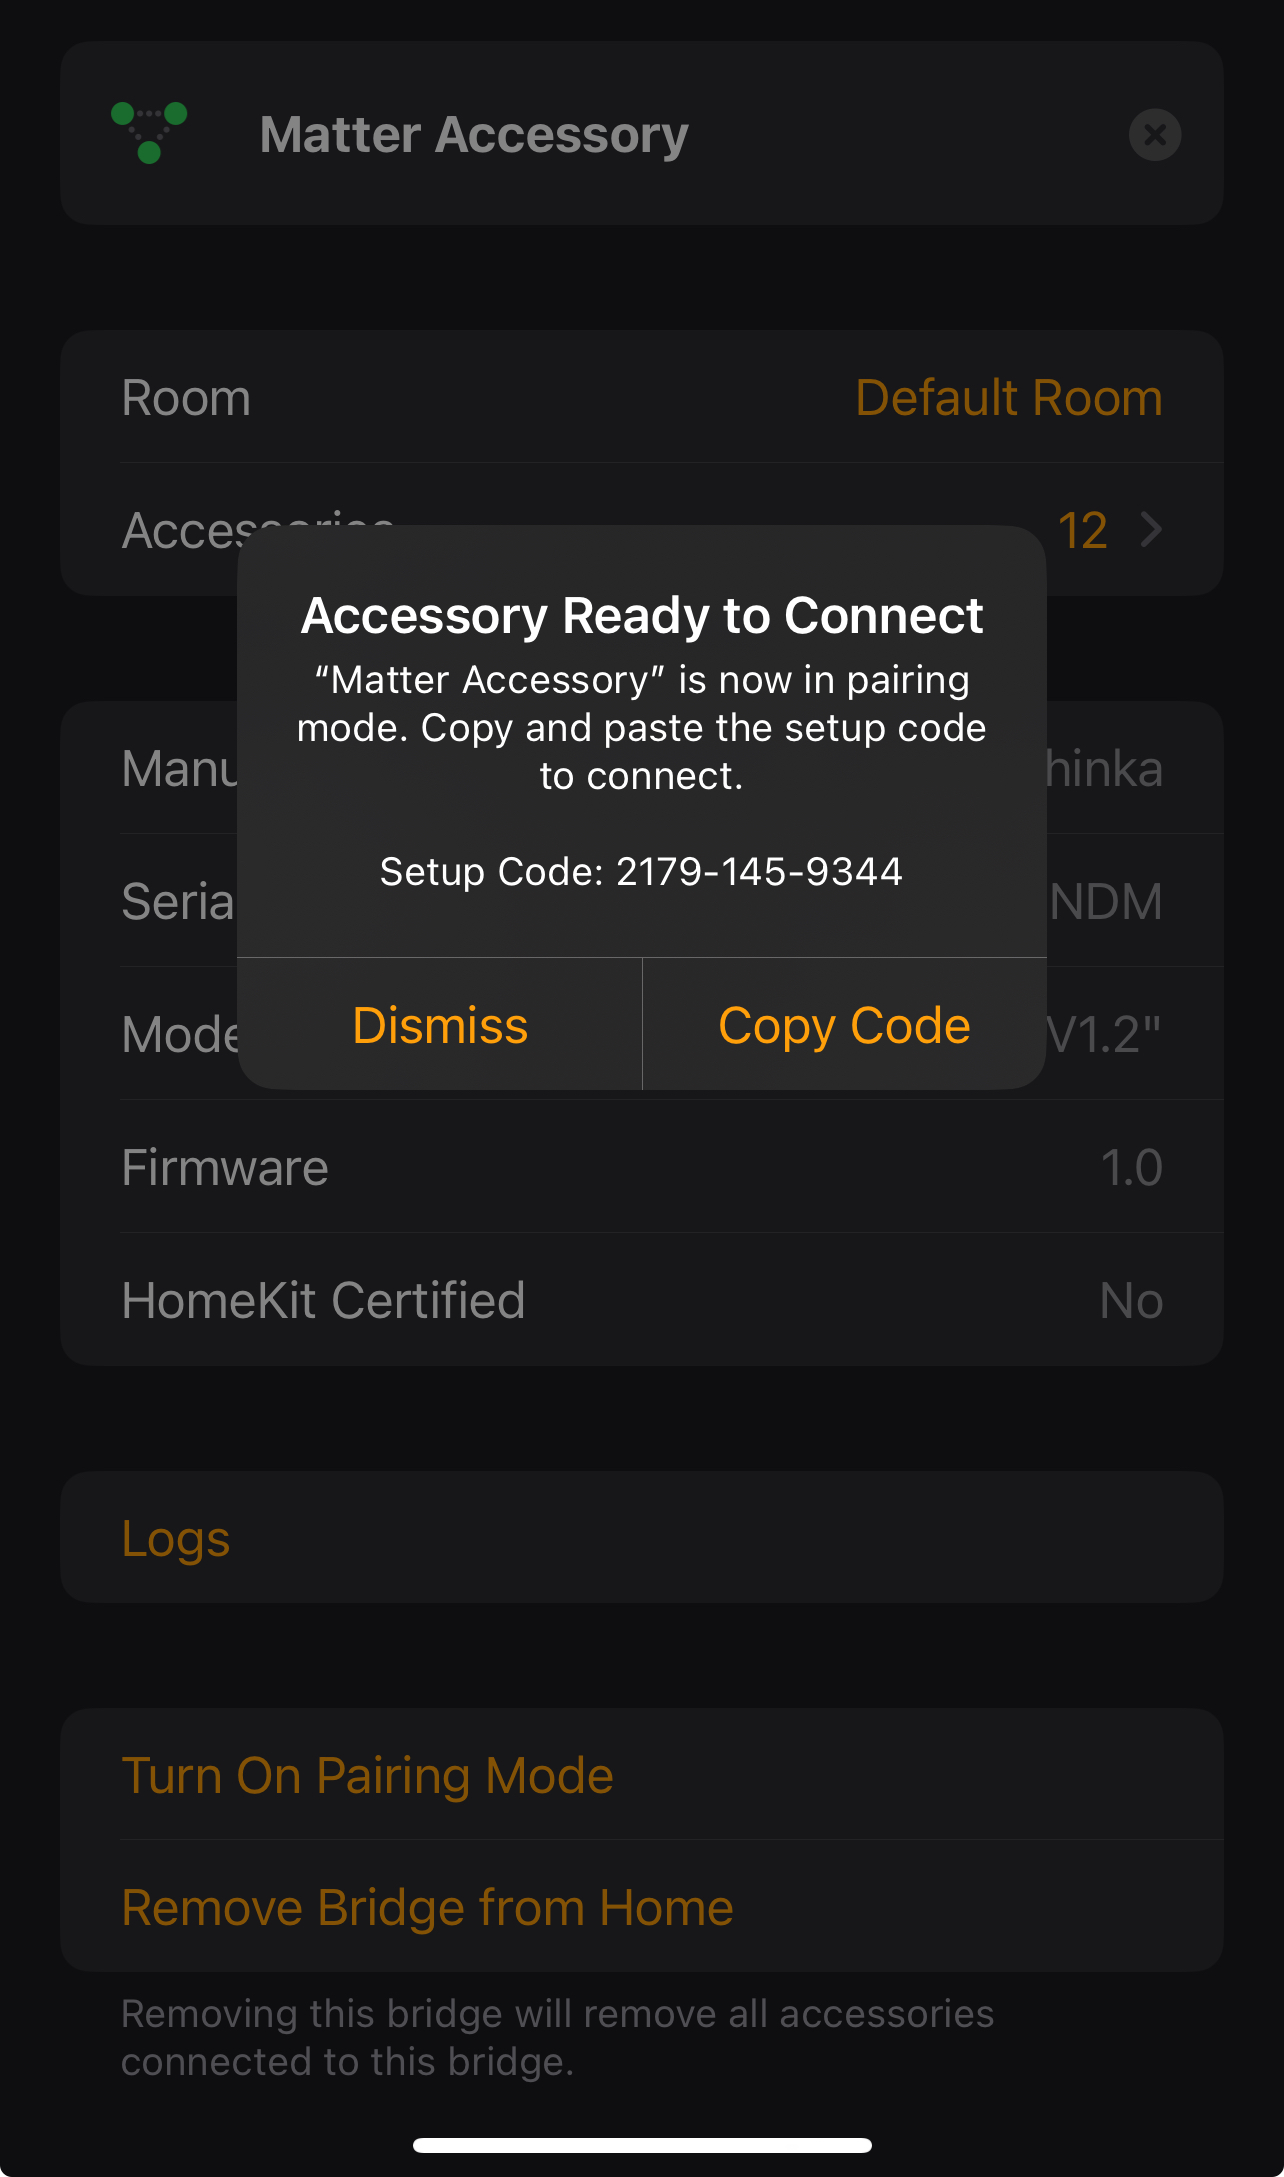
Continue using the Manual Pairing Code as described above.