Thinka for Z-Wave — FAQ
How Do I Log In to My Thinka?
Logging in to your Thinka is fast and easy! Just follow these simple steps:
- Open your preferred web browser and visit https://setup.thinka.eu.
- Enter the serial number of your Thinka device.
- You will be automatically redirected to your Thinka’s web interface on your local network.
- If your Thinka is password-protected, simply enter your password when prompted.
- Once logged in, you’ll be taken straight to the Settings page, where you can easily manage all your Thinka features and settings.
Pro Tip: For quick access in the future, bookmark your Thinka’s web interface so you can go directly to it without revisiting the setup.thinka.eu site.
Enjoy seamless control and management of your Thinka smart home hub—right from your browser!
Can I Use Thinka for Visualisation?
Yes, Thinka is designed for seamless visualisation of your smart home devices!
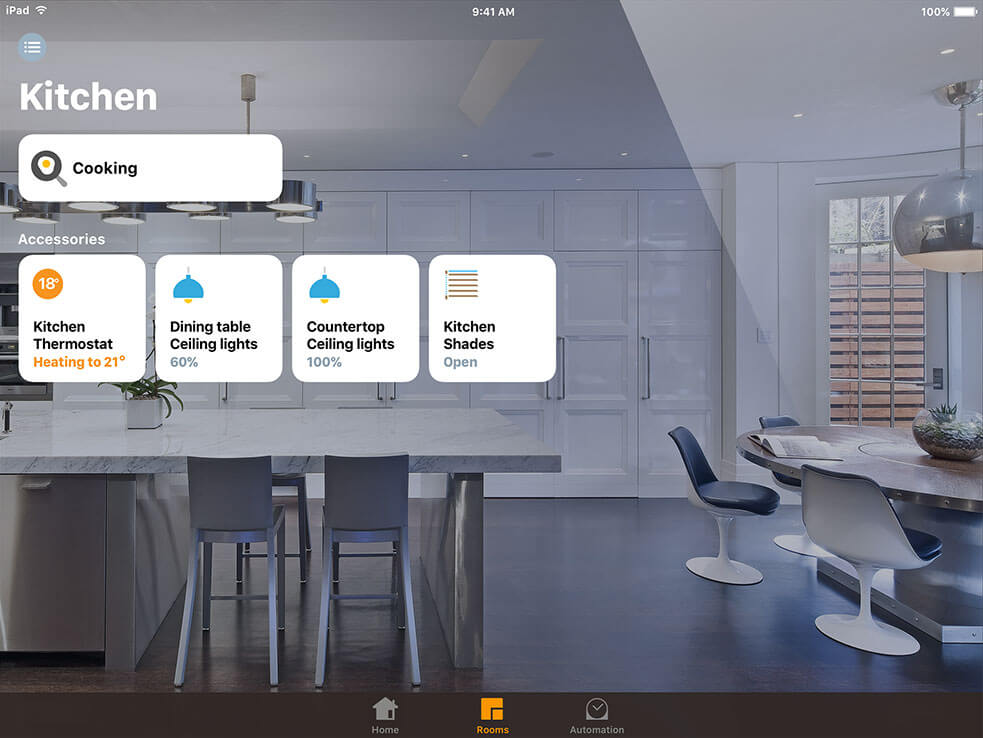
- Effortlessly monitor and control your home with HomeKit on your iPad, iPhone, Apple TV, or Apple Watch.
- Prefer Amazon Alexa or Google Home? Thinka also integrates smoothly with their apps for easy visualisation and management.
- Enjoy the convenience of voice control or explore intuitive interfaces—choose the platform that fits your lifestyle!
With Thinka, your smart home is always at your fingertips, offering you flexibility, comfort, and complete control from your favorite device.
Where Can I Find the Serial Number of My Thinka?
Locating your Thinka serial number is simple and essential for product registration, support, and updates. Here’s how you can easily find it:
- On the Device: The Thinka serial number is a unique six-character code (for example, XD4DS3). You’ll find it printed on the back of your Thinka device, right next to the S/N symbol for easy identification.
- Via Web Interface: Access your Thinka’s web interface and navigate to Settings → Thinka. Here, your serial number will be clearly displayed for your reference.
- Using the Thinka Companion App: You can also quickly view your serial number through the Thinka Companion app for added convenience.
Whether you’re setting up your Thinka, seeking support, or registering your product, your serial number is always just a few steps away!
What Types of Remote Access Does Thinka Offer?
Thinka provides a variety of secure and convenient remote access solutions, designed to fit your needs—whether you’re a homeowner, integrator, or require technical support. Explore the options below to see which remote access method is right for you:
- Thinka Support Access: Need assistance? Our support team can securely connect to your Thinka for troubleshooting. Learn more about granting Thinka support remote access.
- System Integrator Web Access: Let your system integrator manage and configure your Thinka remotely for seamless integration and updates. Discover how to set up remote access for your integrator.
- HomeKit Remote Control: Enjoy full control of your smart home devices from anywhere using Apple HomeKit. Find out how to control your home remotely with HomeKit.
- VPN Access (PRO Version Only): For advanced users, connect securely via VPN—ideal for ETS and professional setups. See how to set up VPN access.
With Thinka, remote access is safe, flexible, and tailored to your needs!
How to Easily Locate Your Thinka Device on Your Network
Finding your Thinka on your local network is quick and simple! Just follow these easy steps:
- Visit https://setup.thinka.eu/ in your web browser.
- Enter the serial number (S/N) of your Thinka device.
- Once submitted, you’ll be automatically redirected to the last known IP address of your Thinka on your LAN for easy access and configuration.
With this simple process, locating your Thinka on your home or office network has never been easier. For more information on finding your Thinka’s serial number, just click the link above.
Enjoy seamless smart home integration with Thinka—start managing your device today!
How to Configure the IP Address of Your Thinka Device
Setting up your Thinka is quick and hassle-free! By default, your Thinka automatically uses DHCP to obtain an IP address from your network, so you don’t need to worry about manual configuration—just plug it in and get started.
- Automatic Setup: Thinka connects to your network and receives its IP address automatically through DHCP, making installation easy and seamless.
- Need a Static IP Address? If you prefer your Thinka to always have the same IP address, simply reserve a static IP through your router’s settings. This gives you complete control and ensures consistent connectivity.
- No Extra Configuration Needed: Enjoy a smooth experience with Thinka’s plug-and-play setup, whether you use automatic or static IP assignment.
For more detailed instructions on reserving a static IP address, please refer to your router’s user manual or support website. With Thinka, connecting your smart home is always simple and reliable!
Do I Need to Configure My Network for Thinka?
Good news! Setting up Thinka is effortless—there’s no need for complicated network configurations. Thinka automatically connects to your local network using DHCP, so it quickly obtains an IP address from your LAN without any manual setup required.
No internet access is required for Thinka to function within your home network. You don’t need to open any incoming ports or adjust your firewall or router settings, ensuring your network remains secure and private.
Thinka will only use outgoing internet access for a few optional features:
- Receiving software updates directly from our secure private repositories
- Integrating with smart home assistants like Amazon Alexa
- Connecting to Google Home for seamless voice control
- Enabling remote support access when you need expert help
Enjoy hassle-free installation and peace of mind knowing Thinka is designed to work securely with minimal network demands.
What is a Window Covering?
A Window Covering is a versatile term used by Apple HomeKit to describe smart home solutions such as Venetian blinds, shades, and curtains. These window treatments not only enhance your home's style but also offer privacy, light control, and energy efficiency.
- Venetian Blinds: Adjustable slats allow you to control sunlight and privacy with precision.
- Shades: Smooth, fabric coverings that can be raised or lowered for a clean, modern look.
- Curtains: Classic fabric panels that add elegance and can be automated for convenience.
With HomeKit compatibility, you can easily control your window coverings through your iPhone, iPad, or voice commands with Siri. Whether you want to let in morning sunlight or darken a room for movie night, smart window coverings provide comfort, convenience, and style for any home.
Do You Support Venetian Blinds?
Yes, we proudly support Venetian blinds! Our smart system allows you to easily control both the up and down movement and the tilt angle of your Venetian blinds for optimal light and privacy.
- Effortless Control: Adjust the blinds’ height and slat angle with a simple tap or voice command.
- Personalized Comfort: Let in just the right amount of sunlight or enjoy complete privacy anytime.
- Energy Efficiency: Fine-tune your blinds to help regulate indoor temperature and save on energy bills.
- Seamless Integration: Our system works smoothly with your existing Venetian blinds setup.
Whether you want to brighten your room or block out the light, our support for Venetian blinds puts you in total control. Enjoy convenience, style, and smarter living with our easy-to-use solutions.
How to Configure Google Assistant for Thinka Z-Wave
Setting up Google Assistant with your Thinka Z-Wave is fast and easy! Follow these simple steps to enjoy hands-free control of your smart home devices.
-
Step 1: Enable Google Home
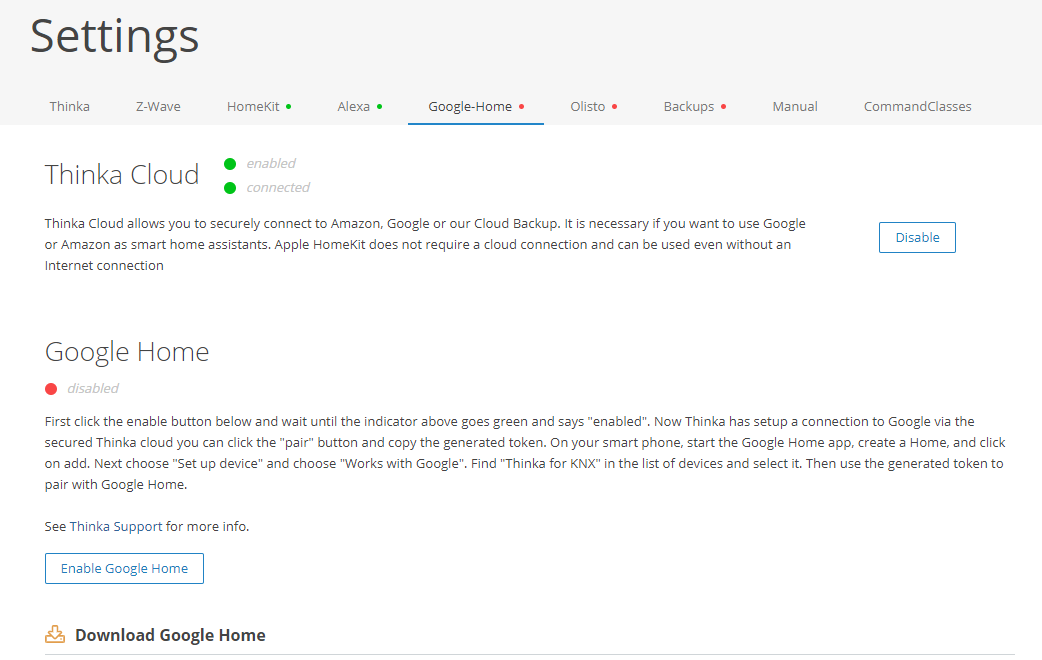
-
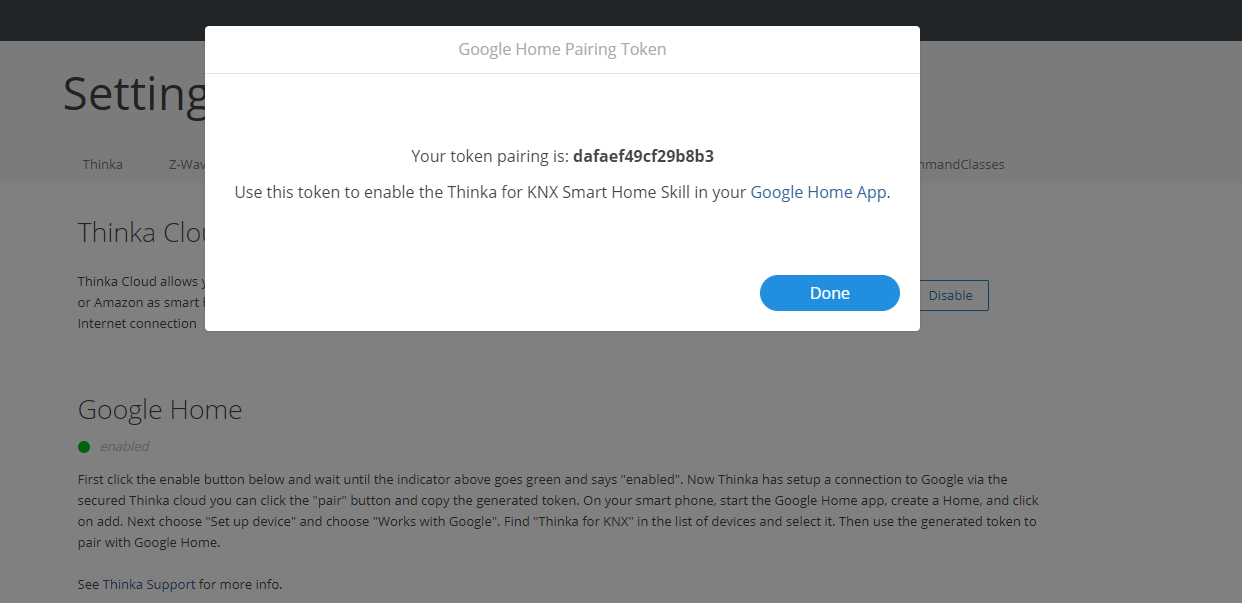
Step 2: Pairing Authorization
Click the "Pair" button on your Thinka Z-Wave interface to generate a secure authorization token.
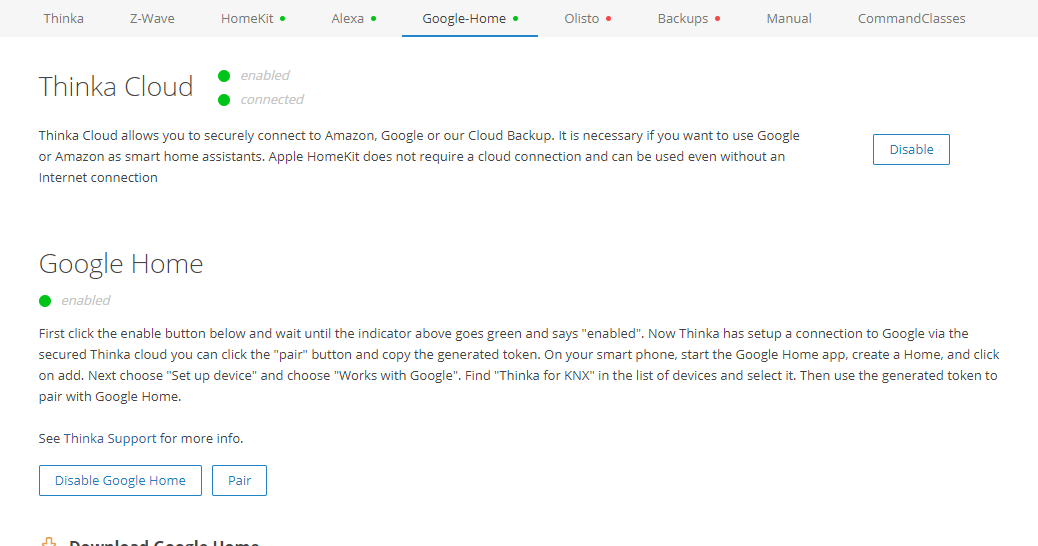
-
Step 3: Connect with Google Home App
On your smartphone, open the Google Home app. Create a new Home if you don’t have one, then tap “Add” > “Set up device” > “Works with Google”.
Search for "Thinka" in the device list, select it, and enter your authorization token to pair your Thinka Z-Wave.
Download the Google Home app for Android or iOS to get started.
Enjoy seamless voice control and smart home integration with Thinka Z-Wave and Google Assistant!
What is the Beta Channel?
Discover the beta channel—your exclusive gateway to try out the latest and most innovative Thinka features before anyone else! By joining the beta channel, you'll help shape the future of Thinka by testing new and experimental updates.
- To join, simply email us at support@thinka.eu. Please include your serial number for Z-Wave or serial number for KNX so we can review your request quickly.
- Once approved, you can easily enable the beta channel yourself. Just log in to your Thinka’s web interface, navigate to the Update Thinka page in the menu, and follow the instructions.
- If the beta channel doesn’t appear, simply restart your Thinka to refresh the updates.
Experience new features first—switch your Thinka from stable to beta and start exploring!
Does Thinka Support Geolocation?
Yes, Thinka supports geolocation through smart home automations!
- Apple HomeKit: You can easily set up location-based automations in HomeKit, such as turning on lights when you arrive home. To use geolocation features, simply configure a HomeKit hub (like an Apple TV, HomePod, or iPad) for seamless smart home control.
- Amazon Alexa: Thinka allows you to create powerful triggers in Alexa routines. Set up actions that are activated when you enter or leave a designated area—perfect for a hands-free, personalized home experience.
Unlock the full power of your smart home with Thinka’s geolocation support. Enjoy effortless automation, enhanced convenience, and a truly intelligent living environment!
Can I Have a Permanent VPN Connection with Thinka?
No, Thinka VPN connections are designed to be temporary and are limited to a maximum of 7 days. This security feature is in place to safeguard the homeowner's network and provide peace of mind. We believe that a 7-day window is more than sufficient for initial Thinka installation and configuration. After this period, any ongoing access should be conducted with the homeowner’s explicit permission to ensure privacy and security.
- Enhanced security: Limiting VPN duration helps protect your home network from unauthorized access.
- Easy setup: You have ample time—7 days—to install and configure your Thinka device.
- Homeowner control: Any further maintenance requires consent, keeping the homeowner in control.
If you are a system integrator or need remote, unattended Thinka management for longer than 7 days, simply contact our support team with your request. Email us at support@thinka.eu and we’ll be happy to help extend your VPN connection period as needed.
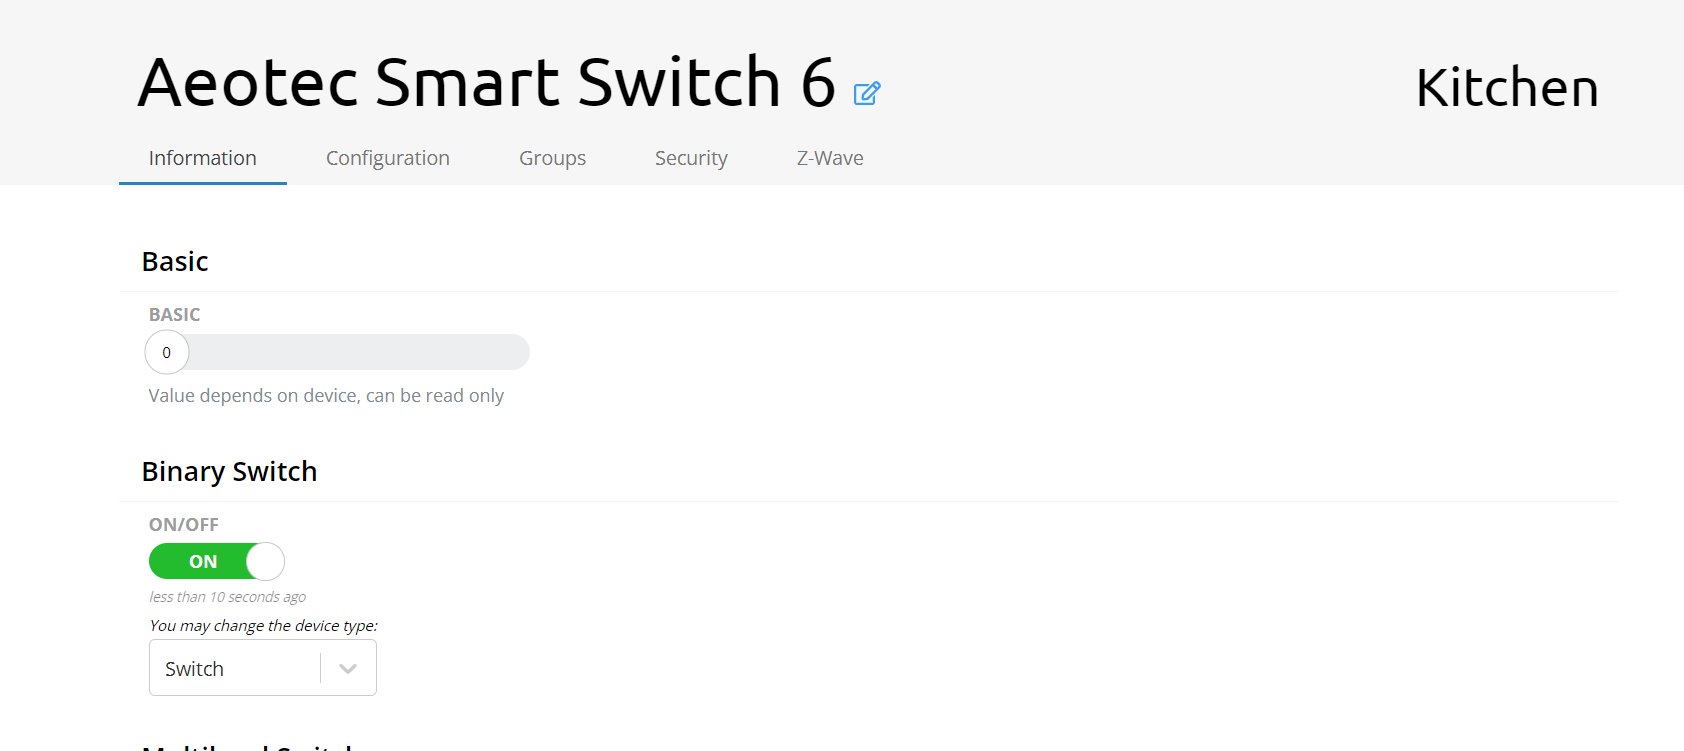
How to Easily Replace a Broken Z-Wave Device with Thinka
If your Z-Wave device has stopped working, replacing it is simple with Thinka’s ‘Replace Failed Node’ feature. You can seamlessly add your new device and continue using Apple Home without any extra setup. Here’s how to replace your broken Z-Wave device step by step:
- If your device is unresponsive, open your Thinka dashboard.
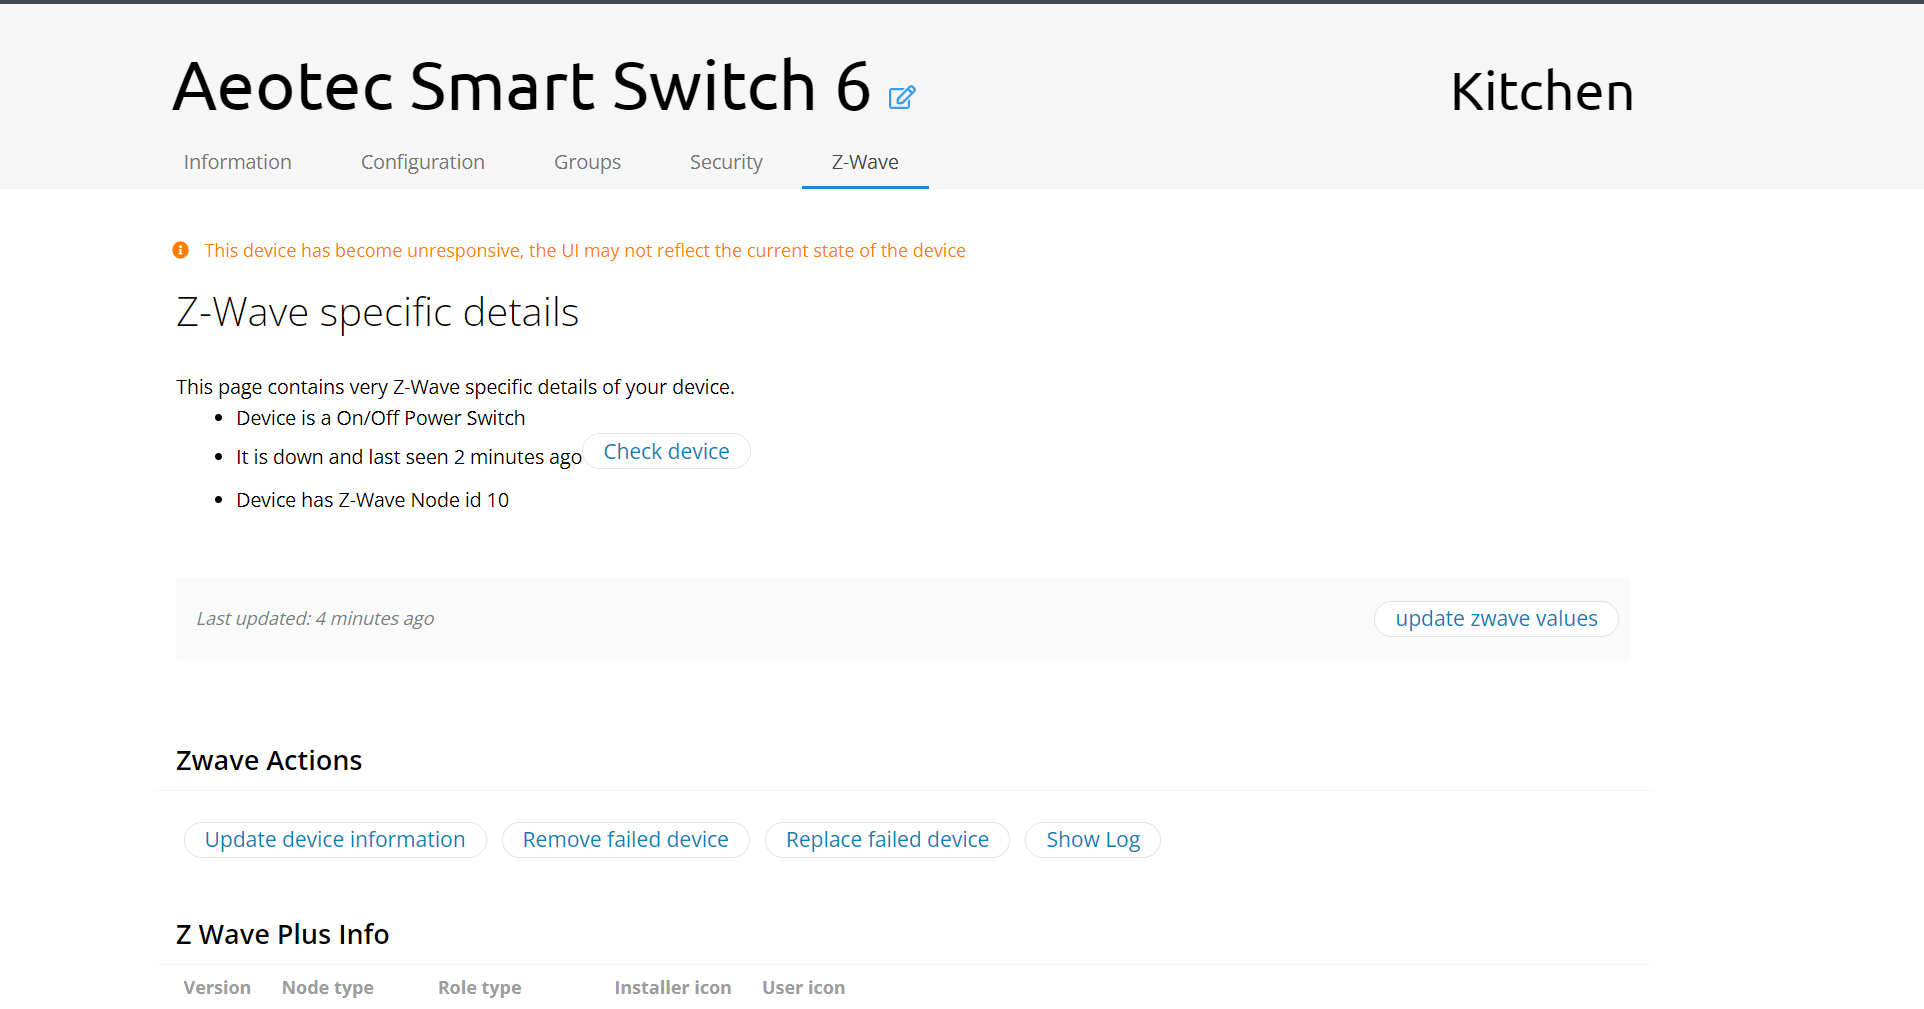
- Click ‘Replace failed device’.
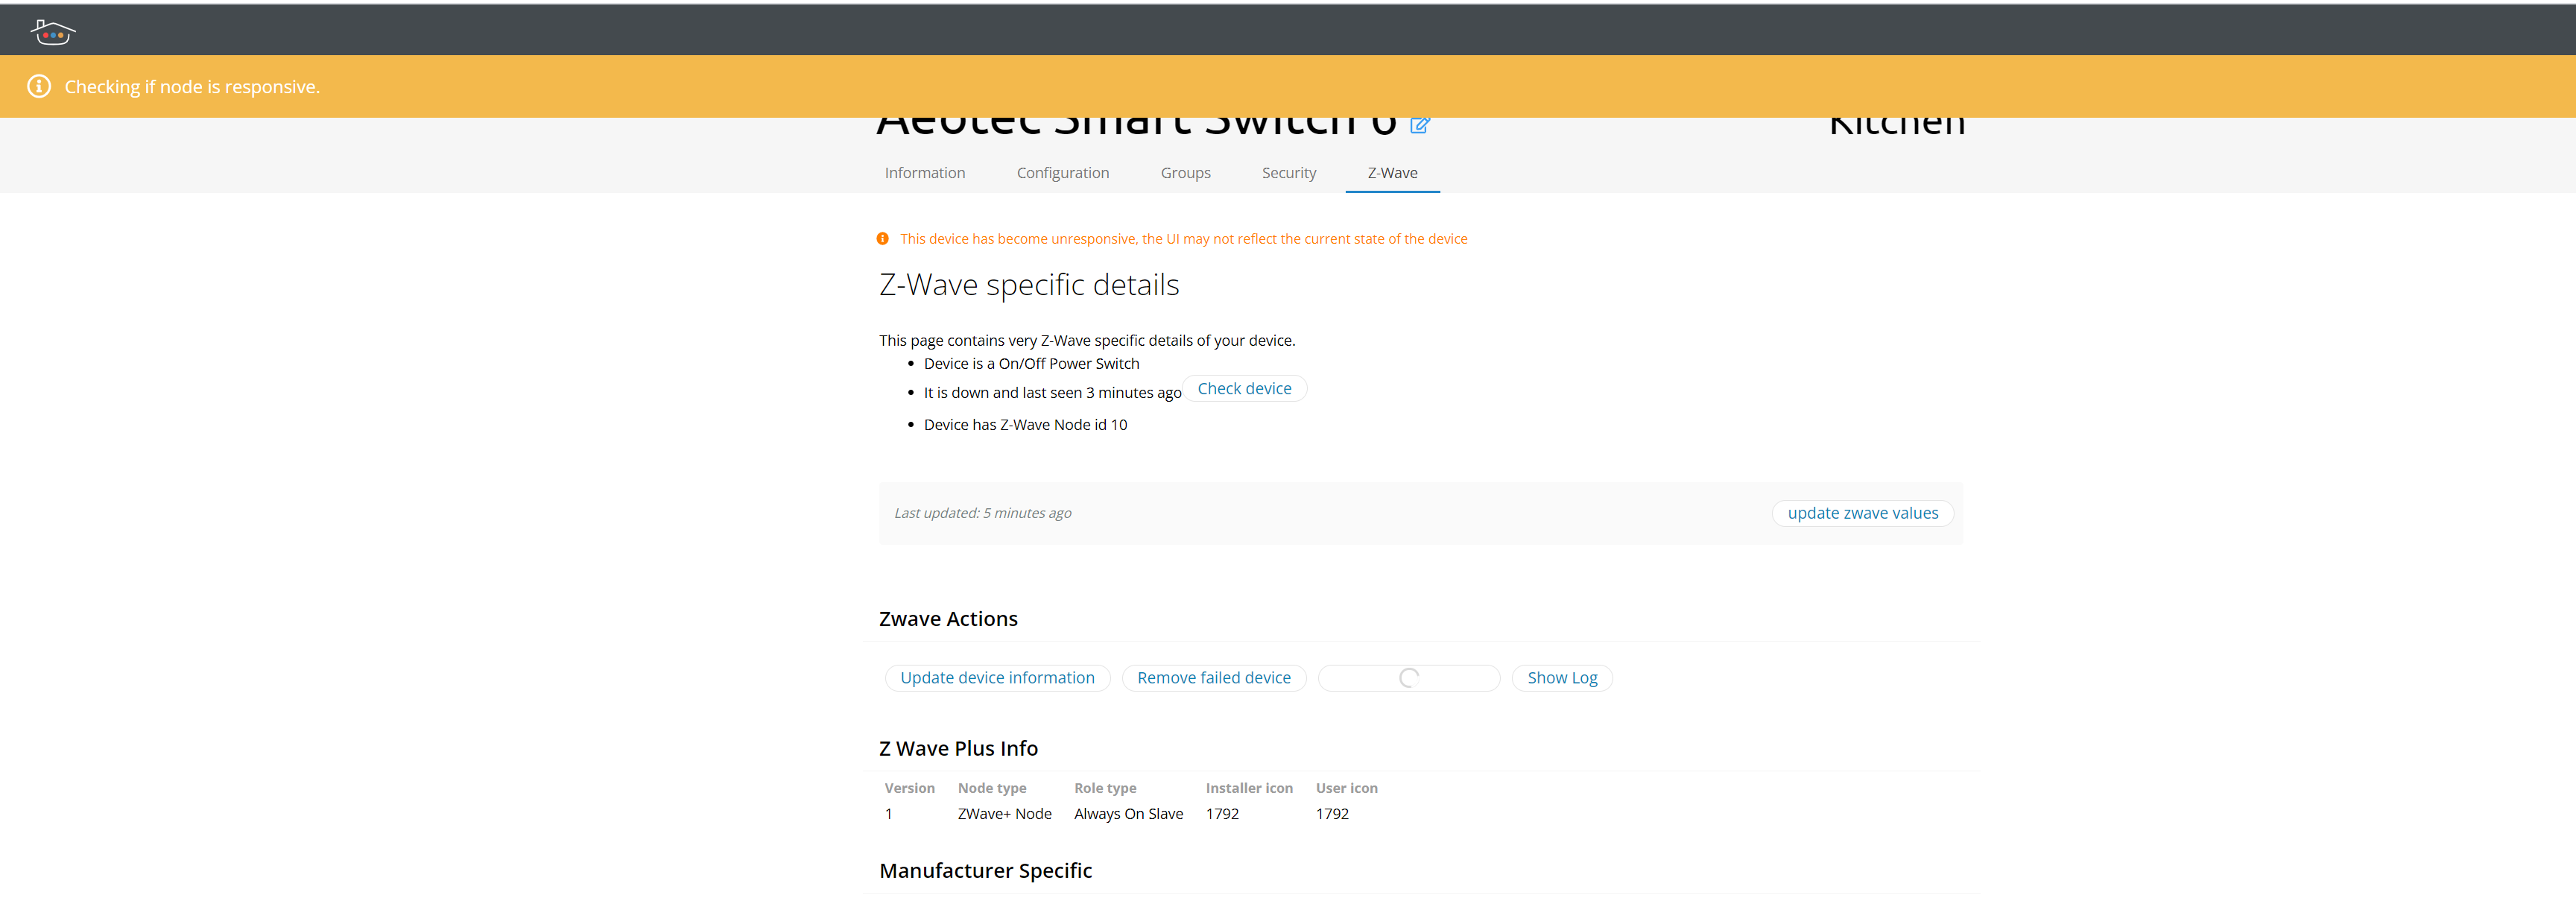
- Press the ‘Start’ button to begin the inclusion process.
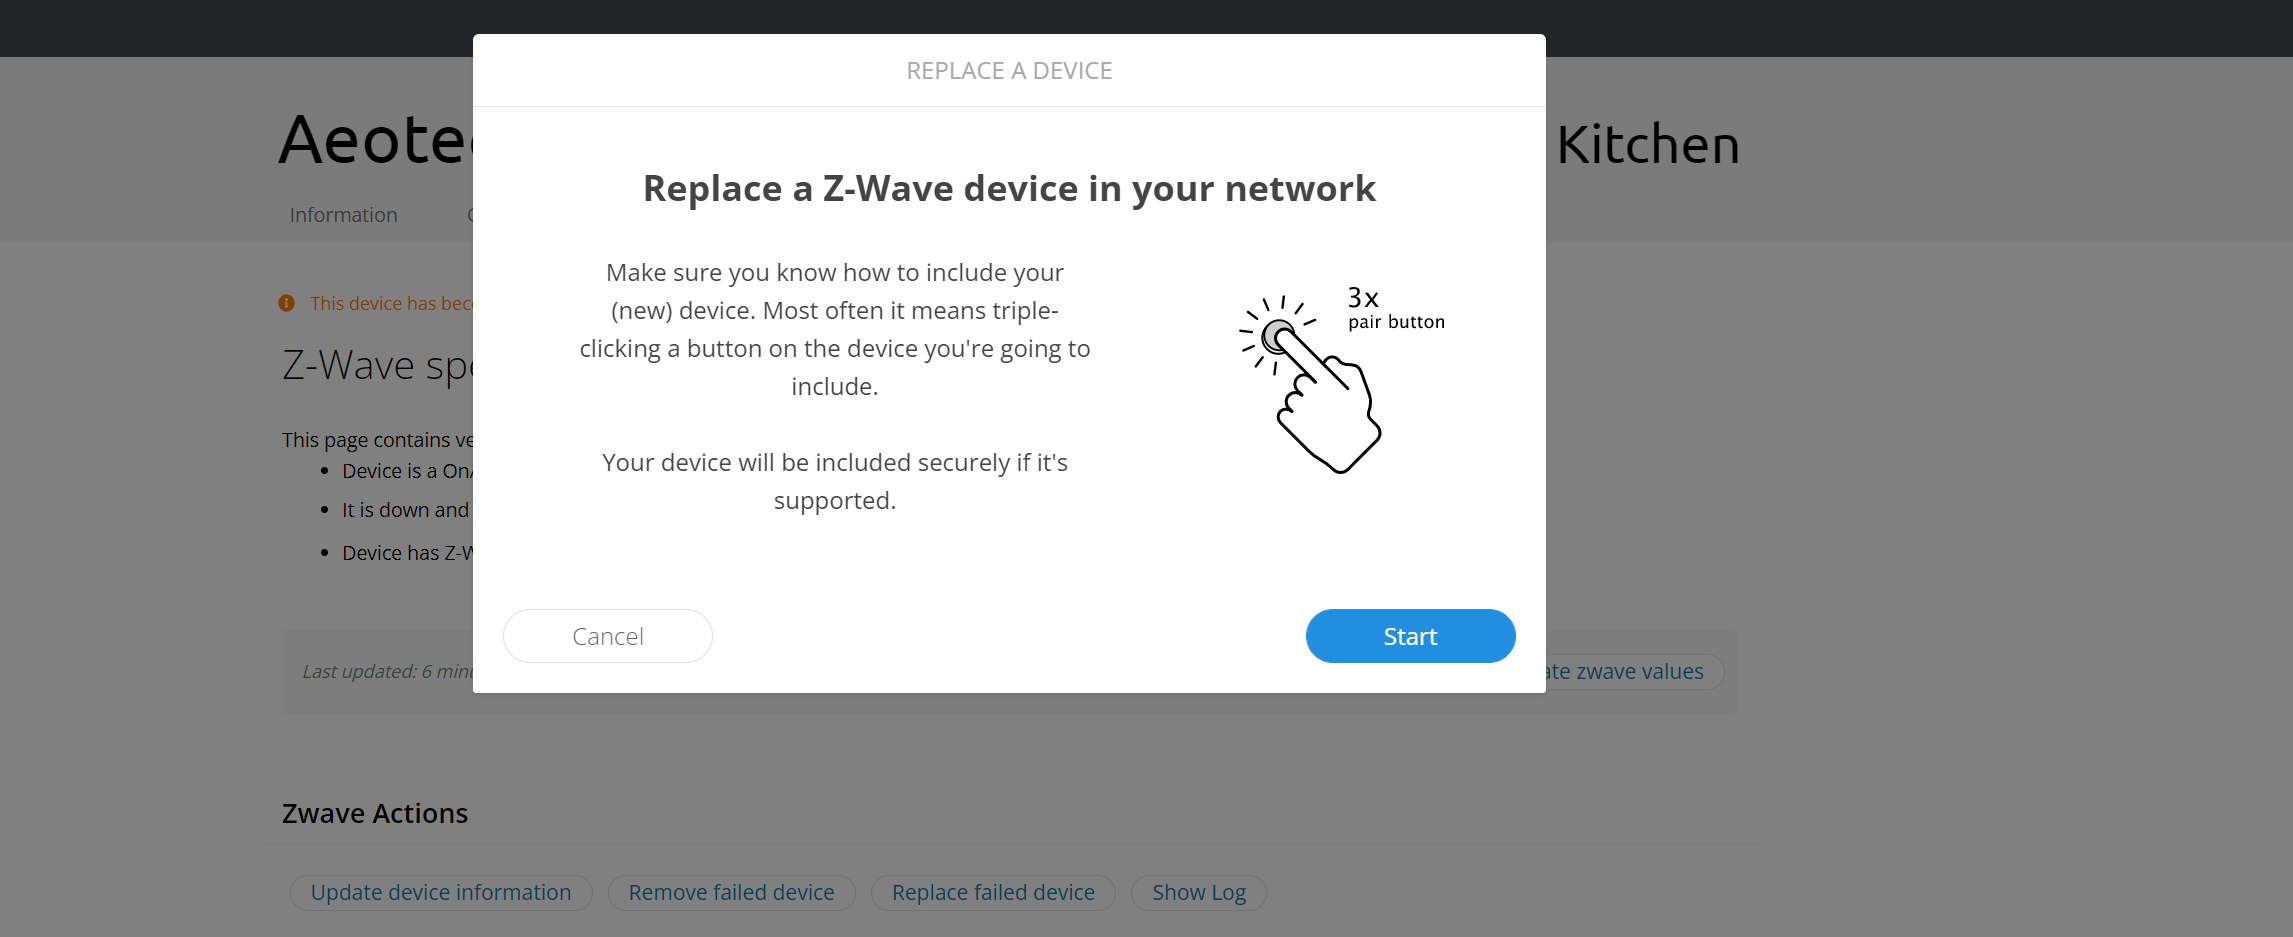
- Put your new Z-Wave device into inclusion mode.
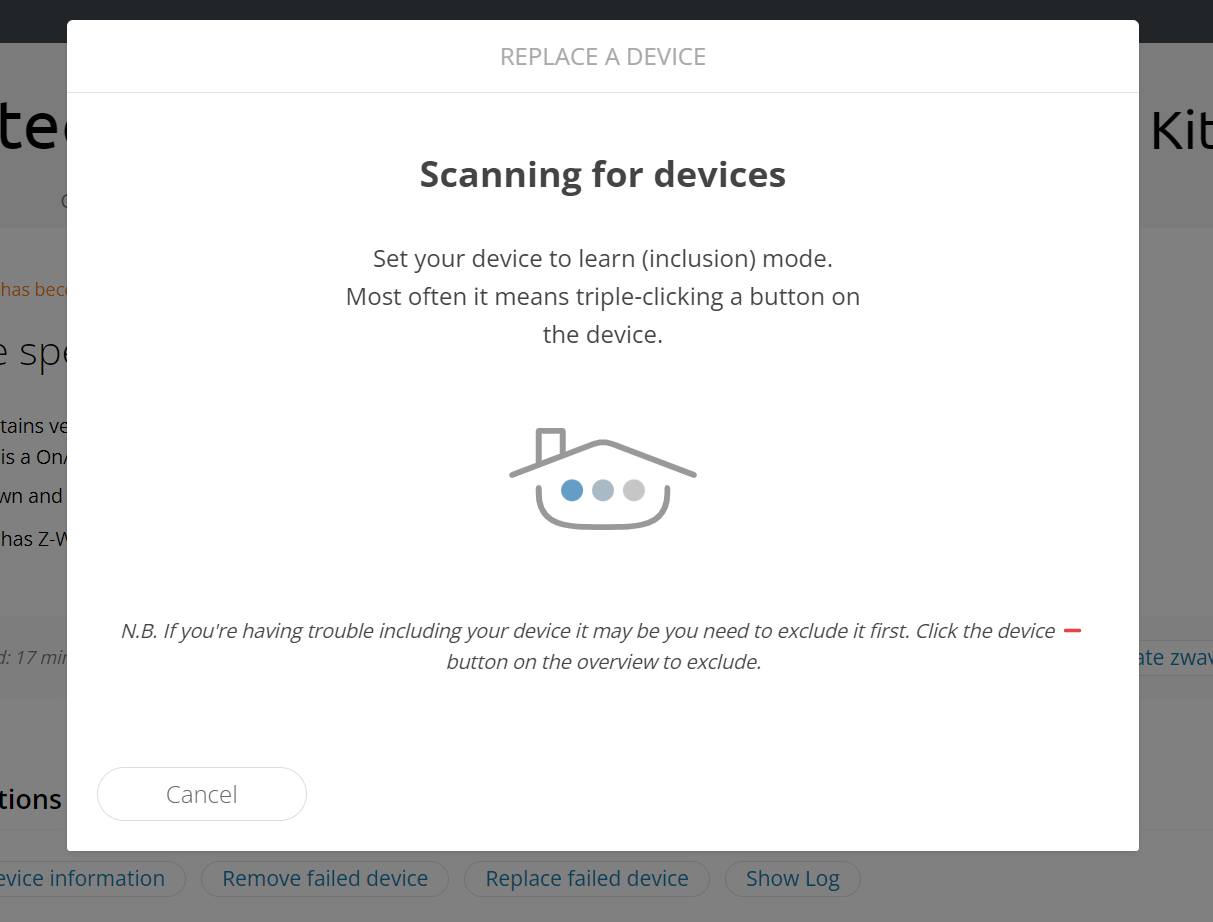
- Once added, set the device name and room if needed. The warning will disappear, and your device will be fully controllable again.
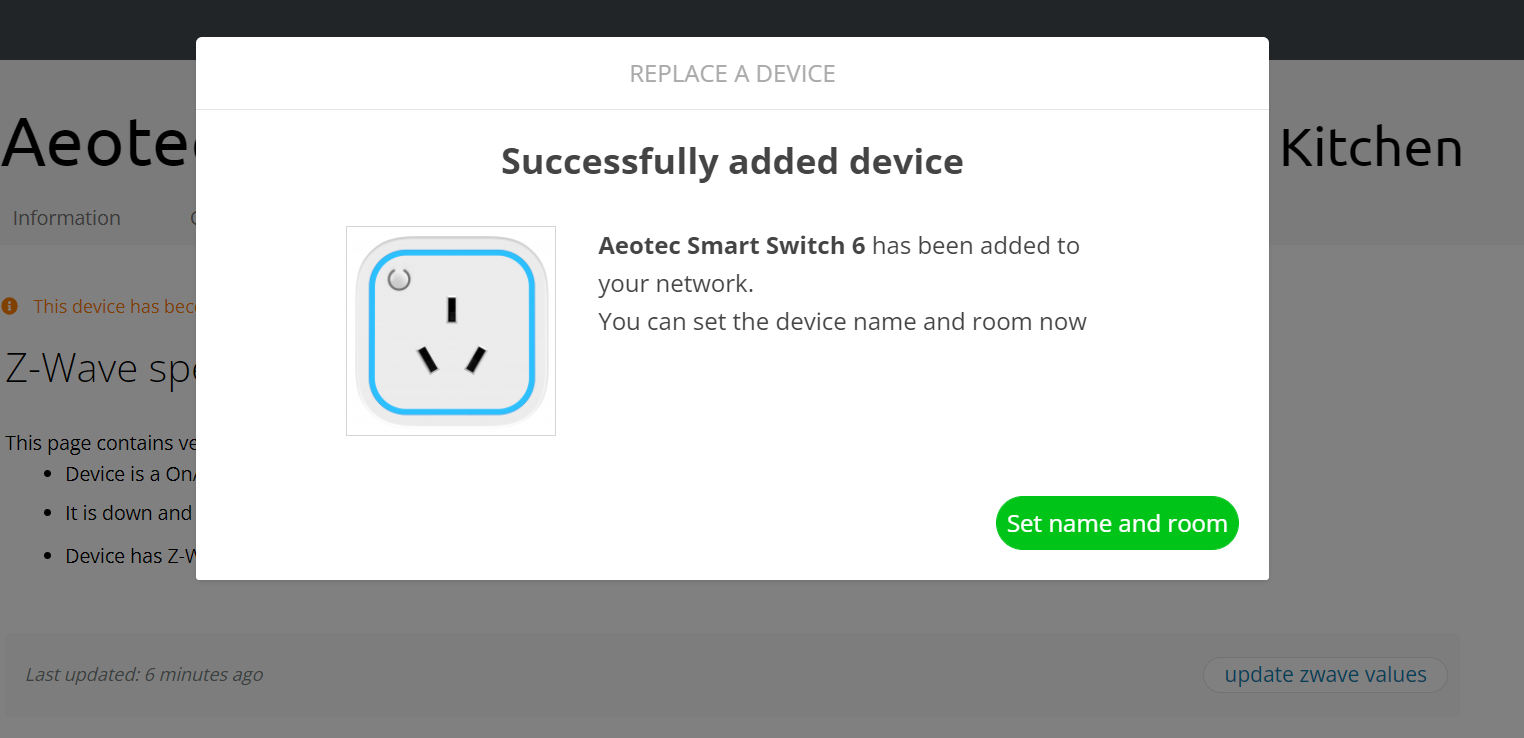
- Compare before and after: previously unresponsive devices and scenes will now function perfectly with your new Z-Wave device.
Enjoy uninterrupted smart home control with Thinka’s easy Z-Wave replacement!
How to Set Up Alexa for Thinka Z-Wave
Integrate your Thinka Z-Wave with Amazon Alexa in just a few simple steps and enjoy seamless voice control for your smart home!
- Go to the Settings page on your Thinka dashboard.
- Click on the Alexa tab to access Alexa integration settings.
- Enable Alexa support by clicking the enable button. Wait until the indicator turns green and shows "enabled".
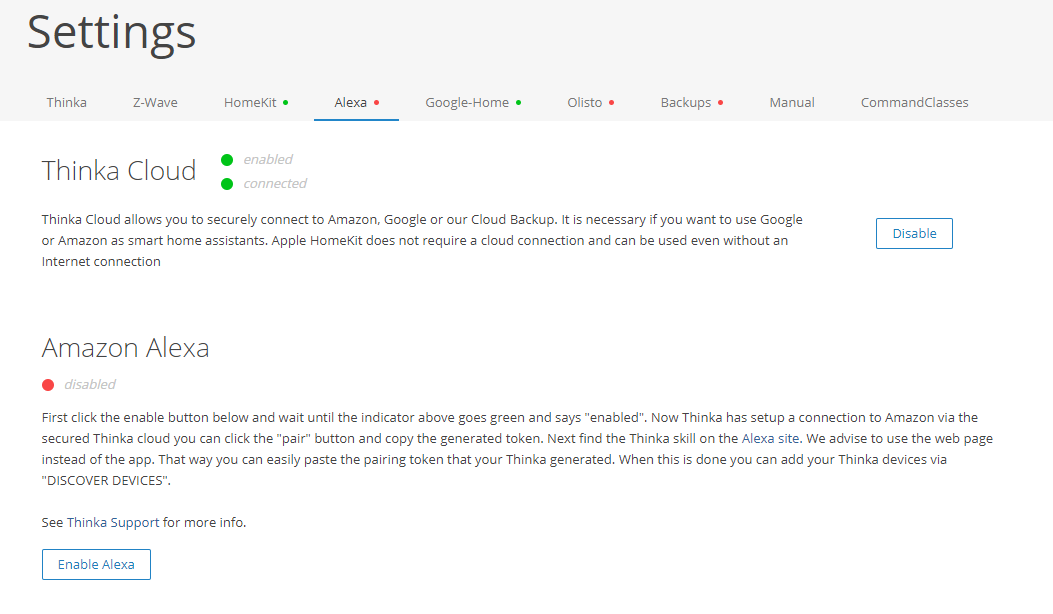
Once Alexa is enabled, your Thinka will securely connect to Amazon via the Thinka cloud.
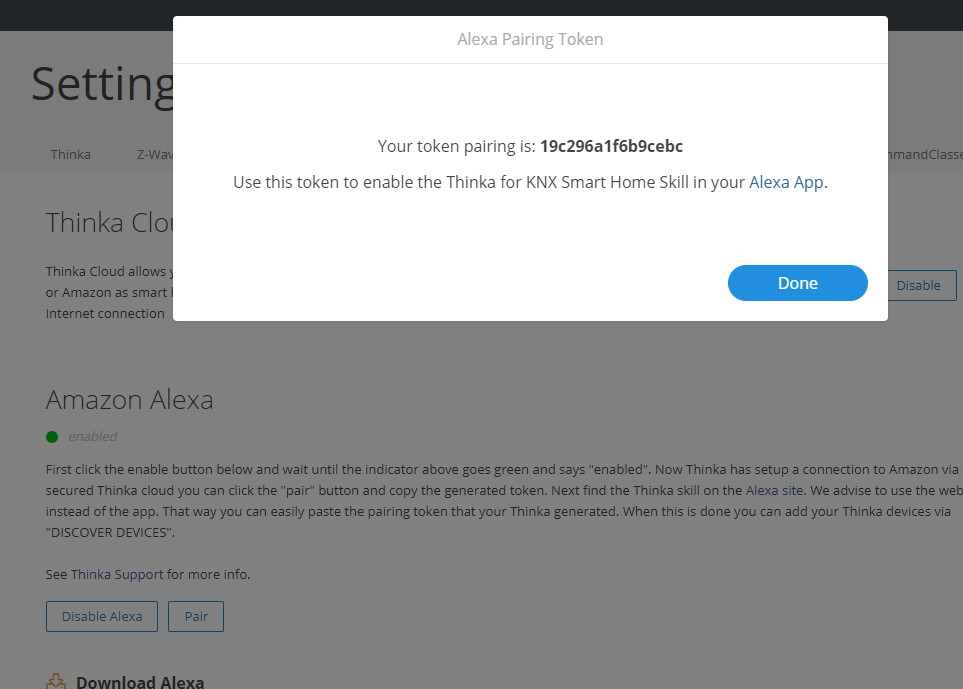
- Click the "Pair" button and copy the generated pairing token.
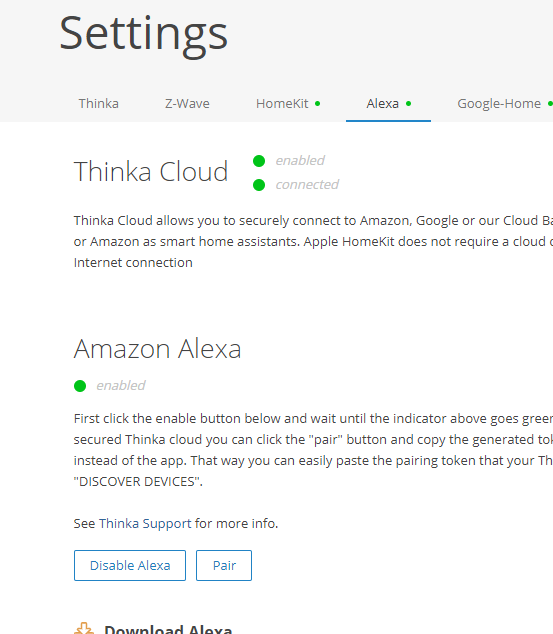
Next, visit the Alexa Skills website (recommended over the app for easy token entry).
- Find and enable the Thinka for KNX Smart Home Skill.
- Paste your pairing token when prompted.
- Click DISCOVER DEVICES to add your Thinka Z-Wave devices.
Your Thinka Z-Wave devices are now ready to be controlled with Alexa voice commands! Experience a smarter home today.
What is the Thinka Companion App? And what is the Home App?
The Thinka Companion App is your essential tool for effortlessly setting up and managing your smart home with HomeKit. Instead of adding each device individually, the Thinka Companion App automatically syncs your Thinka devices and rooms to your HomeKit home, saving you time and ensuring everything stays perfectly organized.
- Seamless HomeKit Configuration: Instantly sync all your Thinka devices and rooms to HomeKit—no manual setup required.
- Easy Device Management: Quickly find your Thinka on your network and monitor its real-time status.
- Remote Support Access: Effortlessly enable remote access for support whenever you need assistance.
- Free to Download: Get the Thinka Companion App from the App Store and start streamlining your smart home setup today.
The Home App is Apple’s pre-installed app on your iPhone or iPad, designed for daily control of all your HomeKit-enabled devices. Once your setup is complete with the Thinka Companion App, you’ll use the Home App for everyday smart home control—simple, intuitive, and always at your fingertips.
Which Regions and Frequencies Does Thinka for Z-Wave Support?
Thinka for Z-Wave is designed to offer seamless compatibility across a wide range of global regions, ensuring your smart home devices work wherever you are. We proudly support the following regions and their corresponding Z-Wave frequencies:
- EU region
- US region
- Australia / New Zealand (ANZ) region
- Hong Kong (HK) region
- Malaysia (MY) region
- India (IN) region
- Japan (JP) region
- Russia (RU) region
- Israel (IL) region
- Korean Republic (KR) region
- China (CN) region
To ensure optimal performance and compliance with local RF legislation, it’s important to select the correct region and frequency for your Thinka device. For detailed legal information and a complete overview of supported channels, please visit Silabs Z-Wave Global Regions (see the SW. Lib. column for reference).
Ready to configure your frequency? Visit our step-by-step guide here.
Do I Receive Thinka PRO Software with My PRO Device Purchase?
When you purchase a Thinka device with PRO functionality, the PRO software is delivered digitally—no physical shipment is needed. After your order is shipped, you'll receive an email with easy-to-follow instructions on how to activate your Thinka PRO features.
- Activation Email: Look out for an email containing a secure activation link.
- Order History Access: The link will take you directly to your order history in your account—resellers can access here, while customers can log in here. Both are accessible from the Thinka shop.
- Feature Availability: After activation, new PRO features like IP Gateway and VPN Server will be enabled automatically the next day, or immediately after a device restart.
Enjoy seamless access to advanced Thinka PRO software features—quick, convenient, and entirely online!
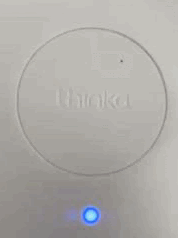
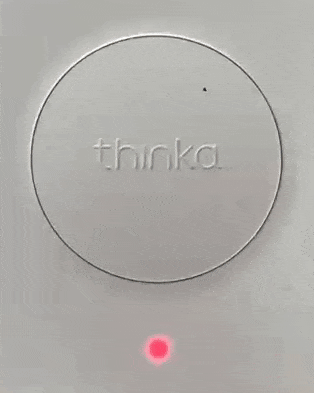
What Do the LEDs Mean on Your Thinka Z-Wave Device?
The Thinka Z-Wave device features three RGB LEDs that provide instant visual feedback about its status. Understanding these LED signals helps you easily manage your Z-Wave smart home system. Here’s a quick guide to what each LED pattern means:
-
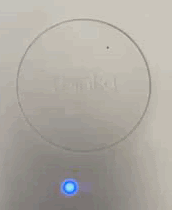 Inclusion Mode: Indicates your device is being added to the Z-Wave network.
-
 Exclusion Mode: Shows when your device is being removed from the network.
-
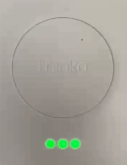 Successful Operation: Inclusion or exclusion was completed successfully.
-
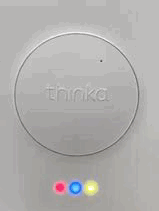 In Progress: Device is initializing, syncing, or performing backend tasks.
-
 Operation Failed: Inclusion or exclusion attempt was not successful.
-
 Action Cancelled: Z-Wave action was cancelled or aborted.
-
 Manufacturing Self-Test: Device is running a self-diagnostic.
-
 Hardware Failure: Indicates a hardware issue detected by the device.
With these easy-to-read LED indicators, managing your Thinka Z-Wave becomes effortless and reliable!
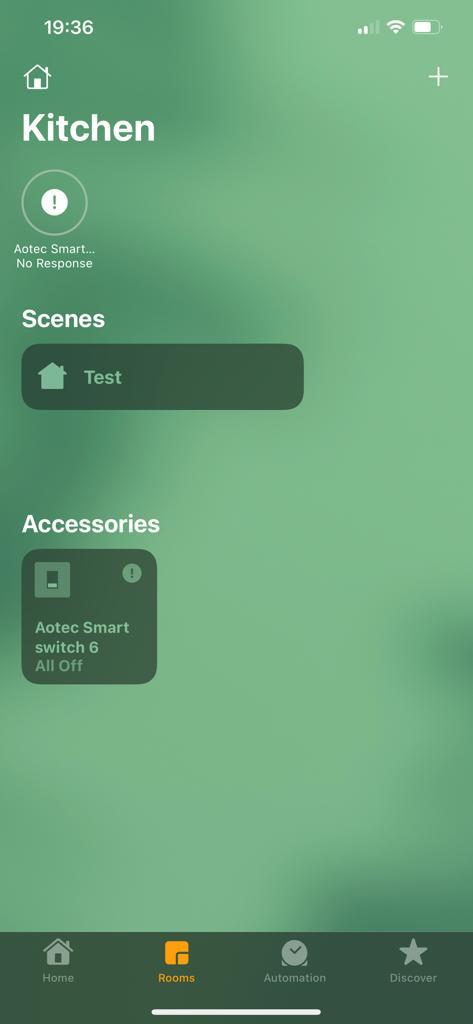
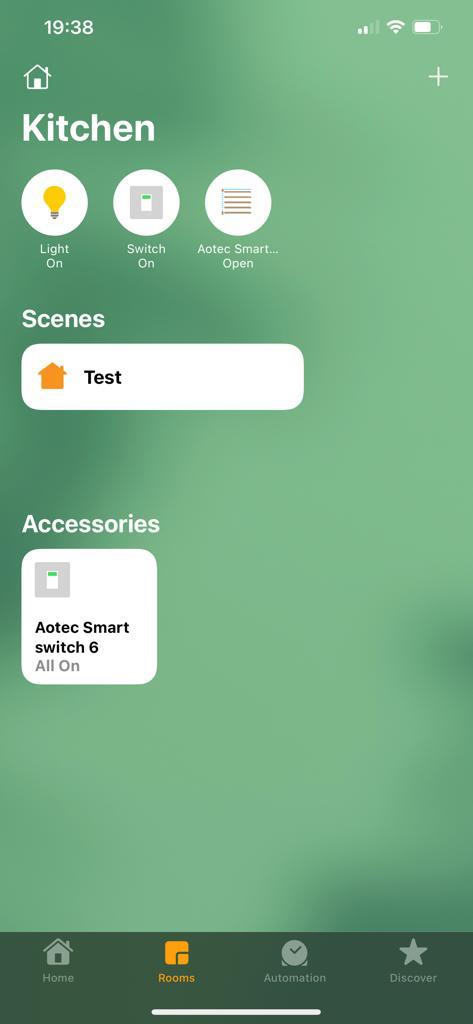
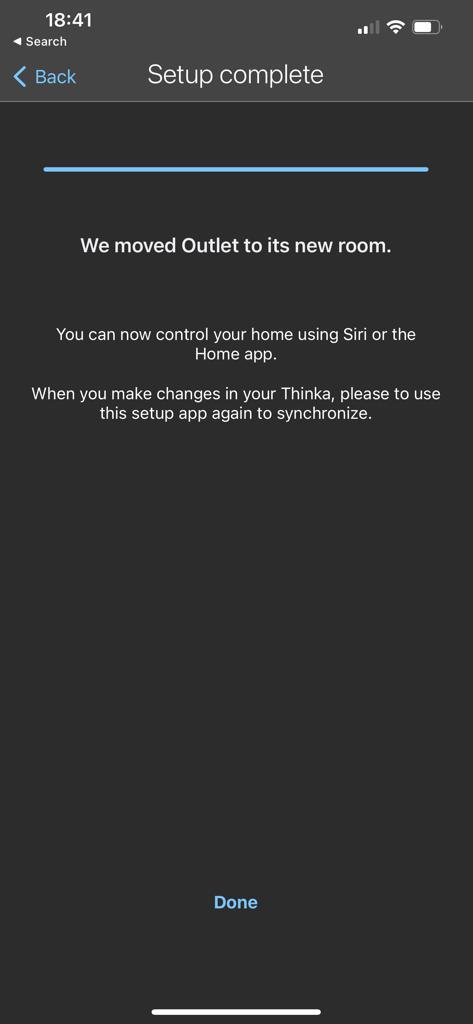
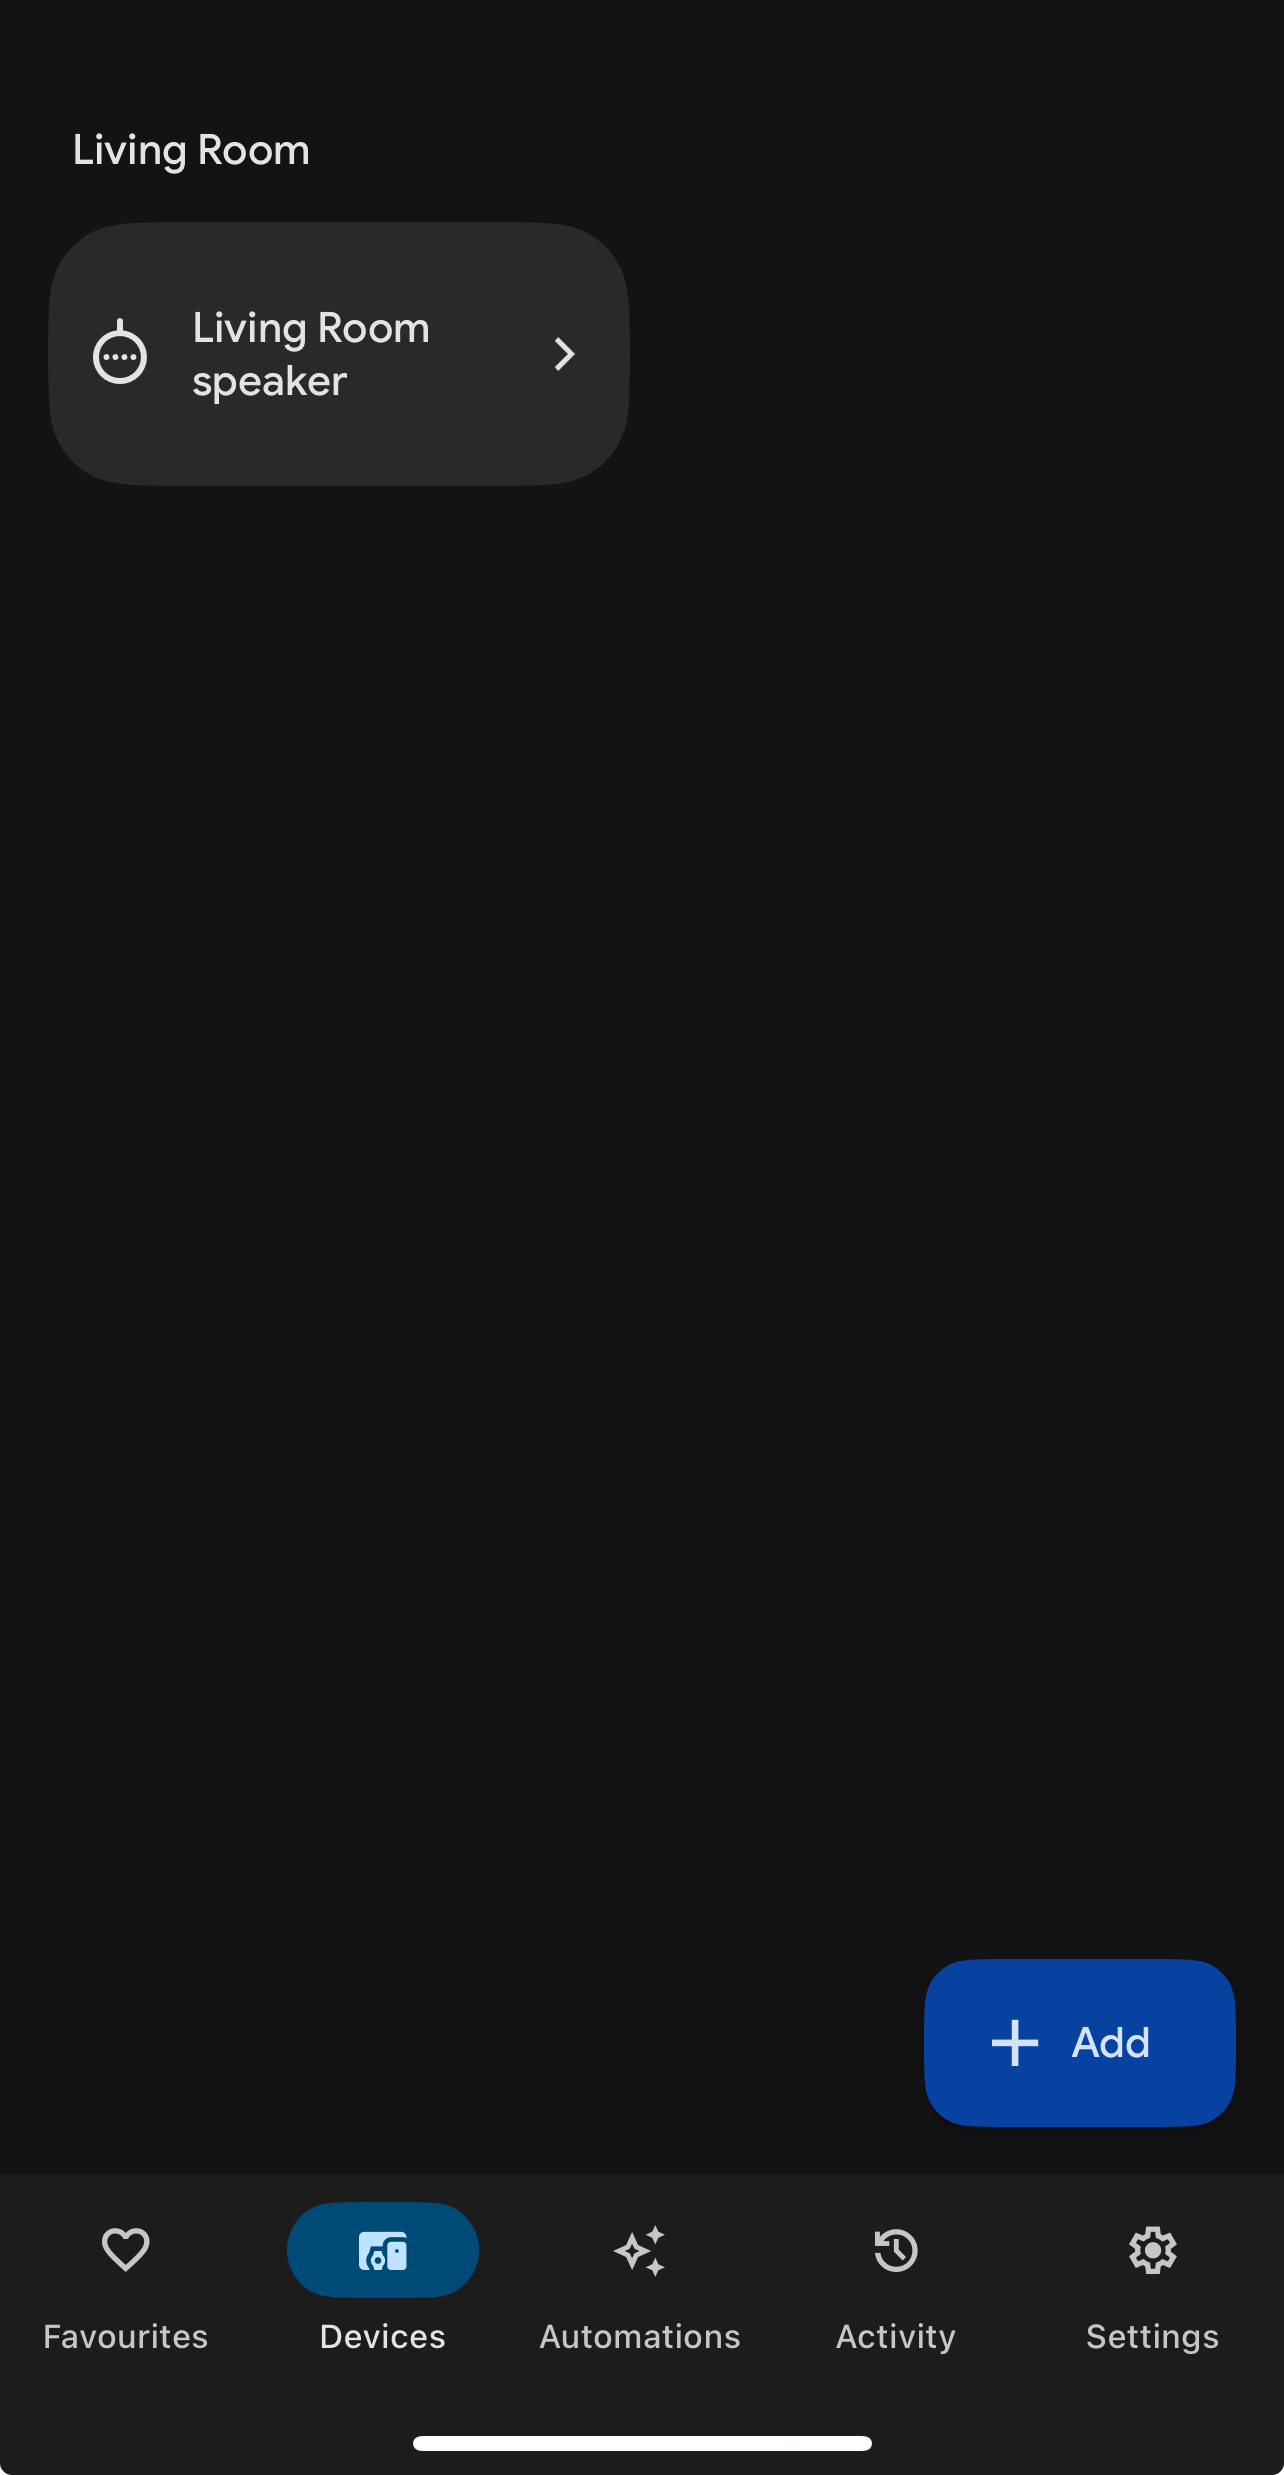
How to Synchronize Rooms and Devices with HomeKit
Keeping your HomeKit setup up-to-date is simple! When you add or remove a Z-Wave device, you'll want to synchronize your devices and rooms to ensure everything works seamlessly with Apple Home. Here’s how you can easily sync your devices using the Thinka App:
- Open the Thinka App on your smartphone or tablet.
- If synchronization is needed, you’ll notice a red warning icon on the device. This means there are devices or rooms that need to be updated.
- Select the device with the warning and tap the "Synchronize…" button.
- The Thinka App will automatically synchronize your rooms and devices with Apple HomeKit, ensuring your smart home stays organized and connected.
Follow these steps whenever you make changes to your Z-Wave devices. For your convenience, here are helpful images to guide you through the process:
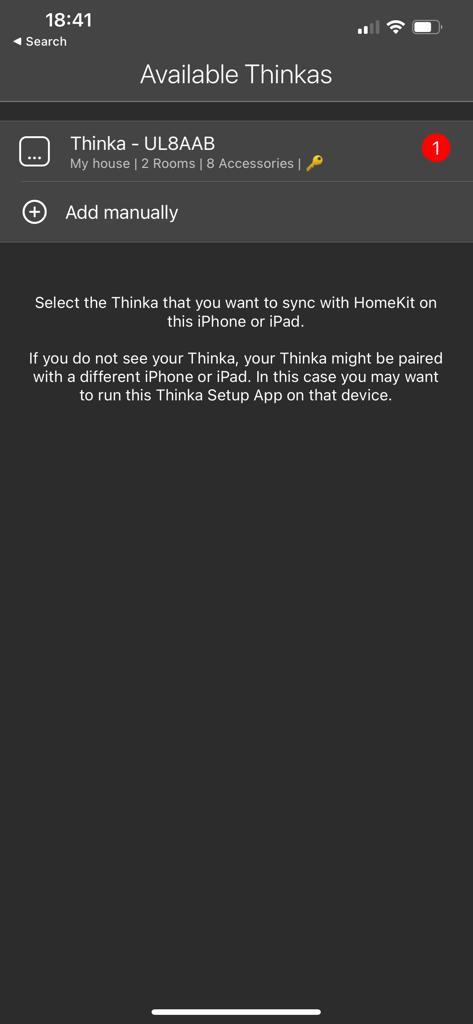
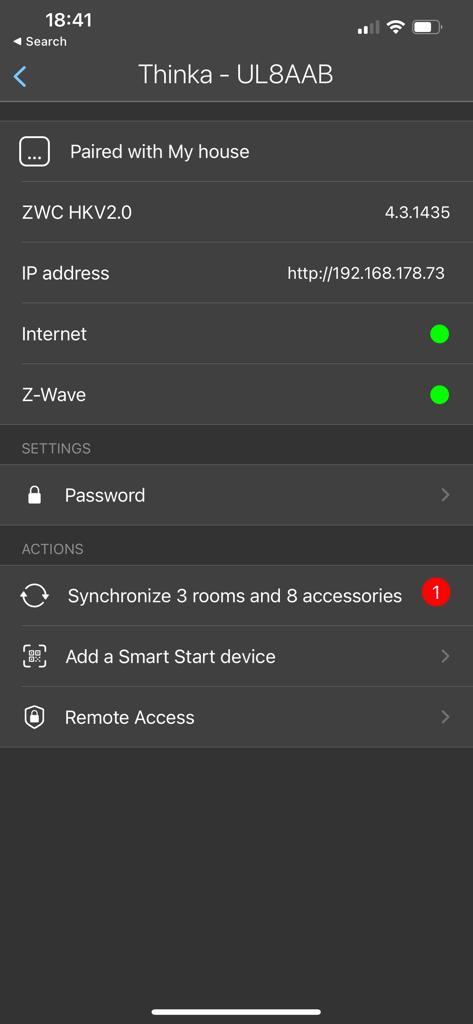
Enjoy a fully synchronized smart home with Thinka and Apple HomeKit!
How to Set Up a Thinka Integration Using Olisto
Getting started with Thinka integration via Olisto is quick and easy! Simply visit the "Inspiration" tab within Olisto, where you’ll discover a variety of ready-made Thinka bundles. These bundles make it simple to connect Thinka with other channels like weather updates, sports teams, and much more—expanding your smart home possibilities with just a few clicks.
- Browse the available Thinka bundles in the "Inspiration" tab.
- Select the integrations that best suit your needs, such as automating actions based on weather or your favorite football team’s results.
- Follow the step-by-step prompts to link your Thinka device with Olisto’s powerful automation tools.
For more details and to explore the full range of integrations, visit the official Olisto website. Enhance your smart home experience effortlessly with Thinka and Olisto!
How to Easily Connect Your Thinka to the Olisto App
Connecting your Thinka smart home hub to the Olisto app unlocks powerful automation features for your smart devices. Follow these simple steps to get started:
- Enable Olisto in Thinka Settings: Go to your Thinka’s settings page and activate Olisto. This allows your Thinka to securely connect to Olisto through the Thinka Cloud.
-
Check Thinka Cloud Connection: Verify that your Thinka is connected to the Thinka Cloud. You should see a confirmation screen like the one below:
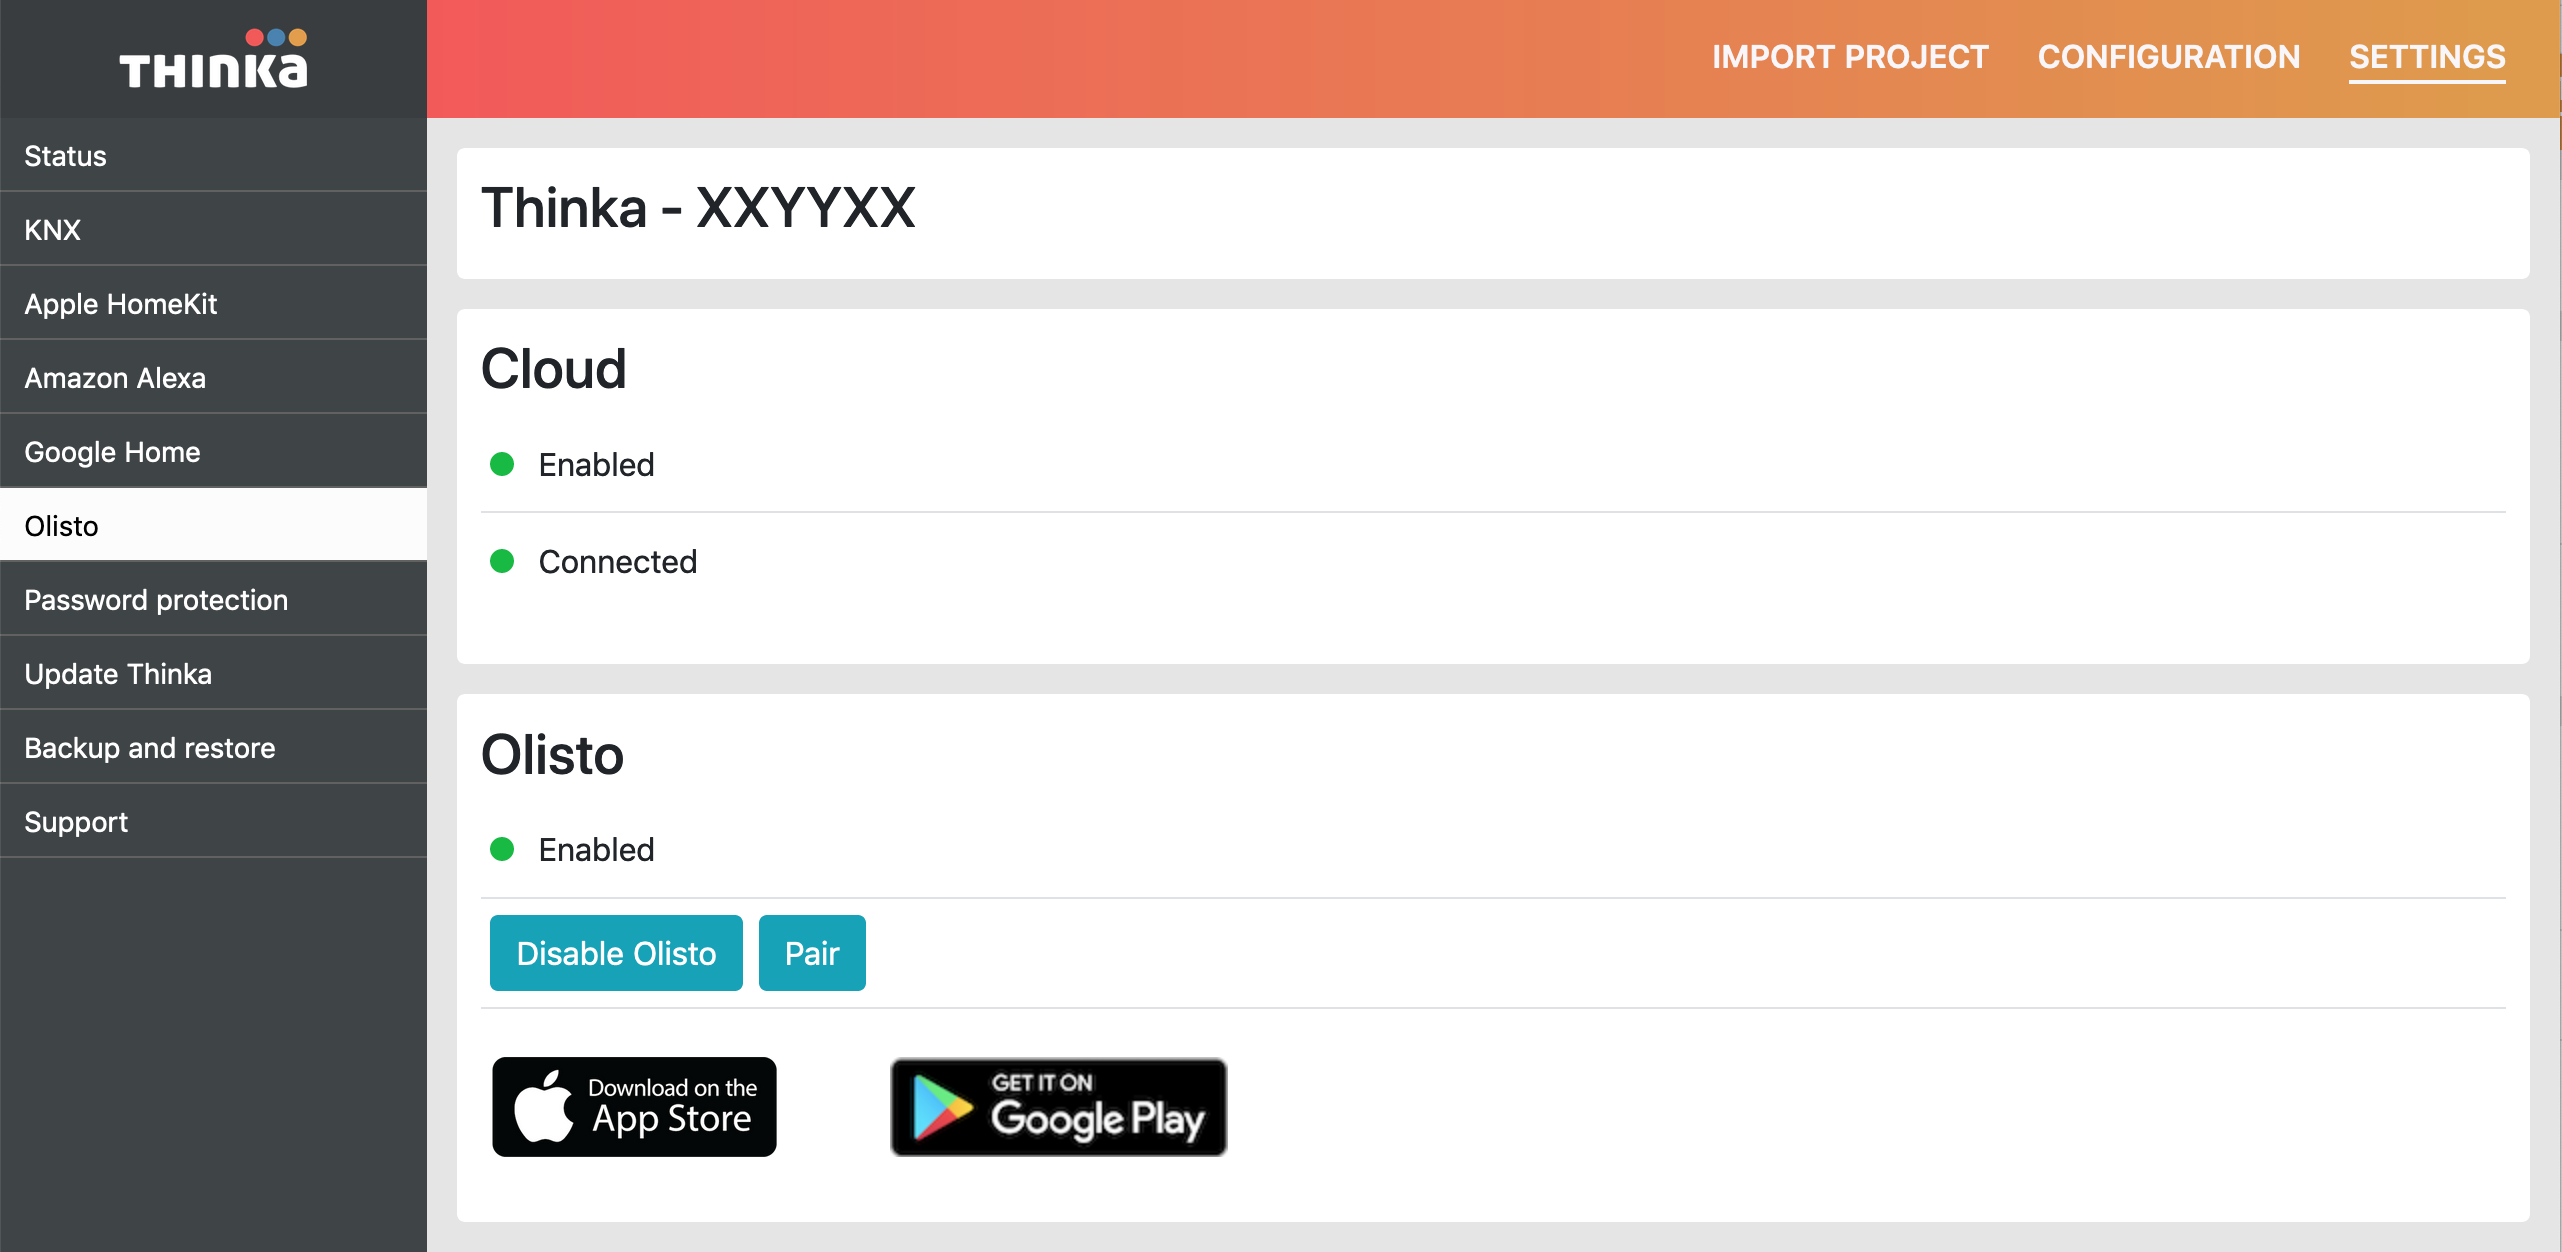
- Pair Thinka with Olisto: Click the “PAIR” button and copy the generated token.
- Set Up in Olisto App: On your smartphone, open the Olisto app (iOS | Android). Log in or create an account, tap "More," choose "Channels," select "Thinka," and press "Add channel." Paste your token to complete the pairing.
Enjoy seamless integration and enhanced smart home automation with Thinka and Olisto!
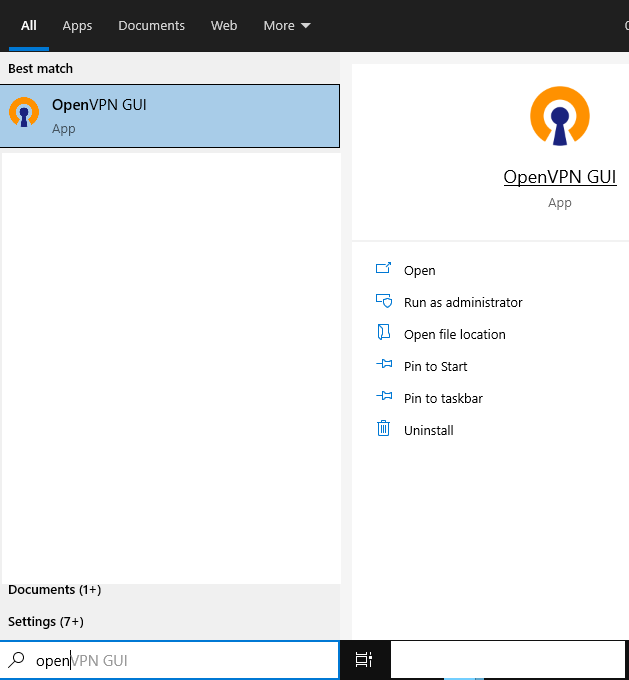
How to Easily Install a VPN Client (OpenVPN) on Windows
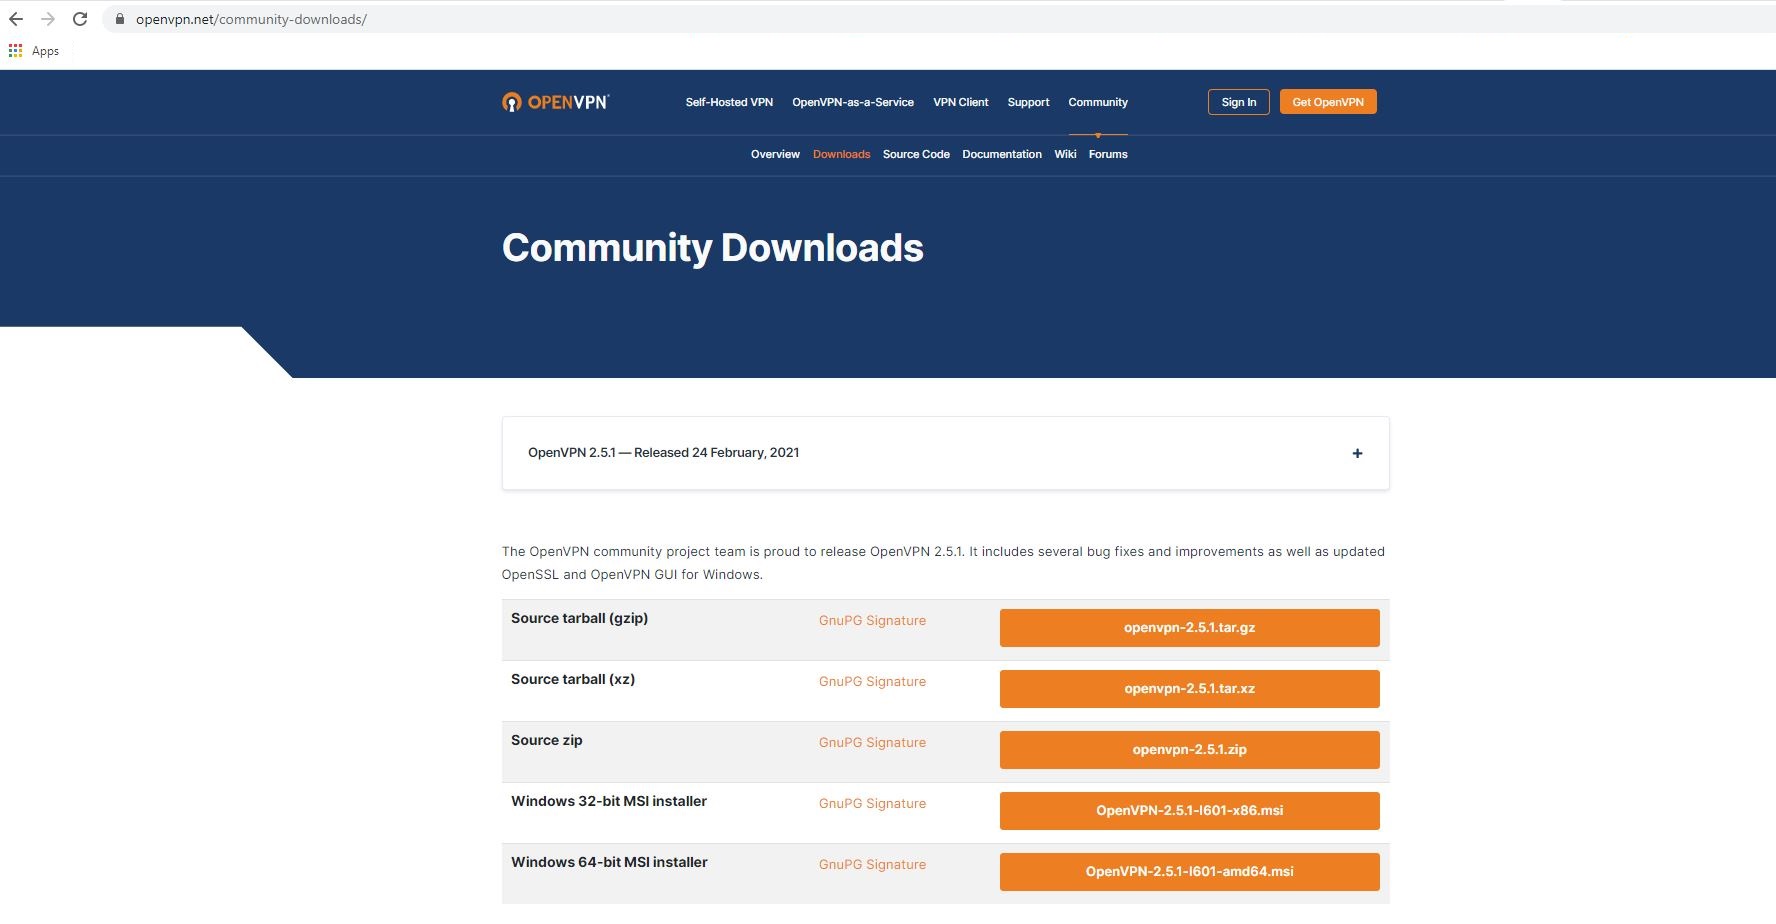
Protect your online privacy and access restricted content in minutes by installing the OpenVPN client on your Windows computer. Follow this simple step-by-step guide:
- Download the OpenVPN Installer: Choose the right installer for your system:
- For most users (64-bit Windows): Download 64-bit version
- For older or 32-bit systems: Download 32-bit version
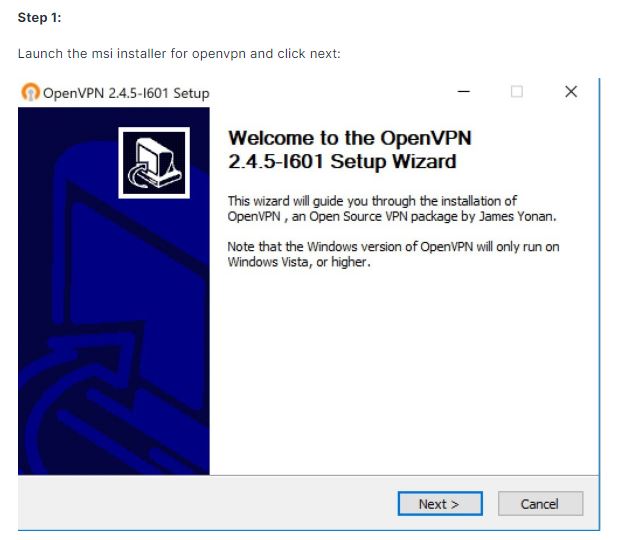
- Run the Installer: Follow the prompts to set up OpenVPN. For detailed instructions, check the official installation guide here.
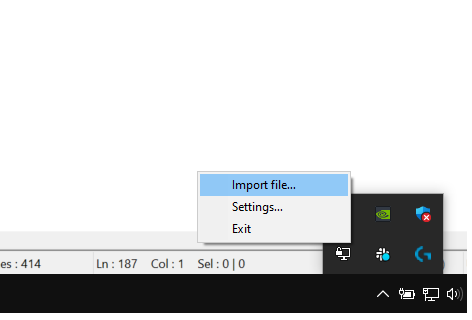
- Launch OpenVPN: After installation, find the OpenVPN icon in your system tray (bottom right of your screen).
- Import Your VPN Configuration File: Right-click the tray icon and select Import file to add your VPN profile.
You're now ready to enjoy secure and private browsing with your VPN client!
- Open the Settings menu on your device.
- Navigate to the Z-Wave tab.
- Select the correct Z-Wave Frequency Region that matches your country or region.

Which Z-Wave Devices Work with Thinka?
Thinka for Z-Wave is a fully Z-Wave certified hub, designed for seamless compatibility with all Z-Wave certified devices. Whether you want to connect smart lights, sensors, locks, or thermostats, as long as your device carries the official Z-Wave certification, it should work effortlessly with Thinka.
- Works with any Z-Wave certified smart device
- Supports a wide range of brands and product types
- Easy to expand your smart home as new Z-Wave devices become available
For the best experience, make sure your Z-Wave device is running the latest firmware version. If your certified device isn’t working as expected, simply update its firmware. If issues continue, our friendly customer support team is here to help—just email us at support@thinka.eu.
Enjoy a smarter home with Thinka’s broad Z-Wave compatibility!
Connect Google Home with Thinka Using Matter – Easy Step-by-Step Guide
Unlock seamless smart home control by connecting your Google Home to Thinka via the Matter protocol. With Matter integration, Google Home and Amazon Alexa can operate locally and independently from the cloud, ensuring faster response and enhanced privacy. For Apple Home users, we recommend sticking with Apple HomeKit to avoid device duplication, as using Matter alongside HomeKit may cause overlapping devices.
How to Join the Matter Beta:
- Contact our support team to request access to the Matter beta.
- Once accepted, find the new Matter tab under Settings in the Thinka web interface.

Connecting Google Home to Thinka via Matter
- Open the Google Home app and tap the Add button in Devices.
Select the Matter-enabled device option.
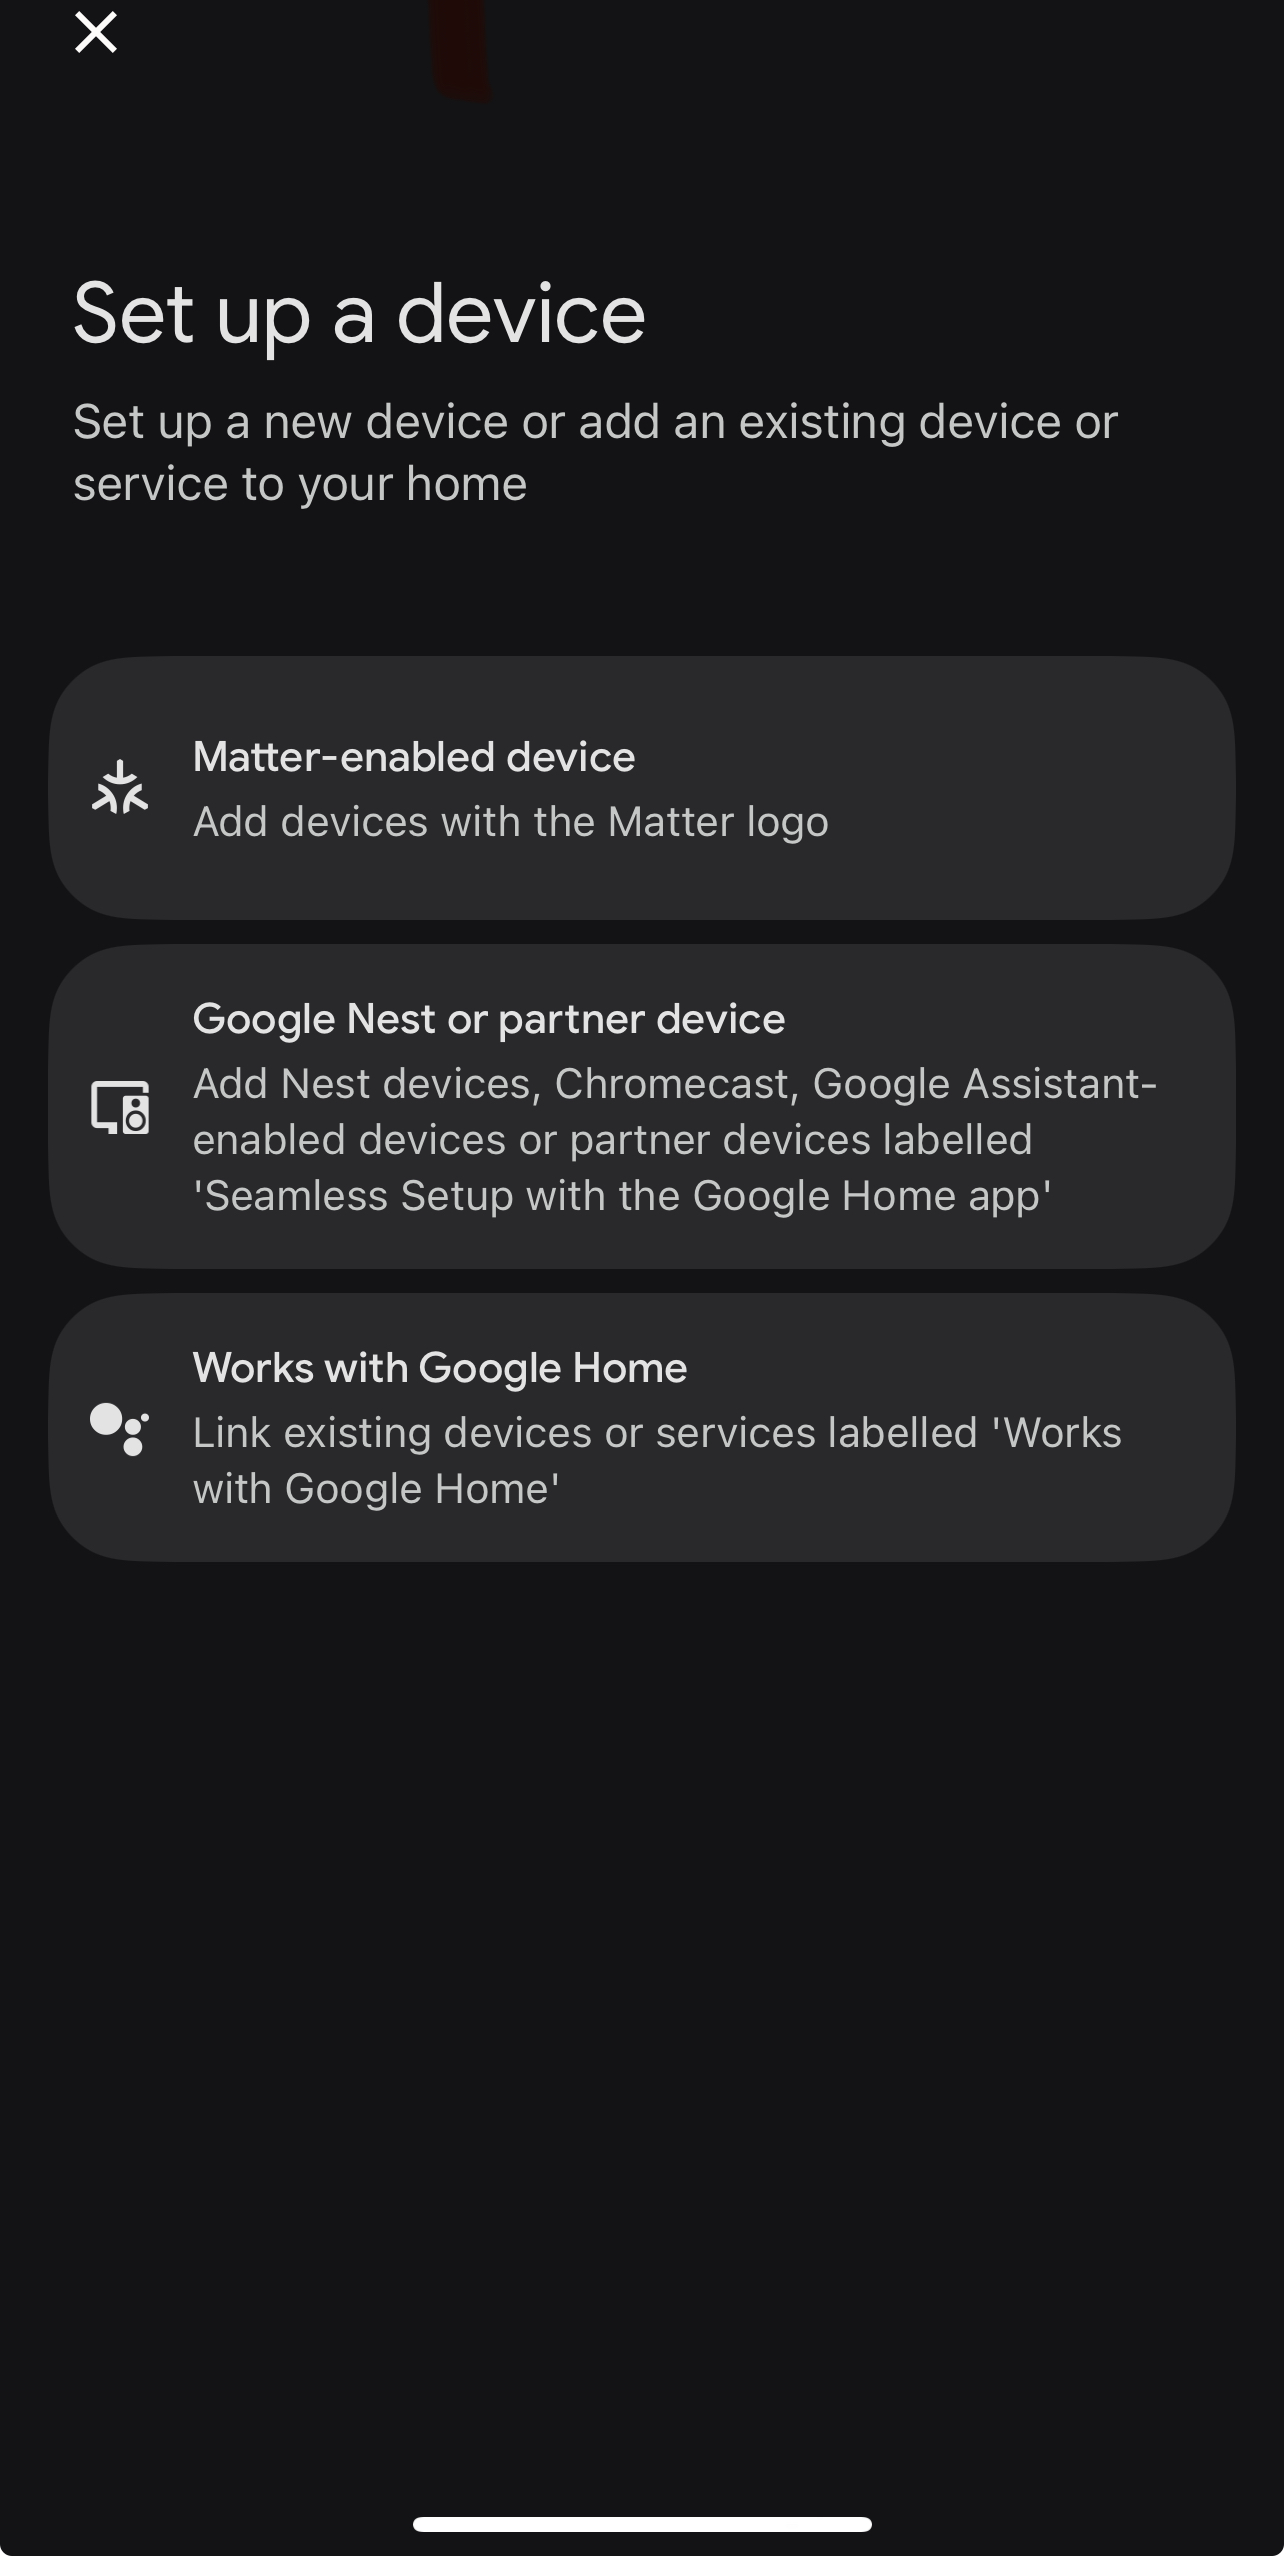
- Use the QR code (scan from Thinka UI) or choose "Set up without QR code" for manual pairing.
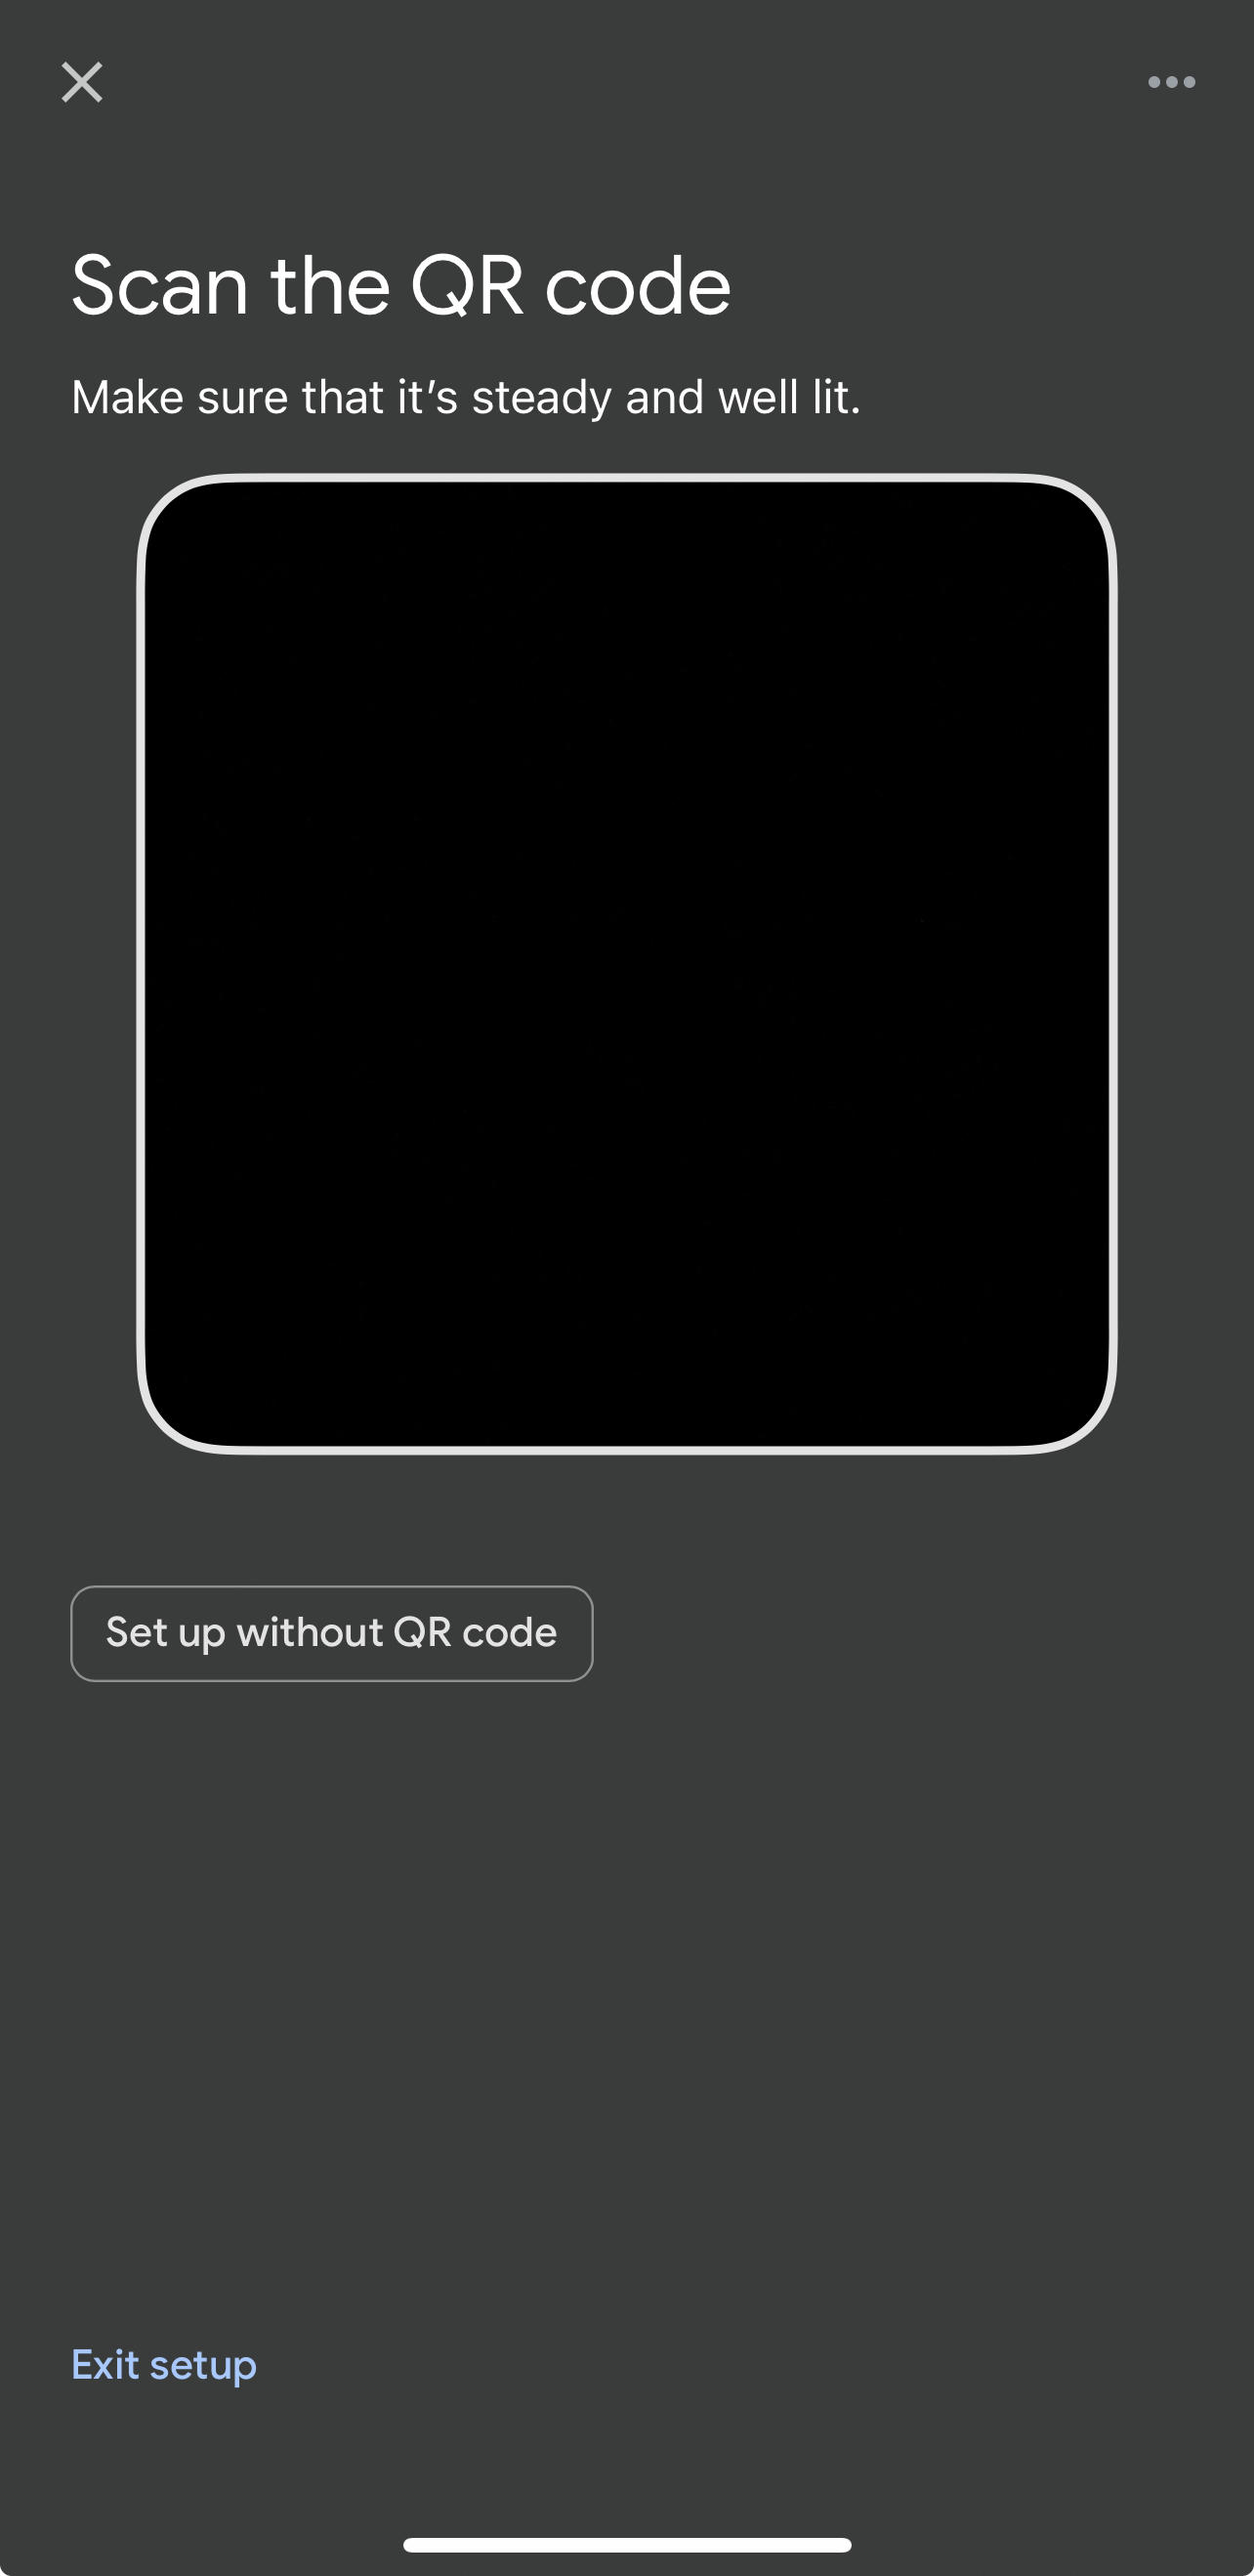
Manual Pairing Code: Enter the code from Thinka UI or the app already commissioned.

- Follow the on-screen steps, clicking Add Anyway when prompted.
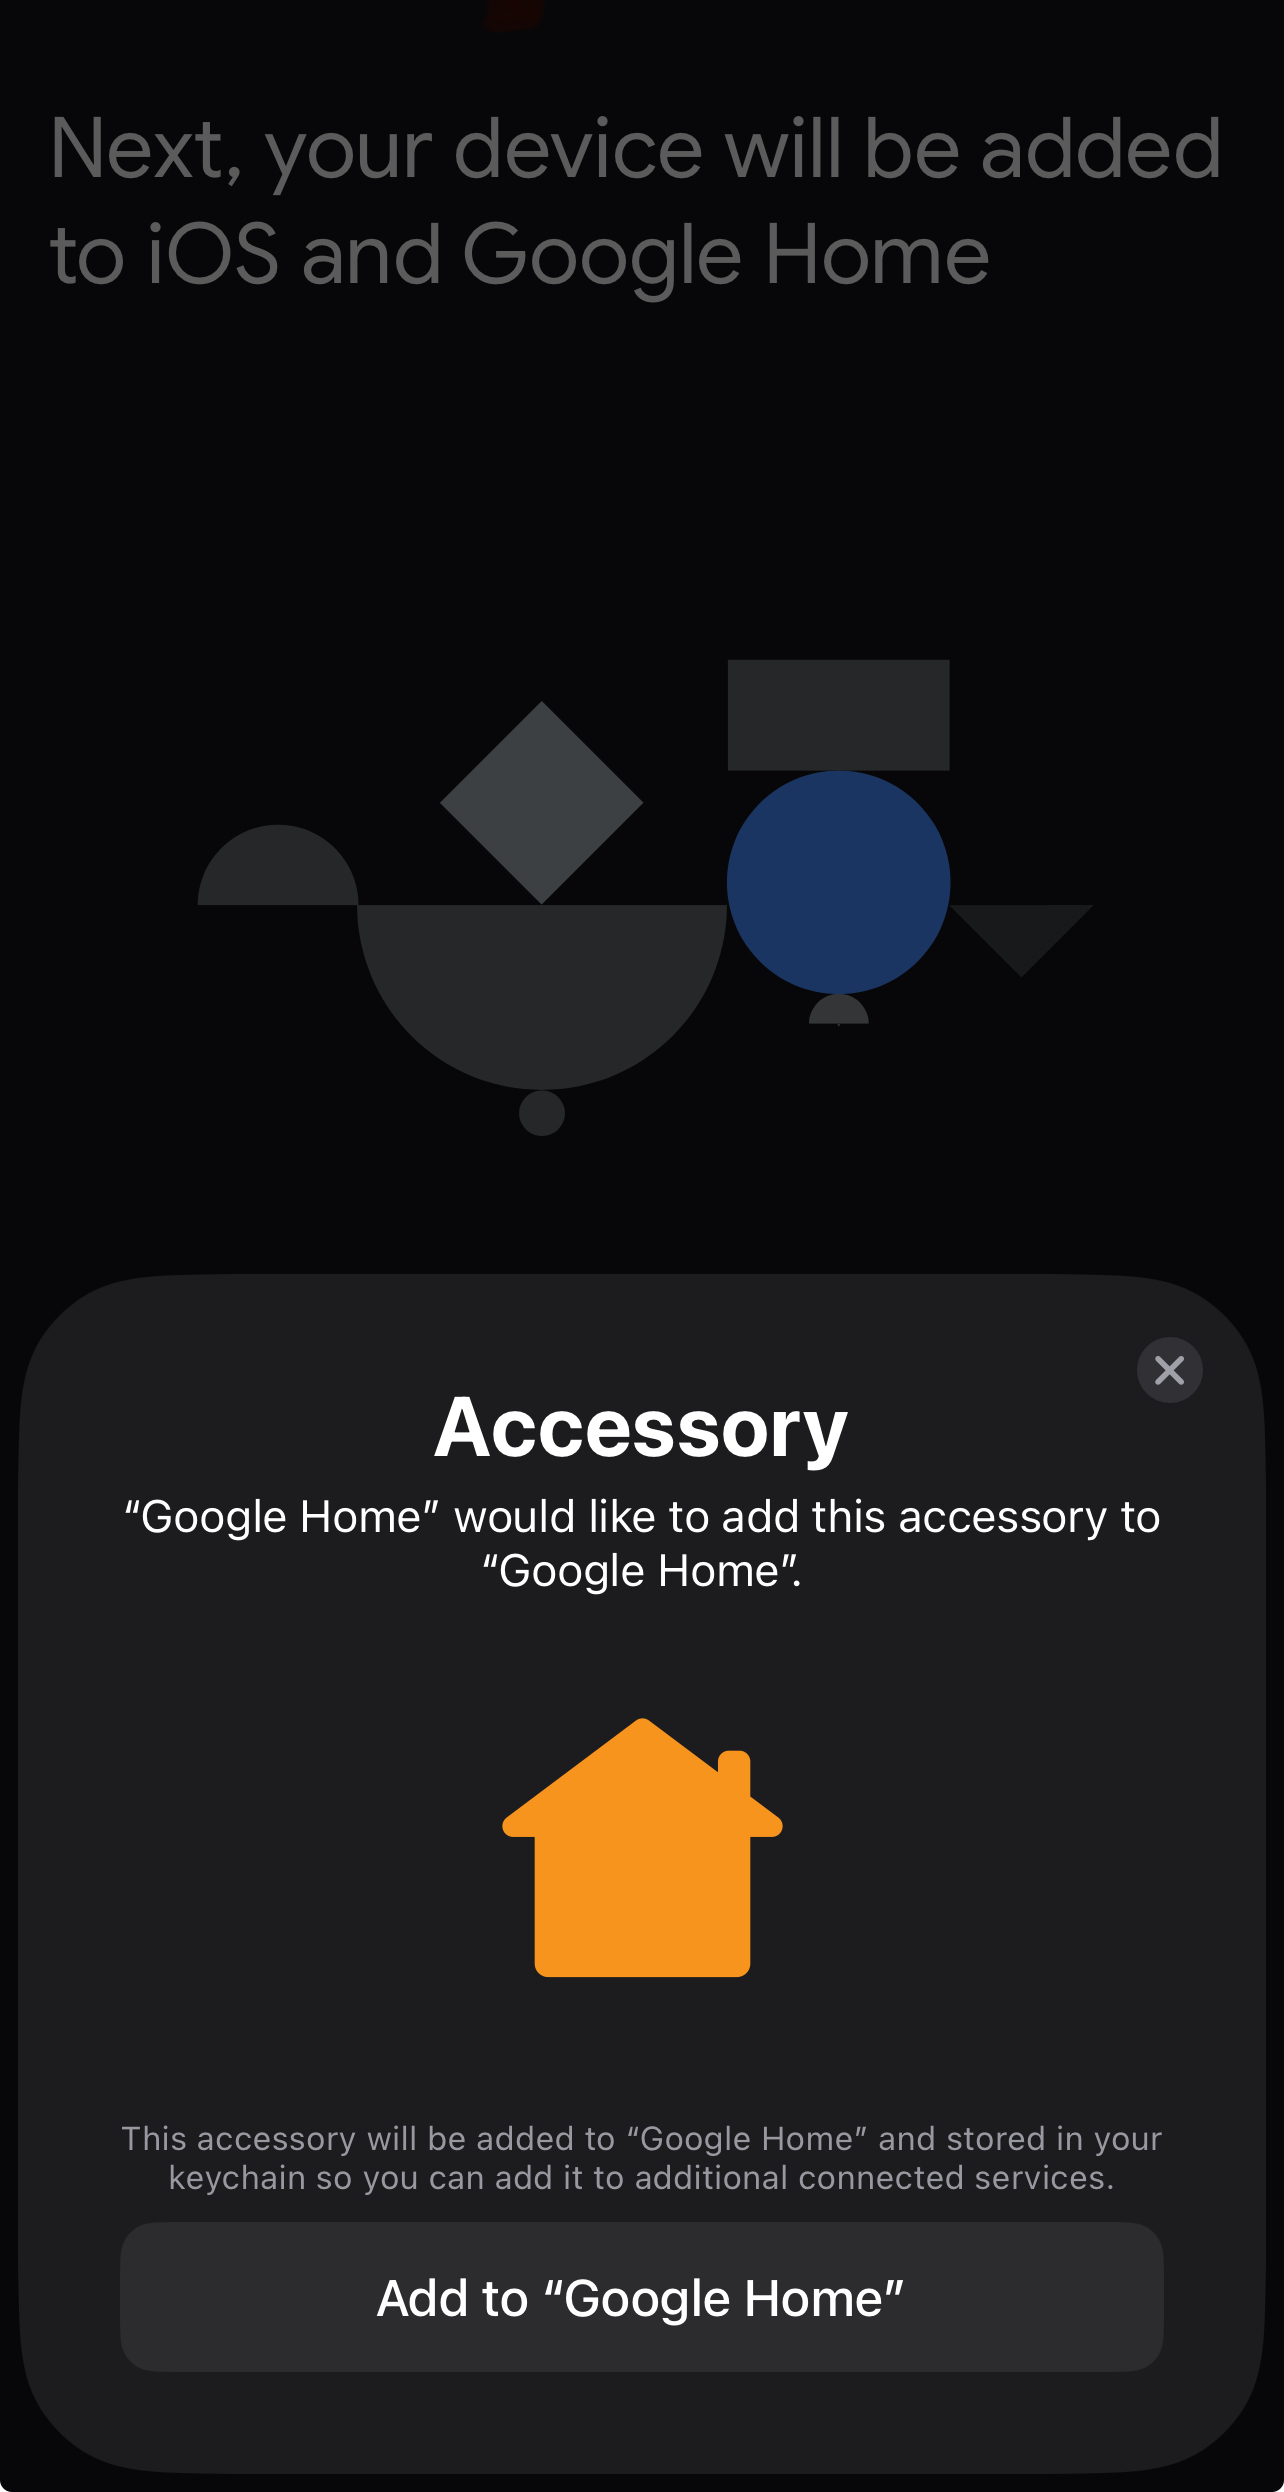
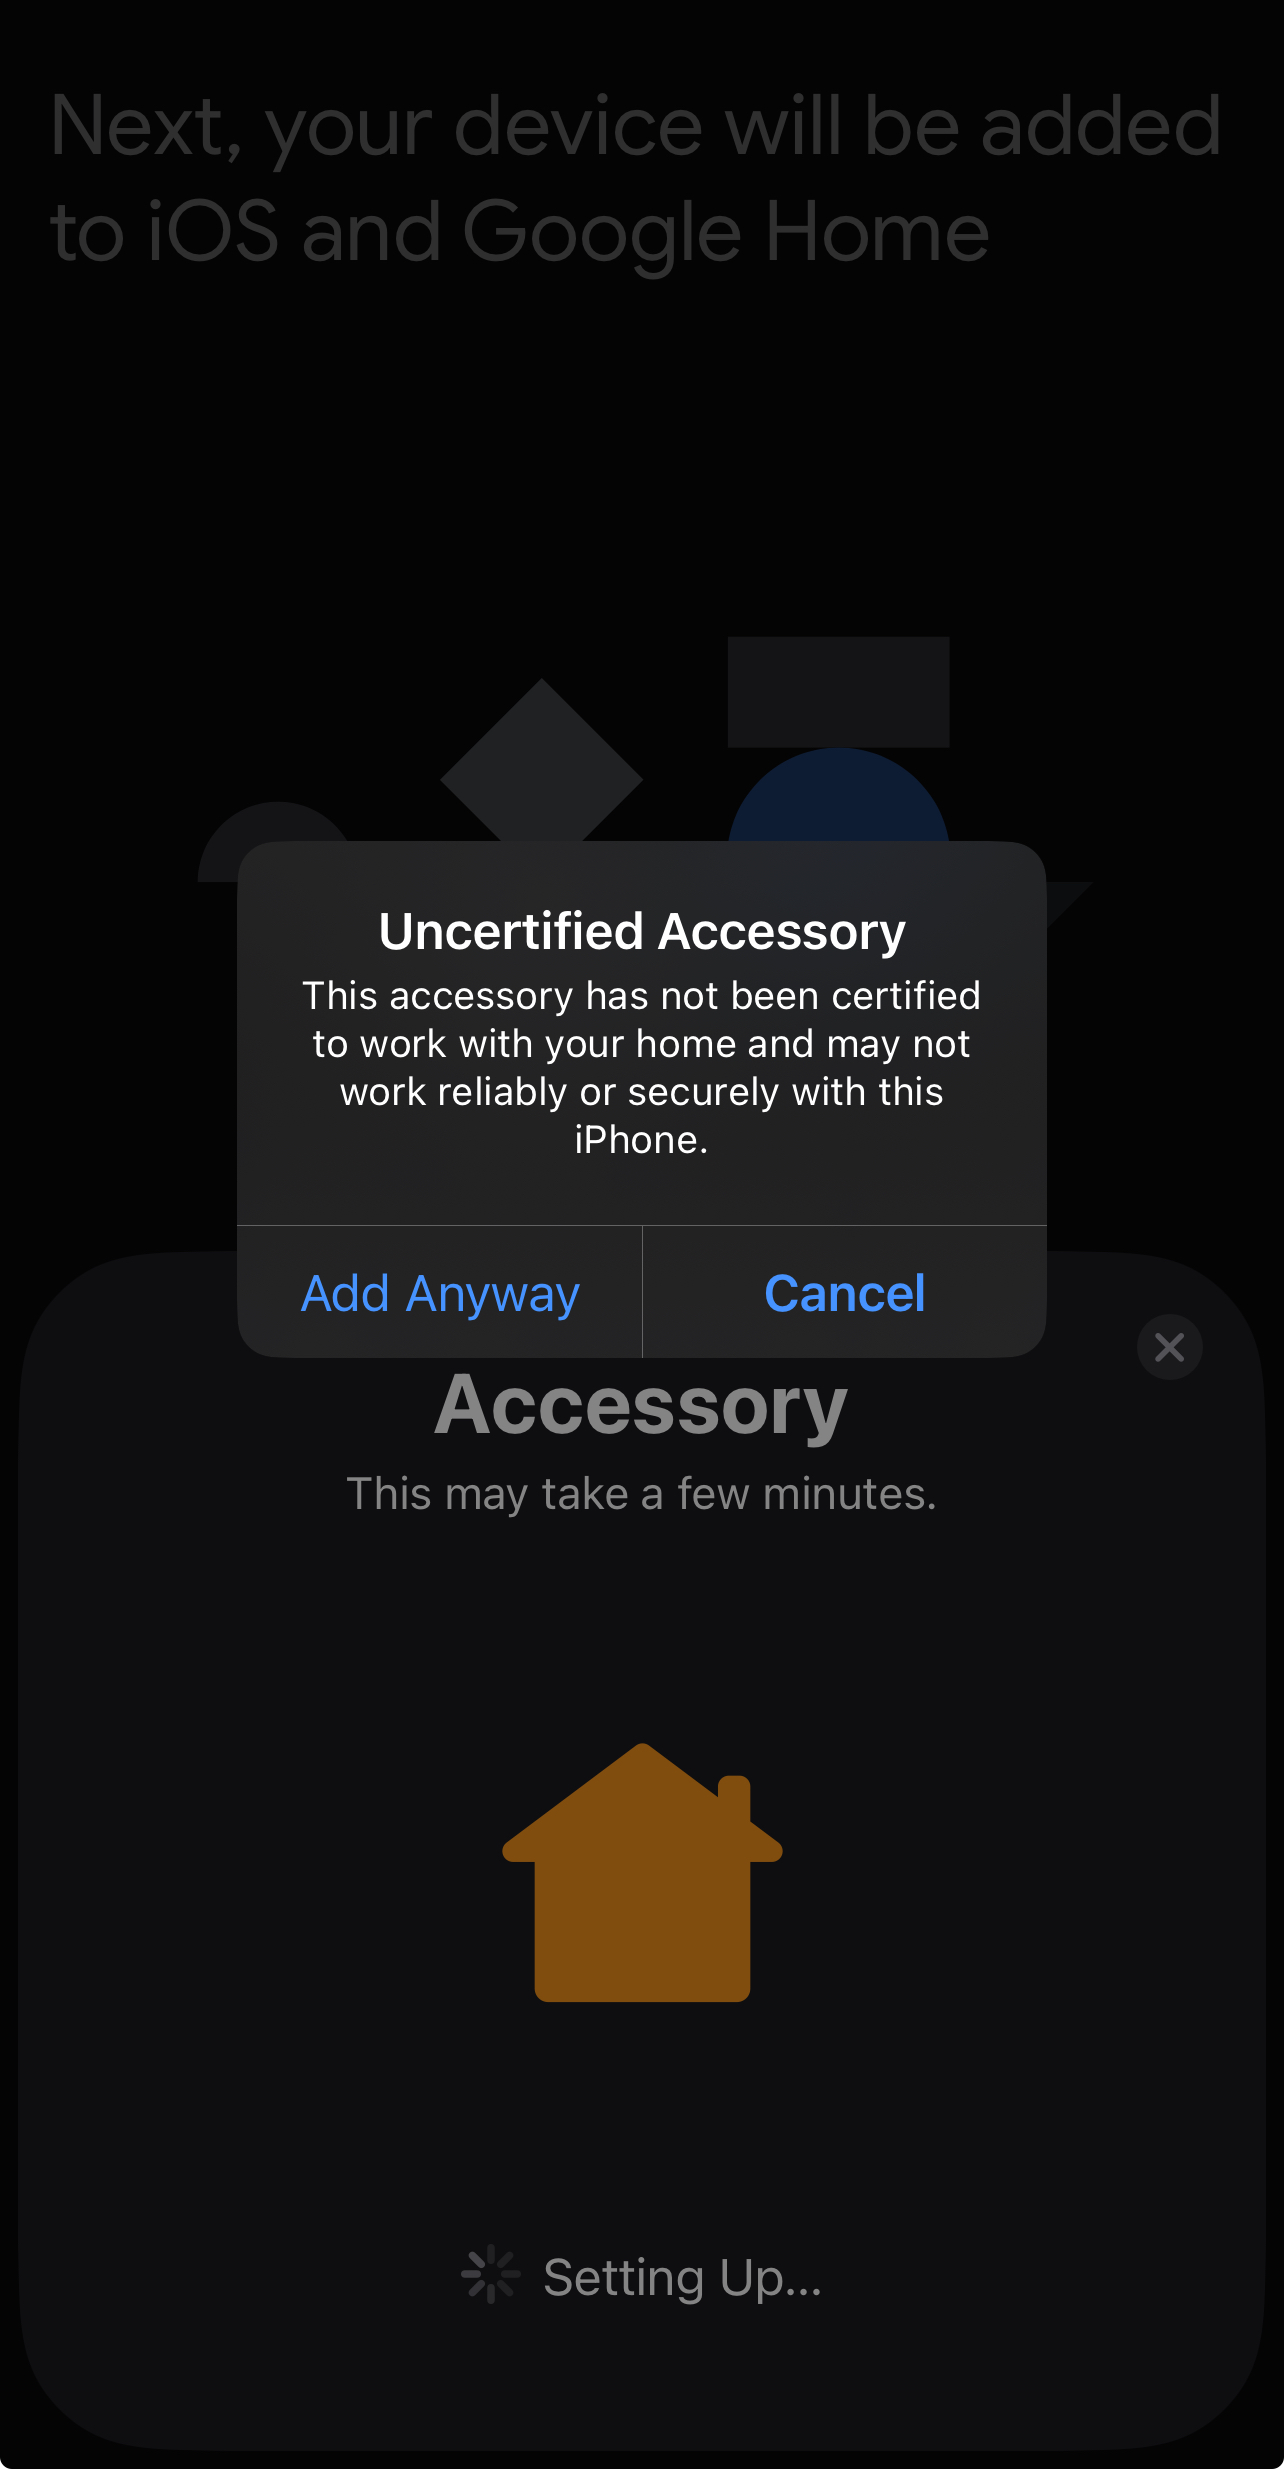
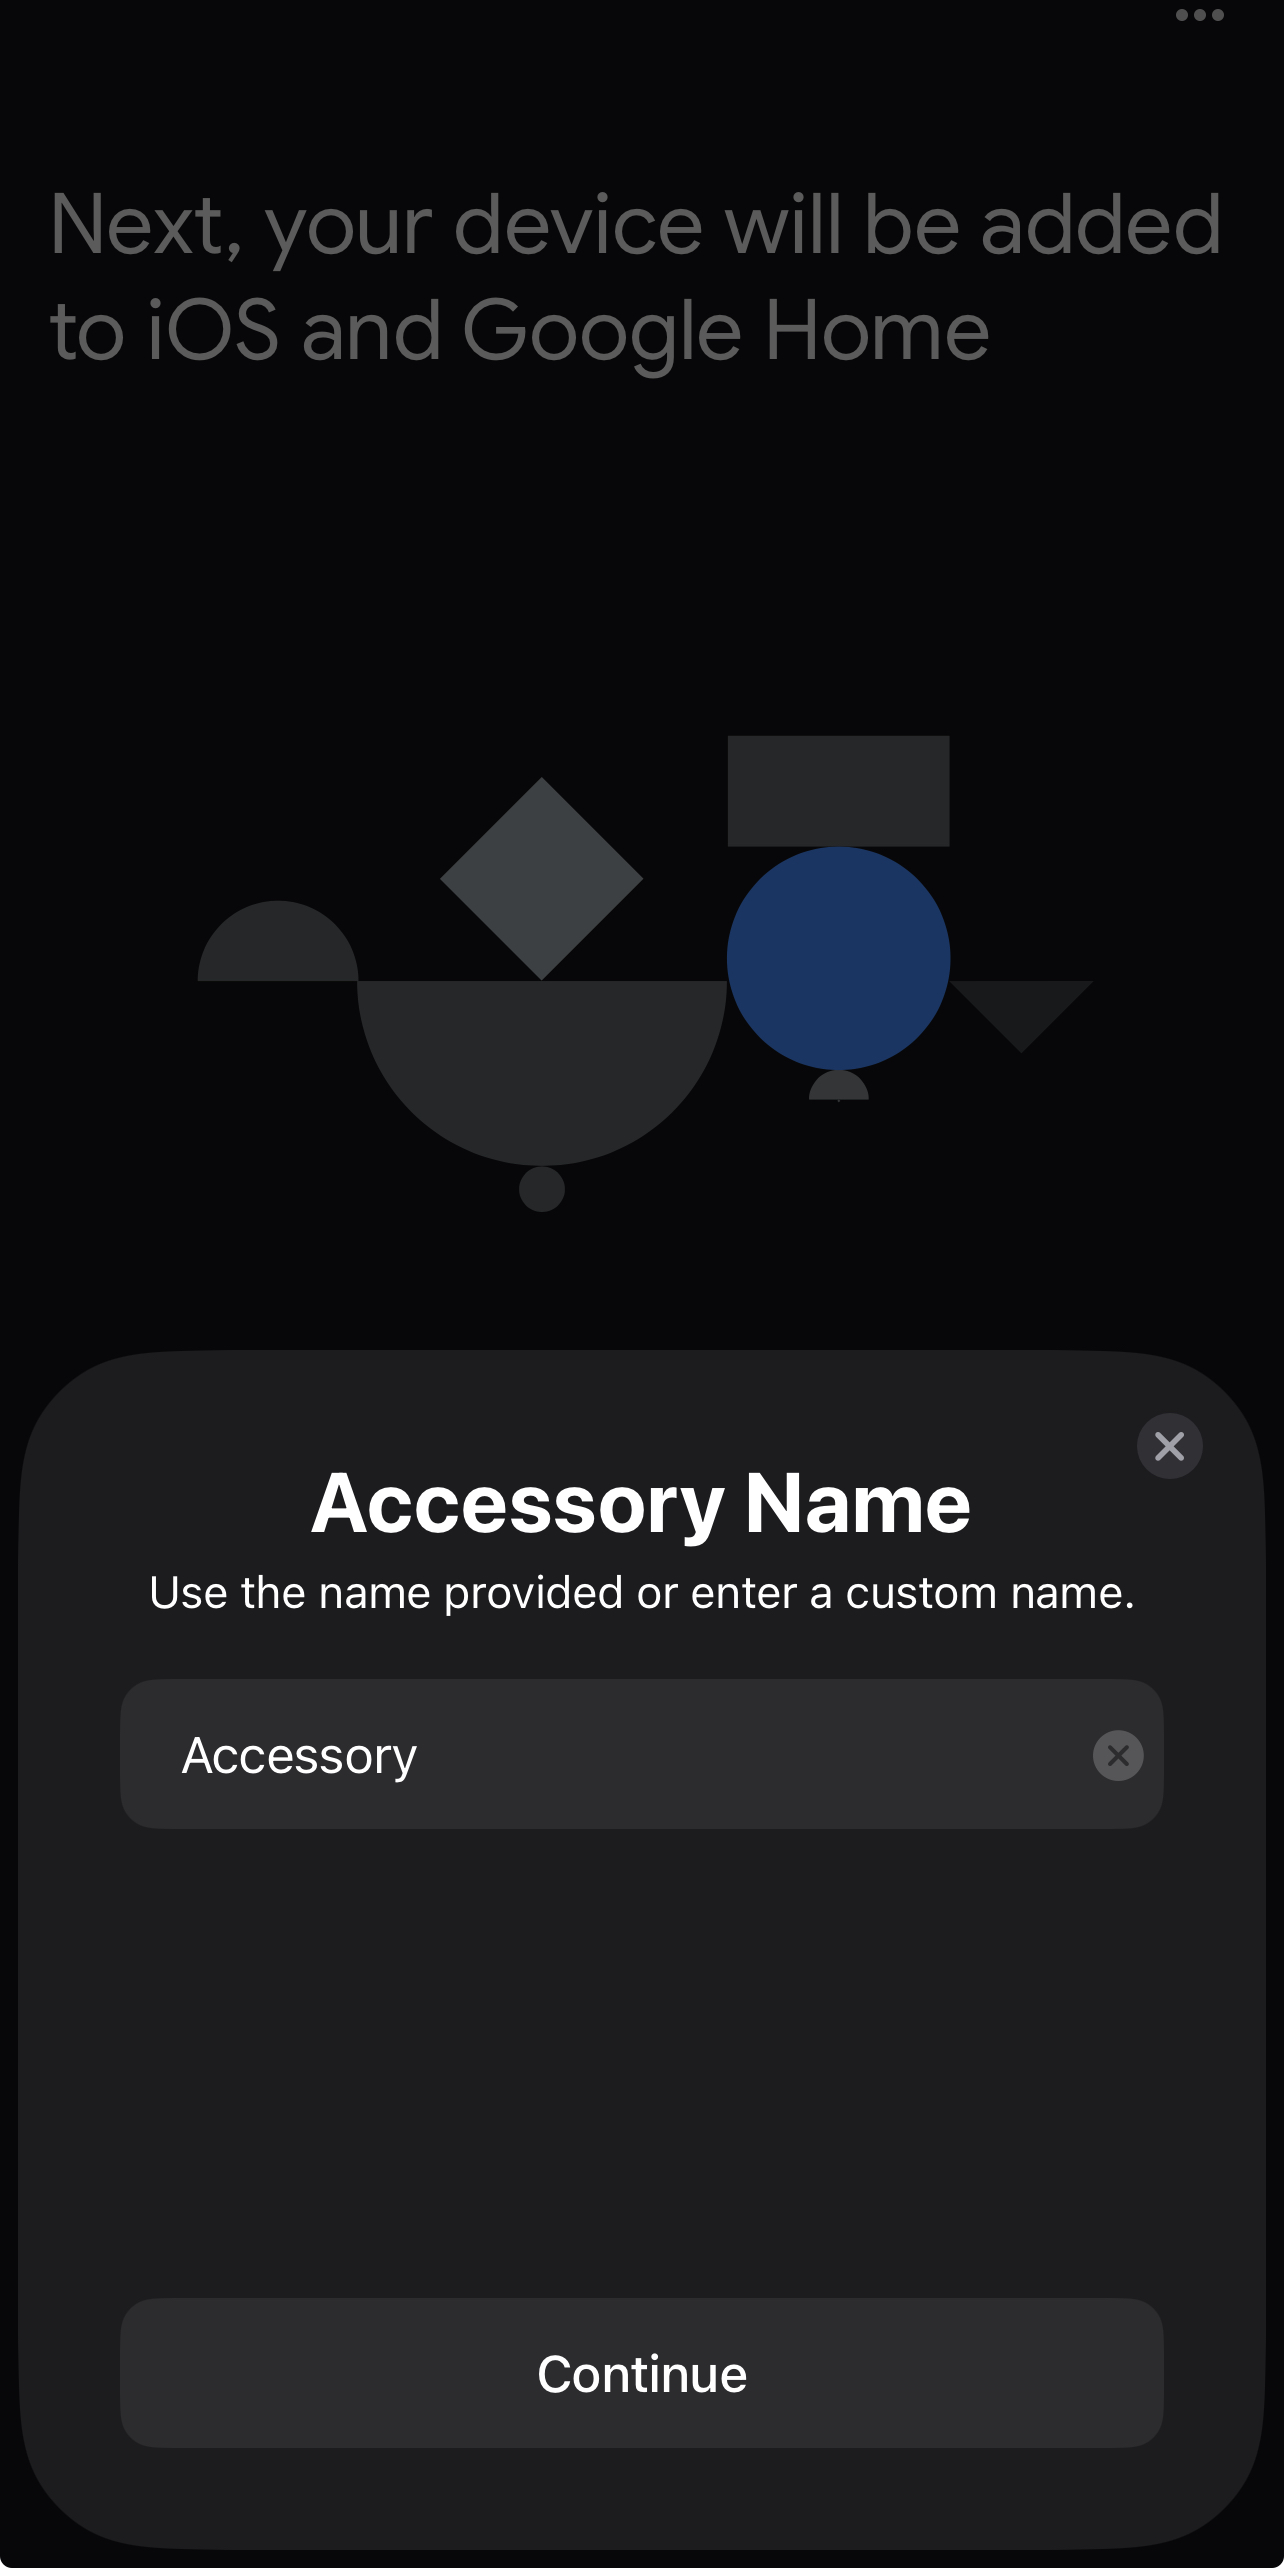
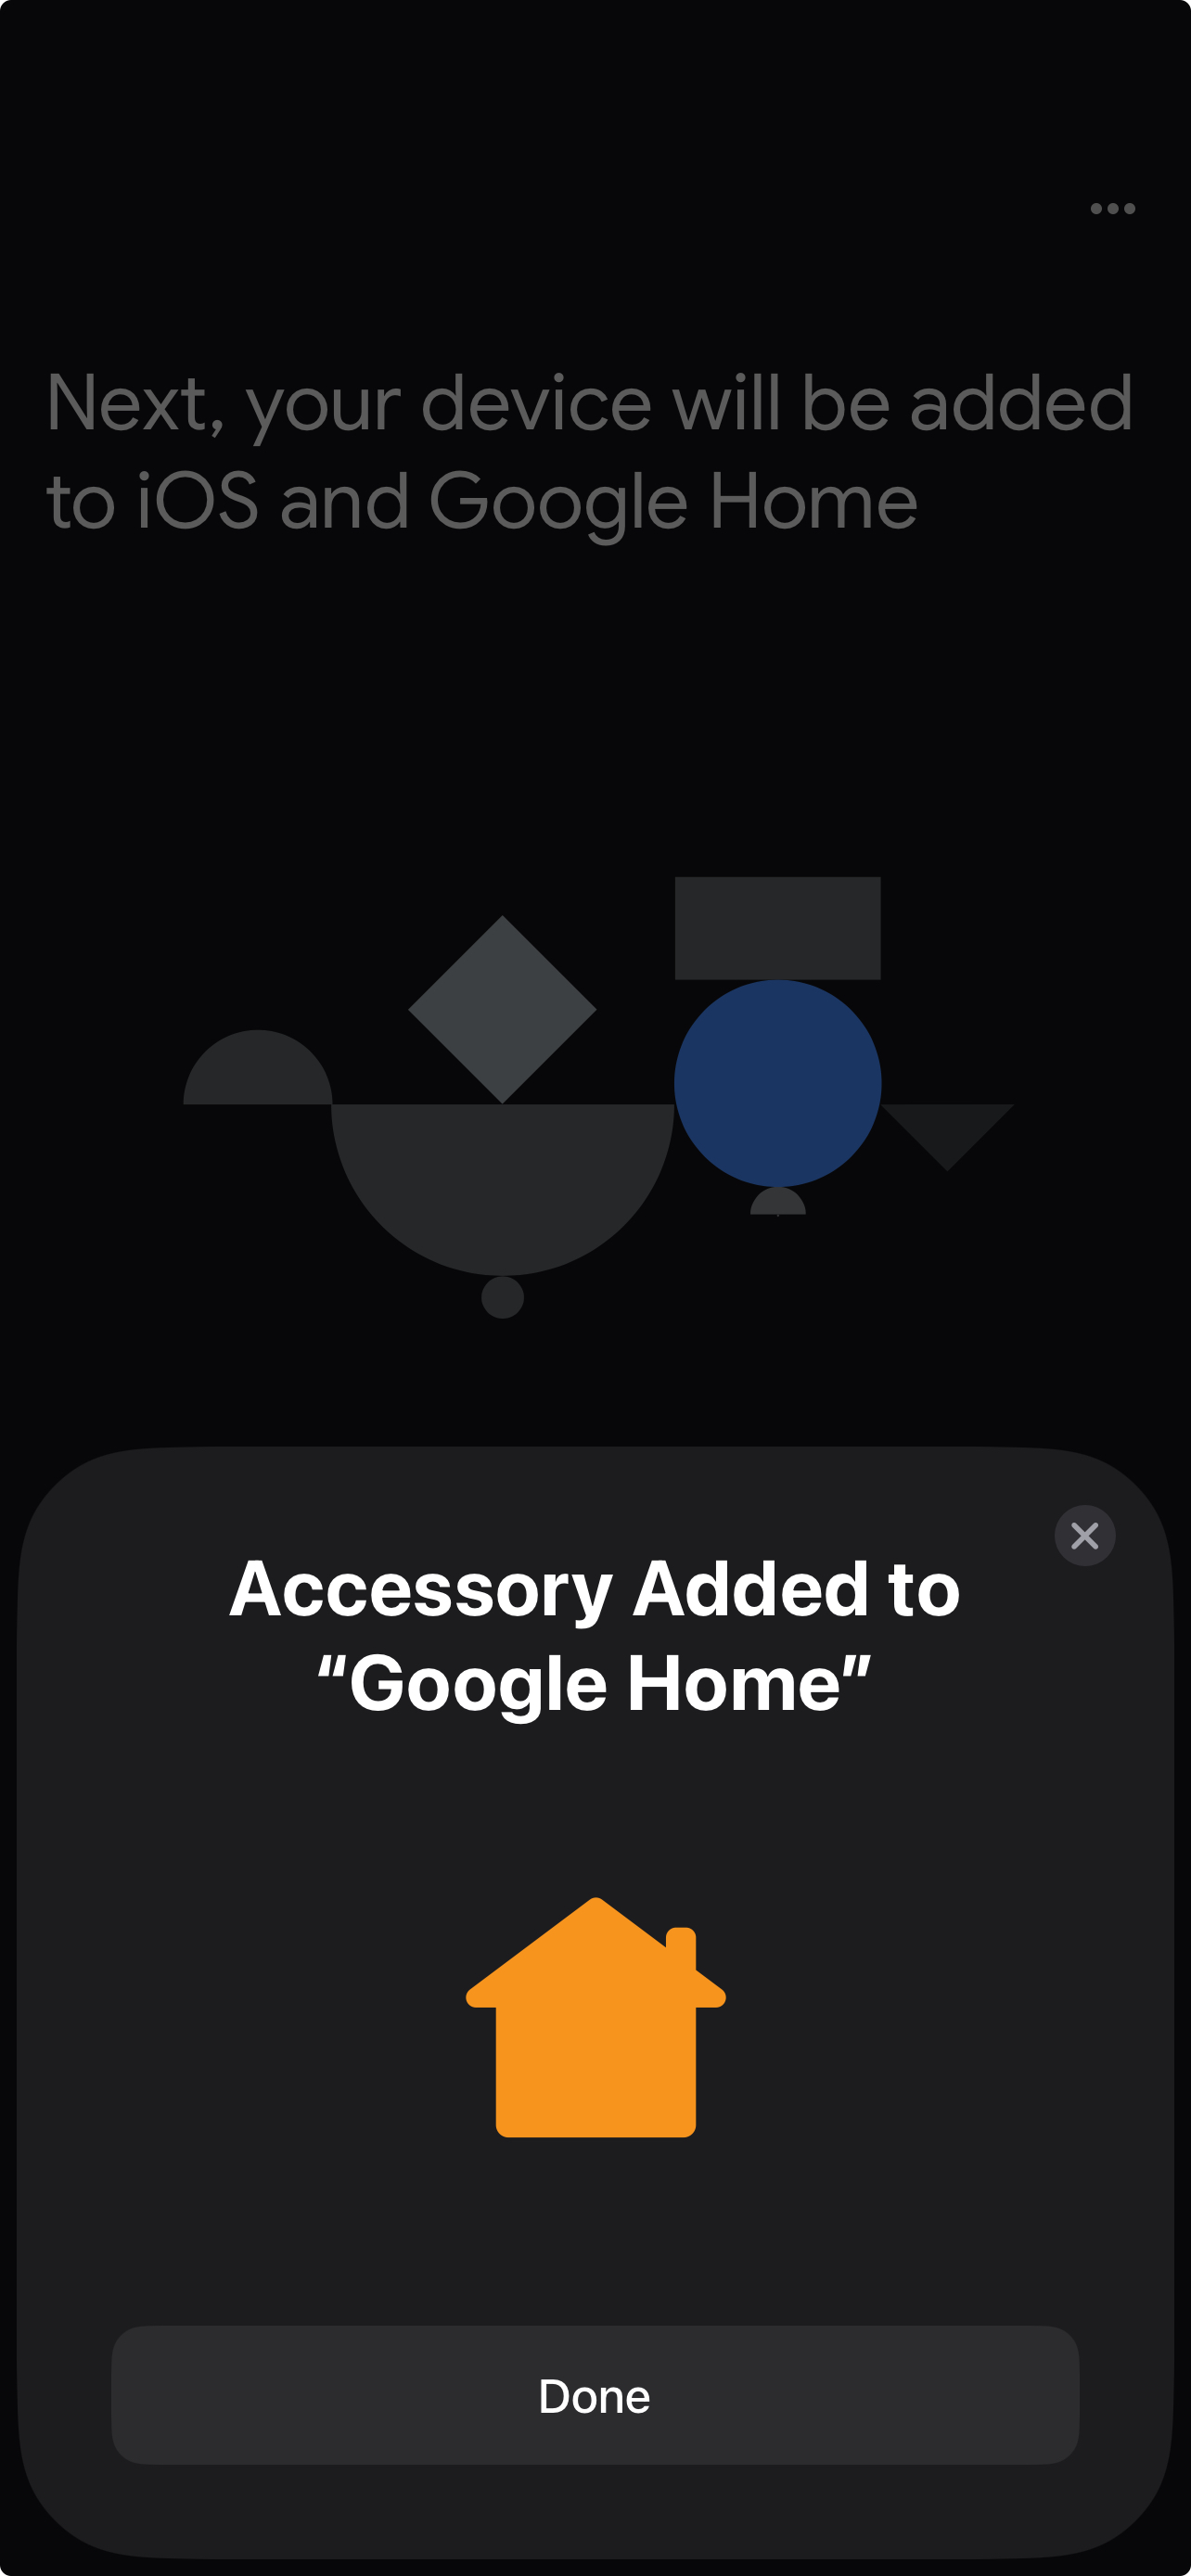
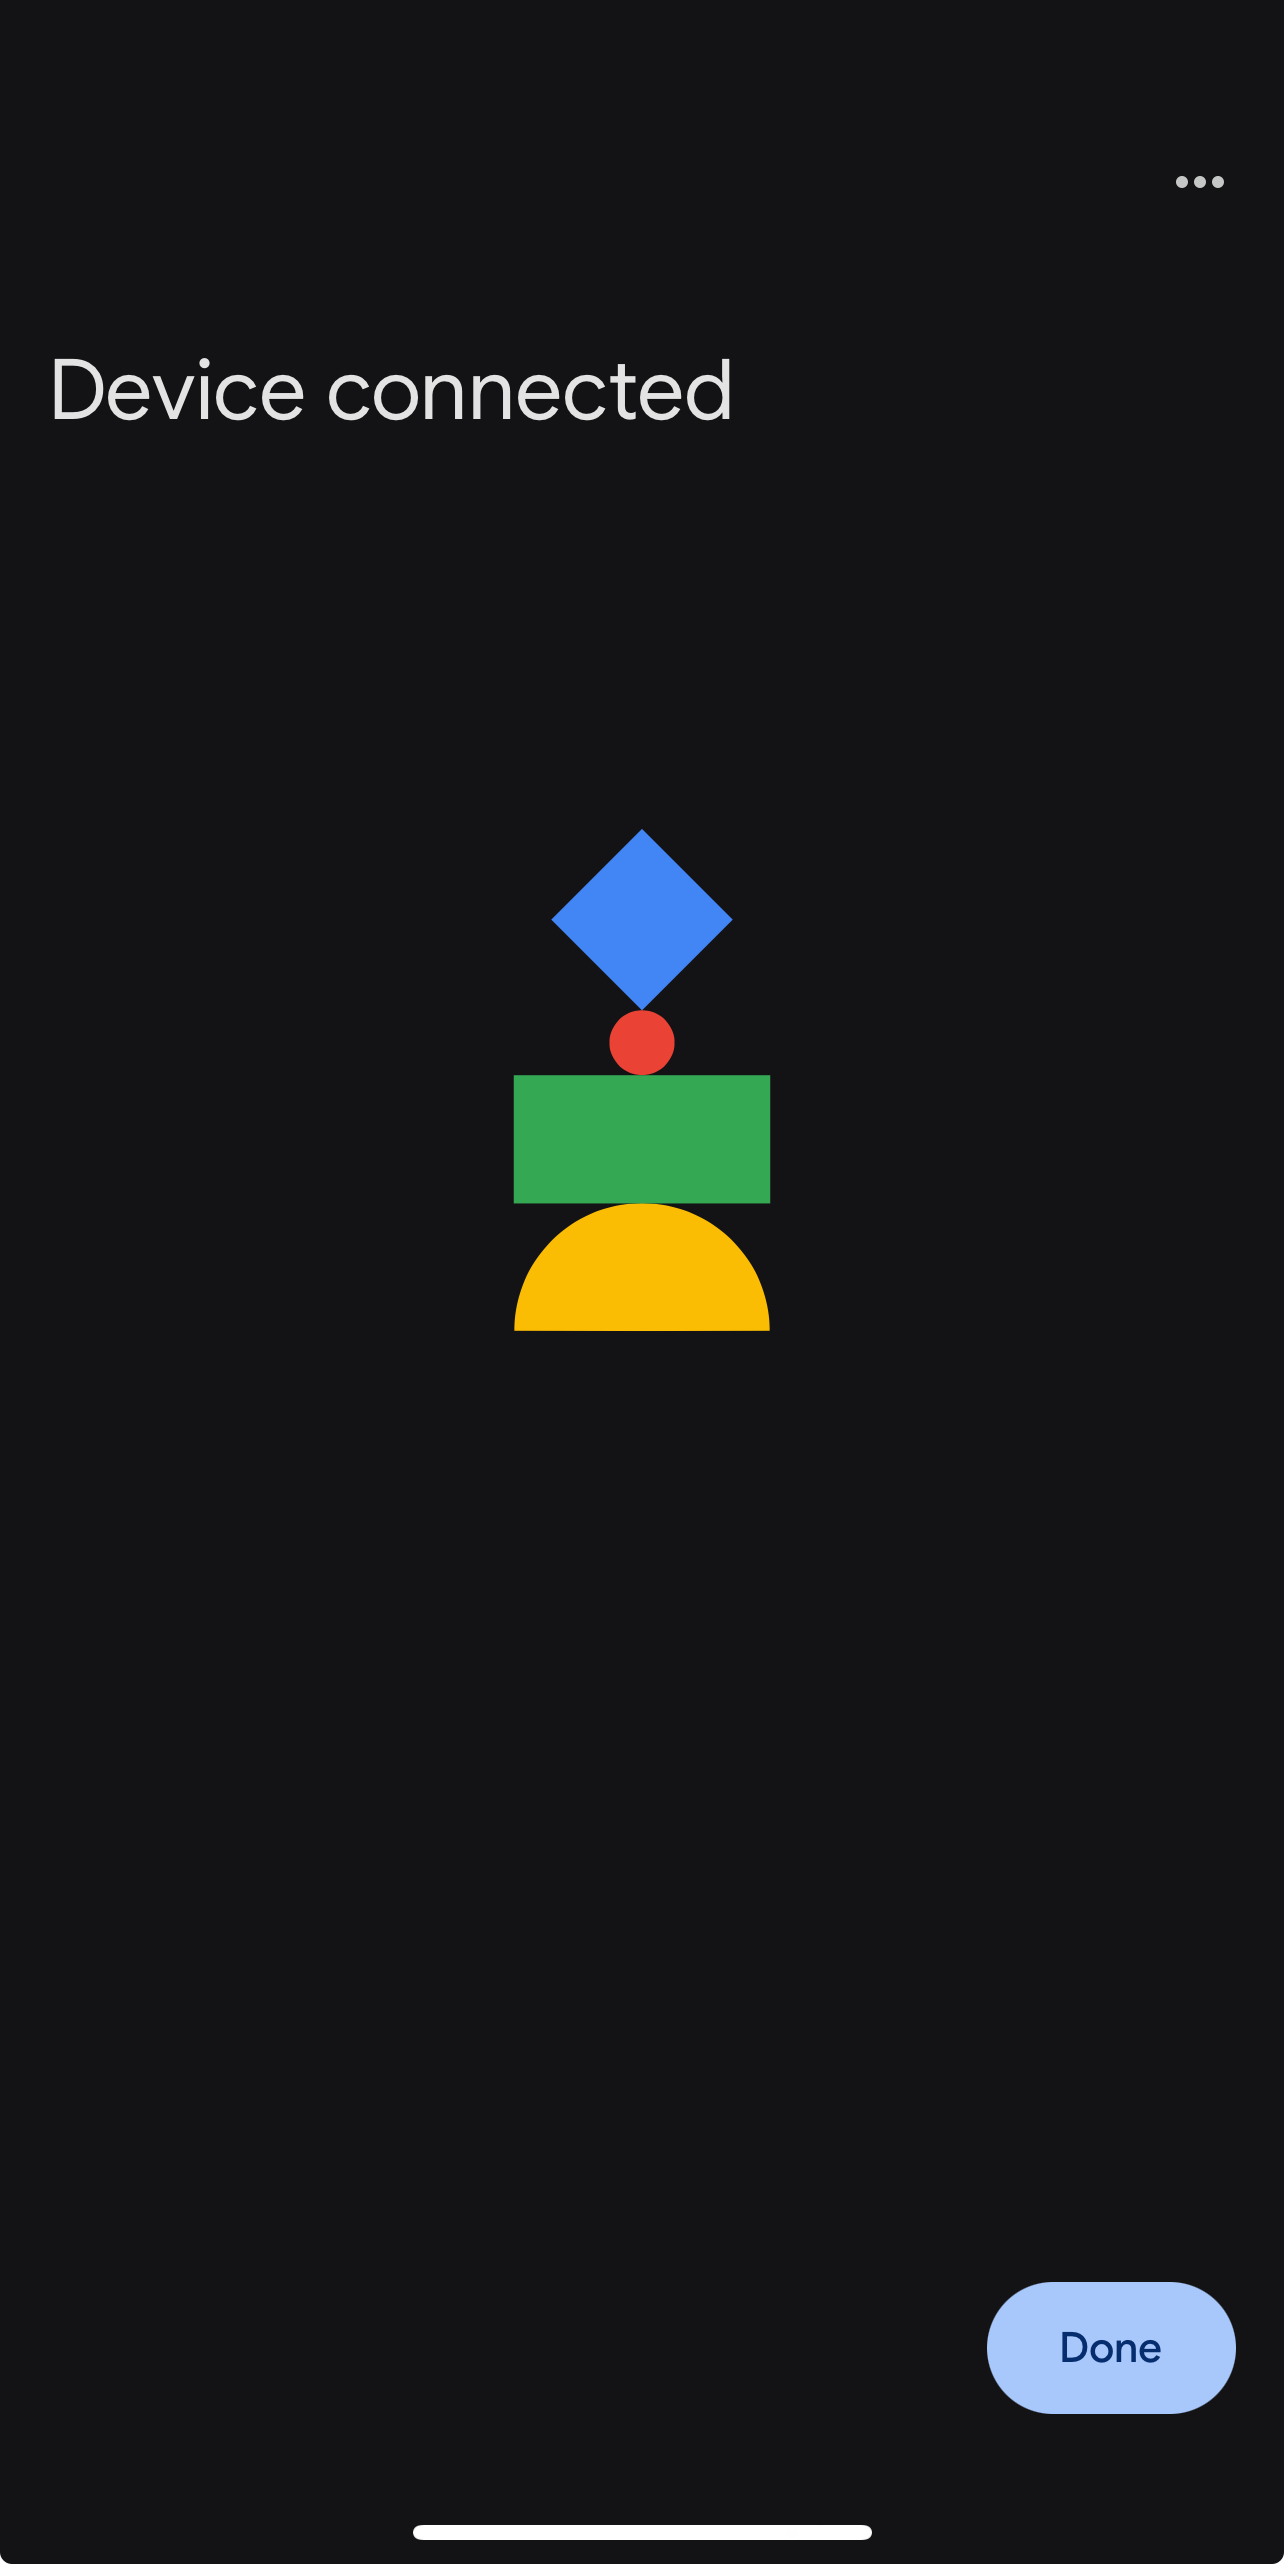
- After clicking Done, your accessories will appear in Google Home.
- Already Commissioned by Another Matter App?
If your Thinka Hub is already set up with Apple Home, SmartThings, Alexa, or another Matter app, simply share the setup code from the first app. In Apple Home, go to Home Settings → Home Hubs & Bridges → Matter Accessory, enable Pairing Mode, and copy the code.
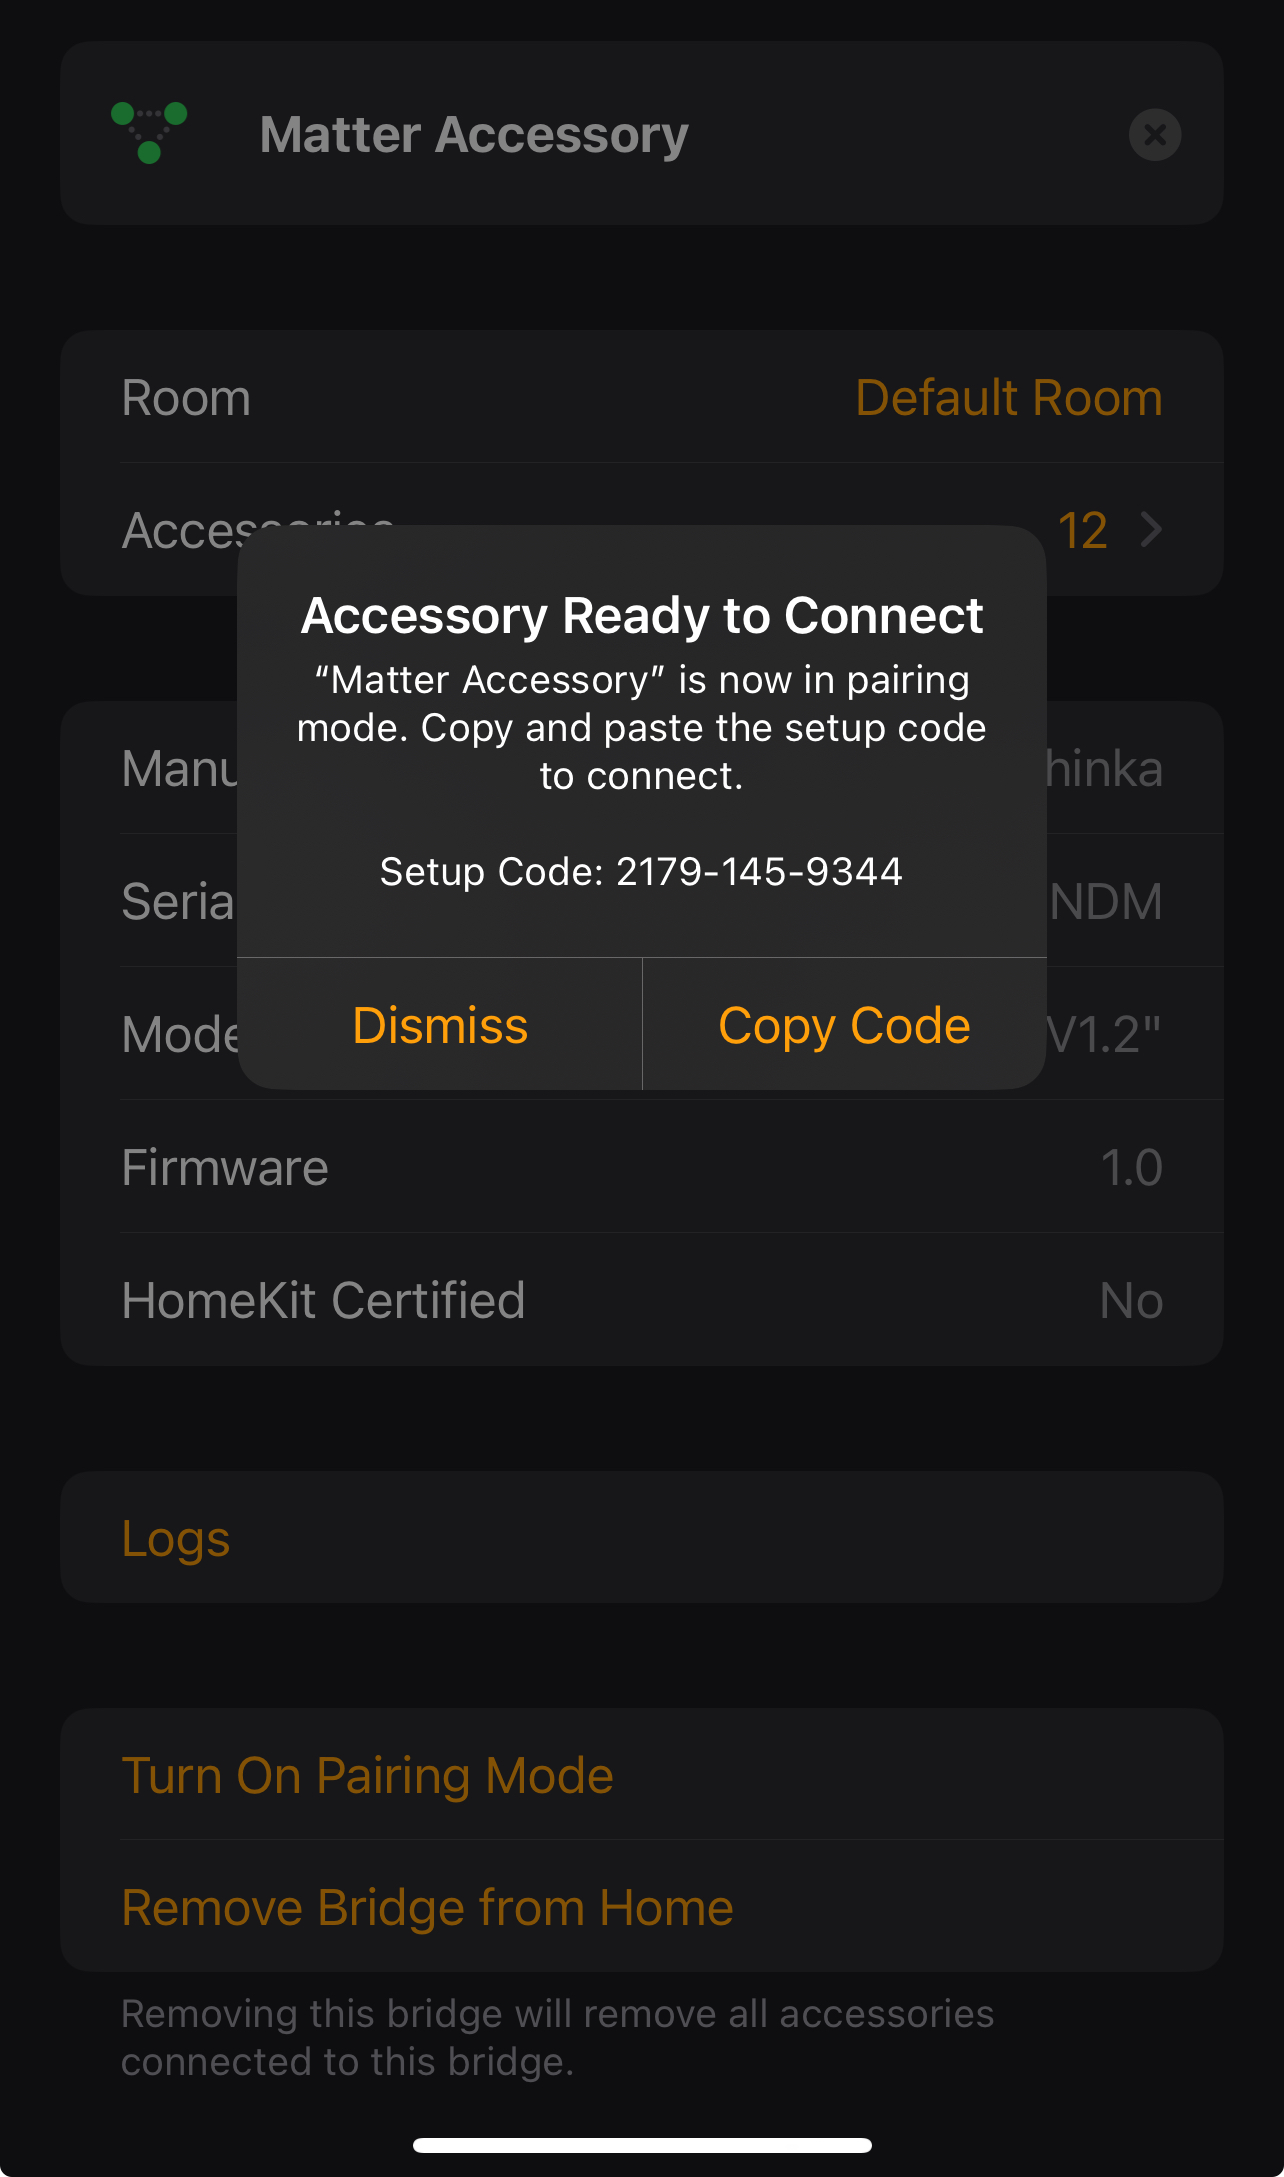
Continue using the Manual Pairing Code as described above.
Is Thinka Z-Wave Compatible in the United States?
Yes, Thinka for Z-Wave is fully compatible for use in the United States! To ensure optimal performance and seamless integration with your smart home, your Thinka Z-Wave controller must be set to the U.S. Z-Wave frequency of 908.4 MHz.
- If your Thinka device is currently configured for a different region, simply update the Z-Wave frequency to the U.S. setting before use.
- Switching the frequency is quick and easy—just follow our step-by-step instructions found here.
- Once set to the U.S. region, your Thinka controller will connect and communicate reliably with all compatible Z-Wave devices that meet local US standards and regulations.
Enjoy the benefits of a smarter home with Thinka Z-Wave, tailored for the US market! For further assistance, feel free to explore our support resources or contact our customer service team.